


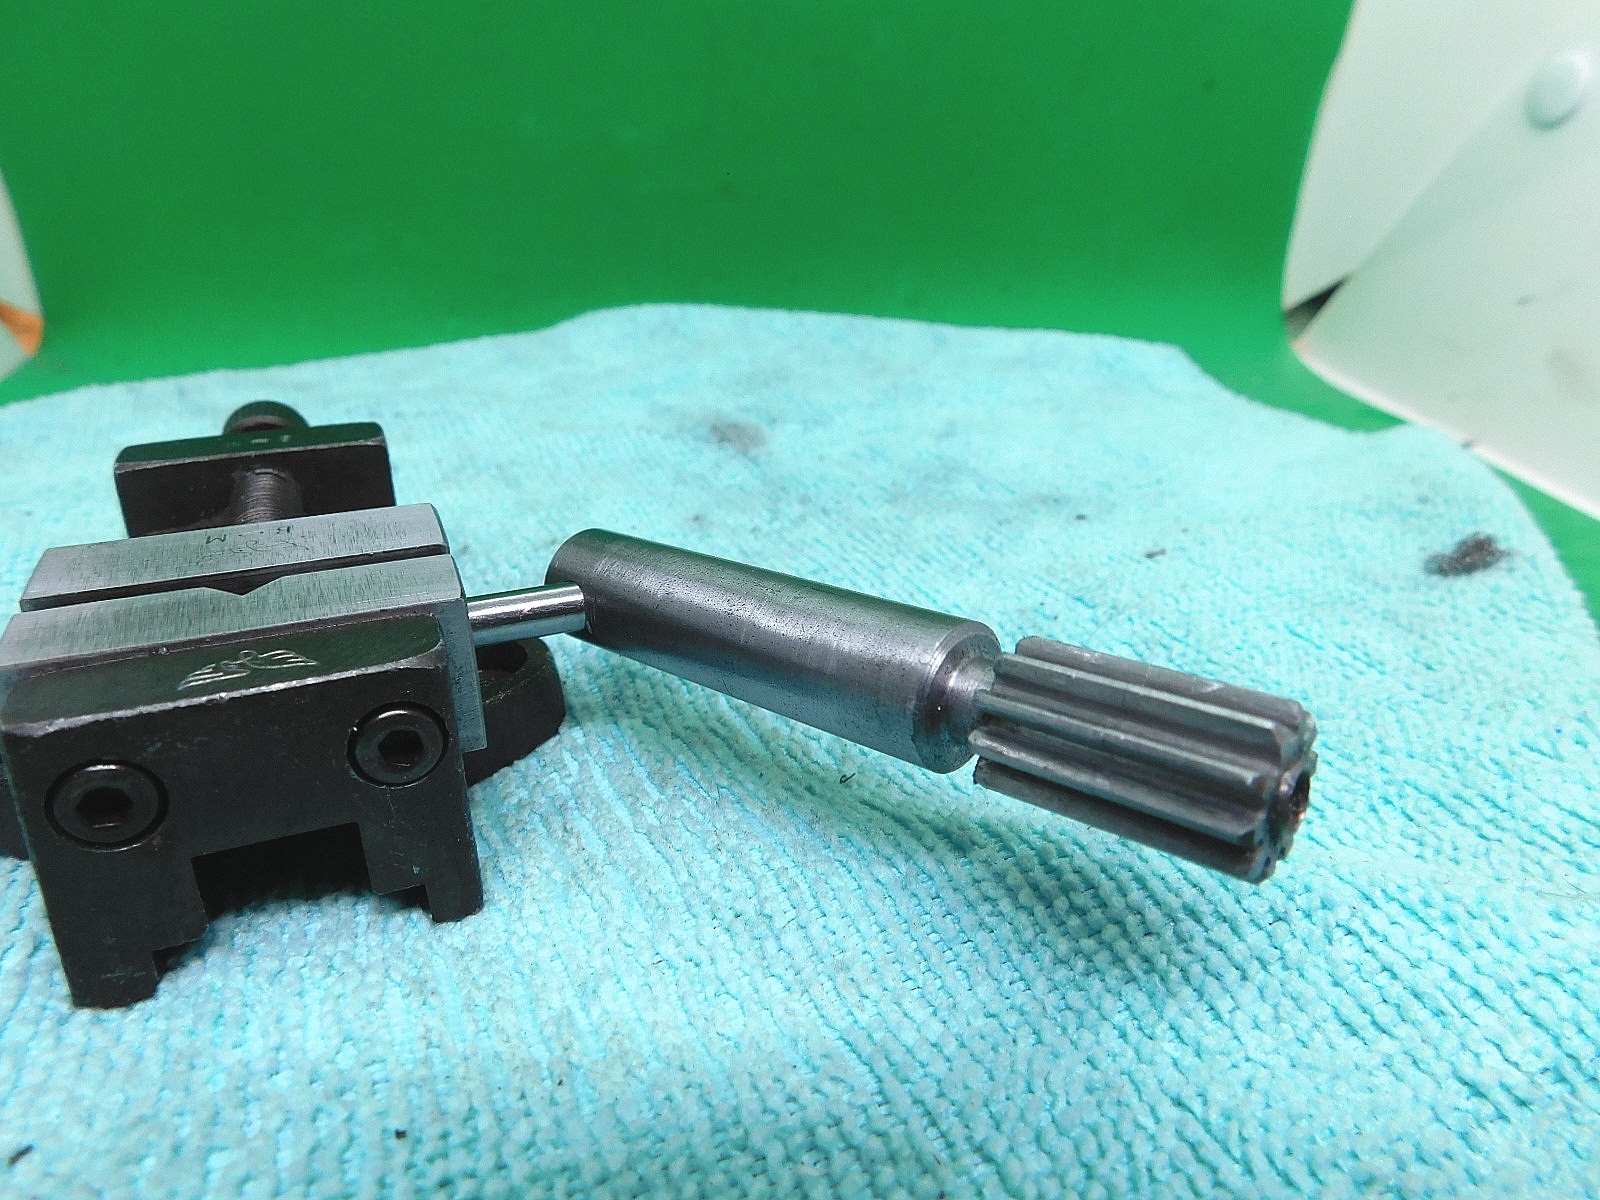
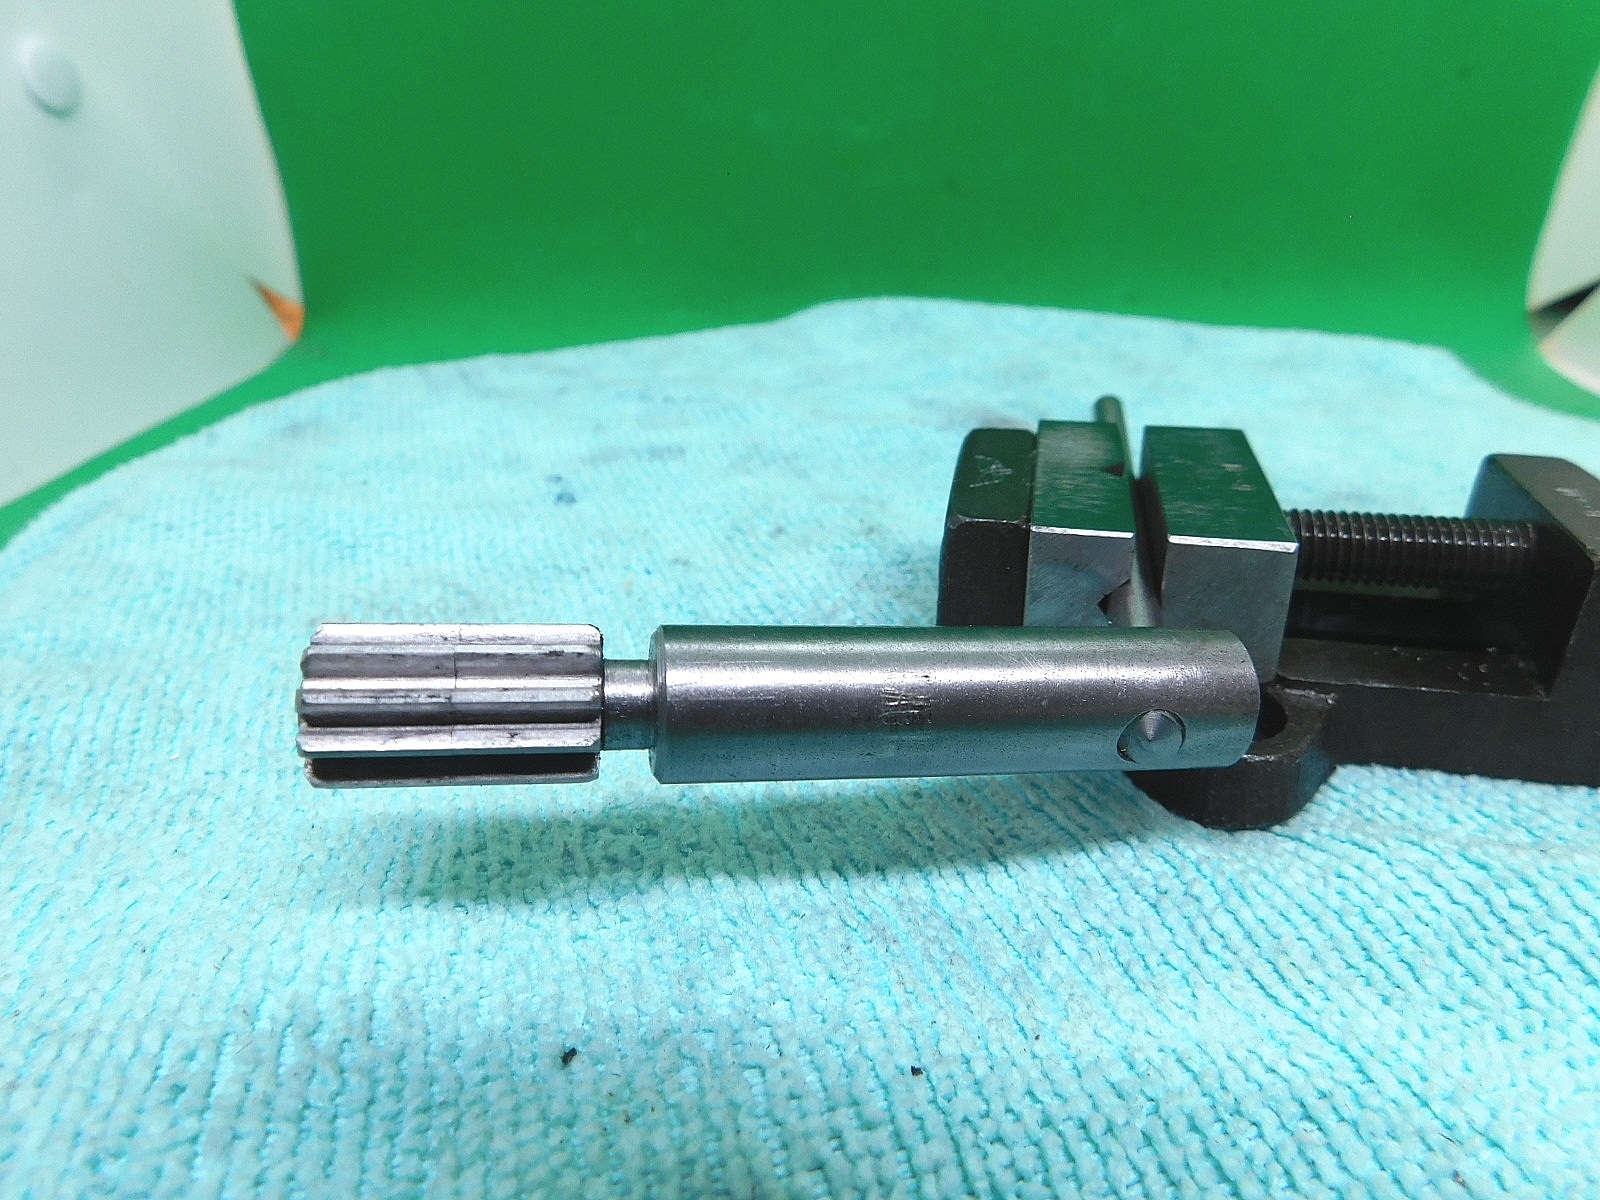
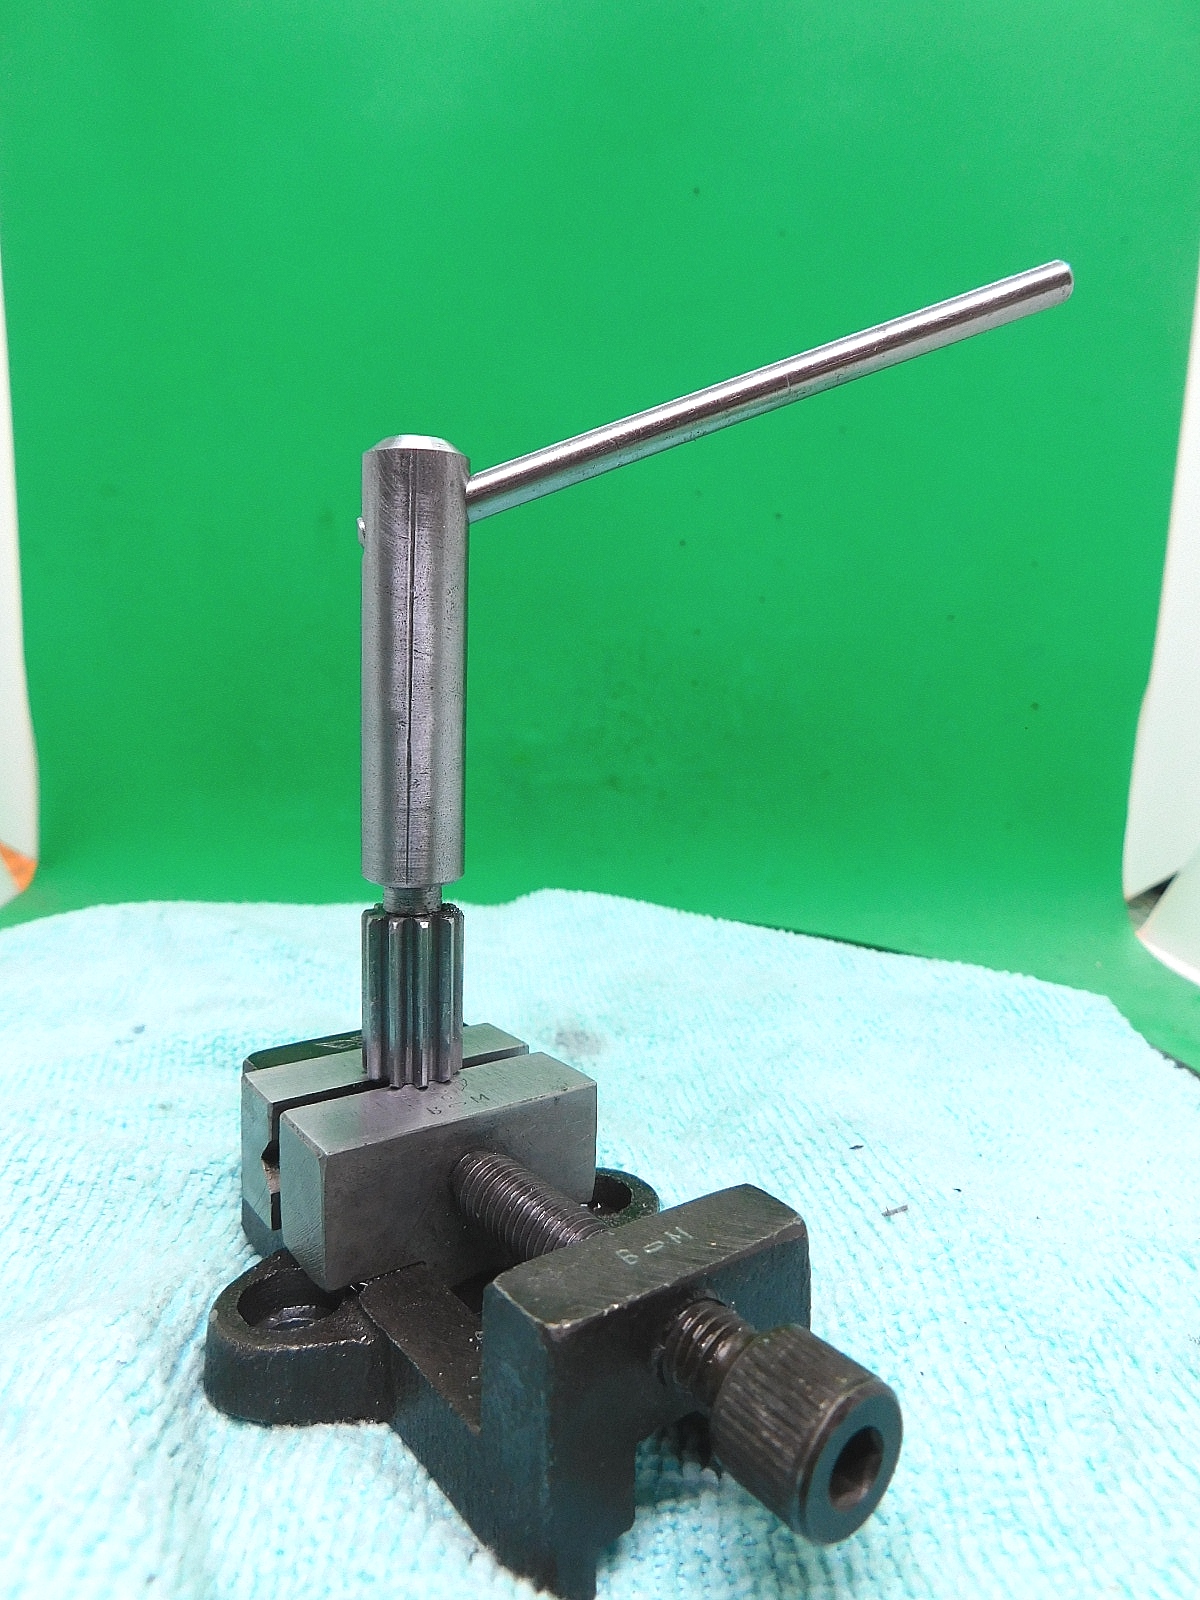
Pinol-Antrieb
Der Pinol-Antrieb meiner Unimat MK 4 hatte Karies. Ihm fehlten schon einige Zahnsegmente. Im Netz sind zwar einige Anbieter, die solche Teile noch verkaufen, aber das war mit mit den Frachtkosten zu viel Geld.
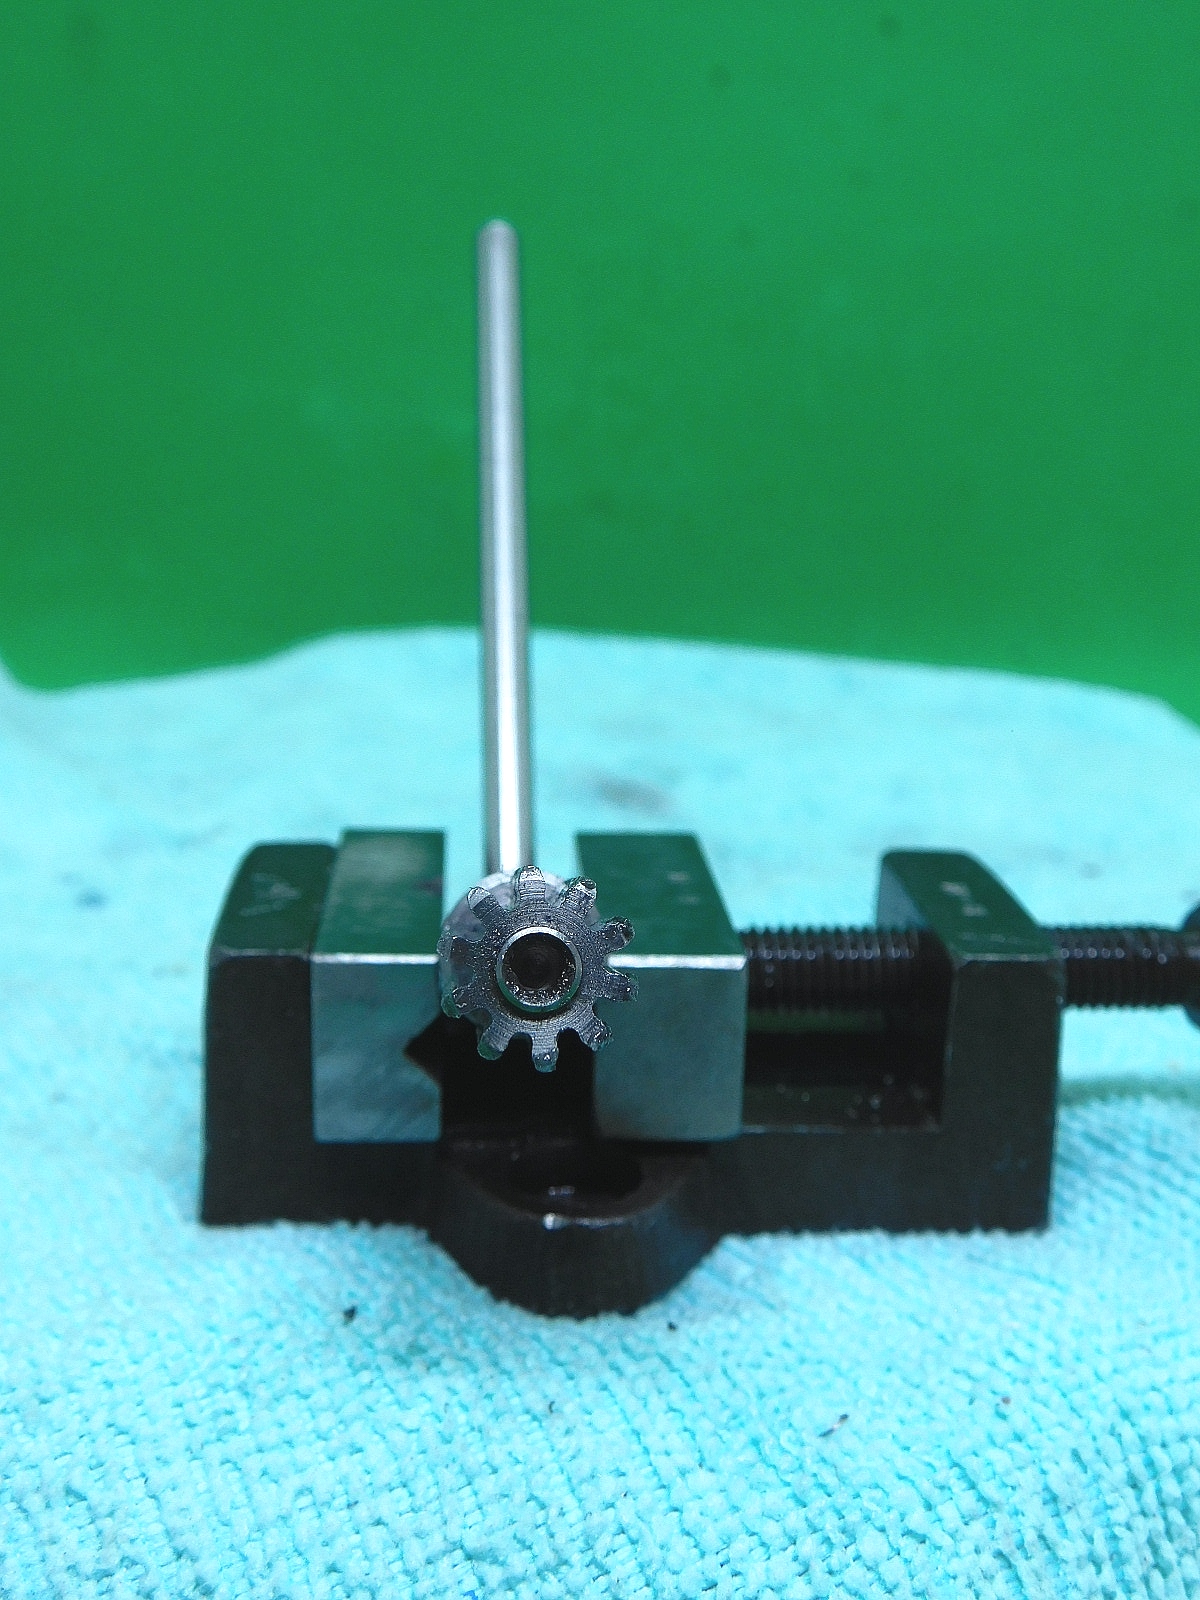
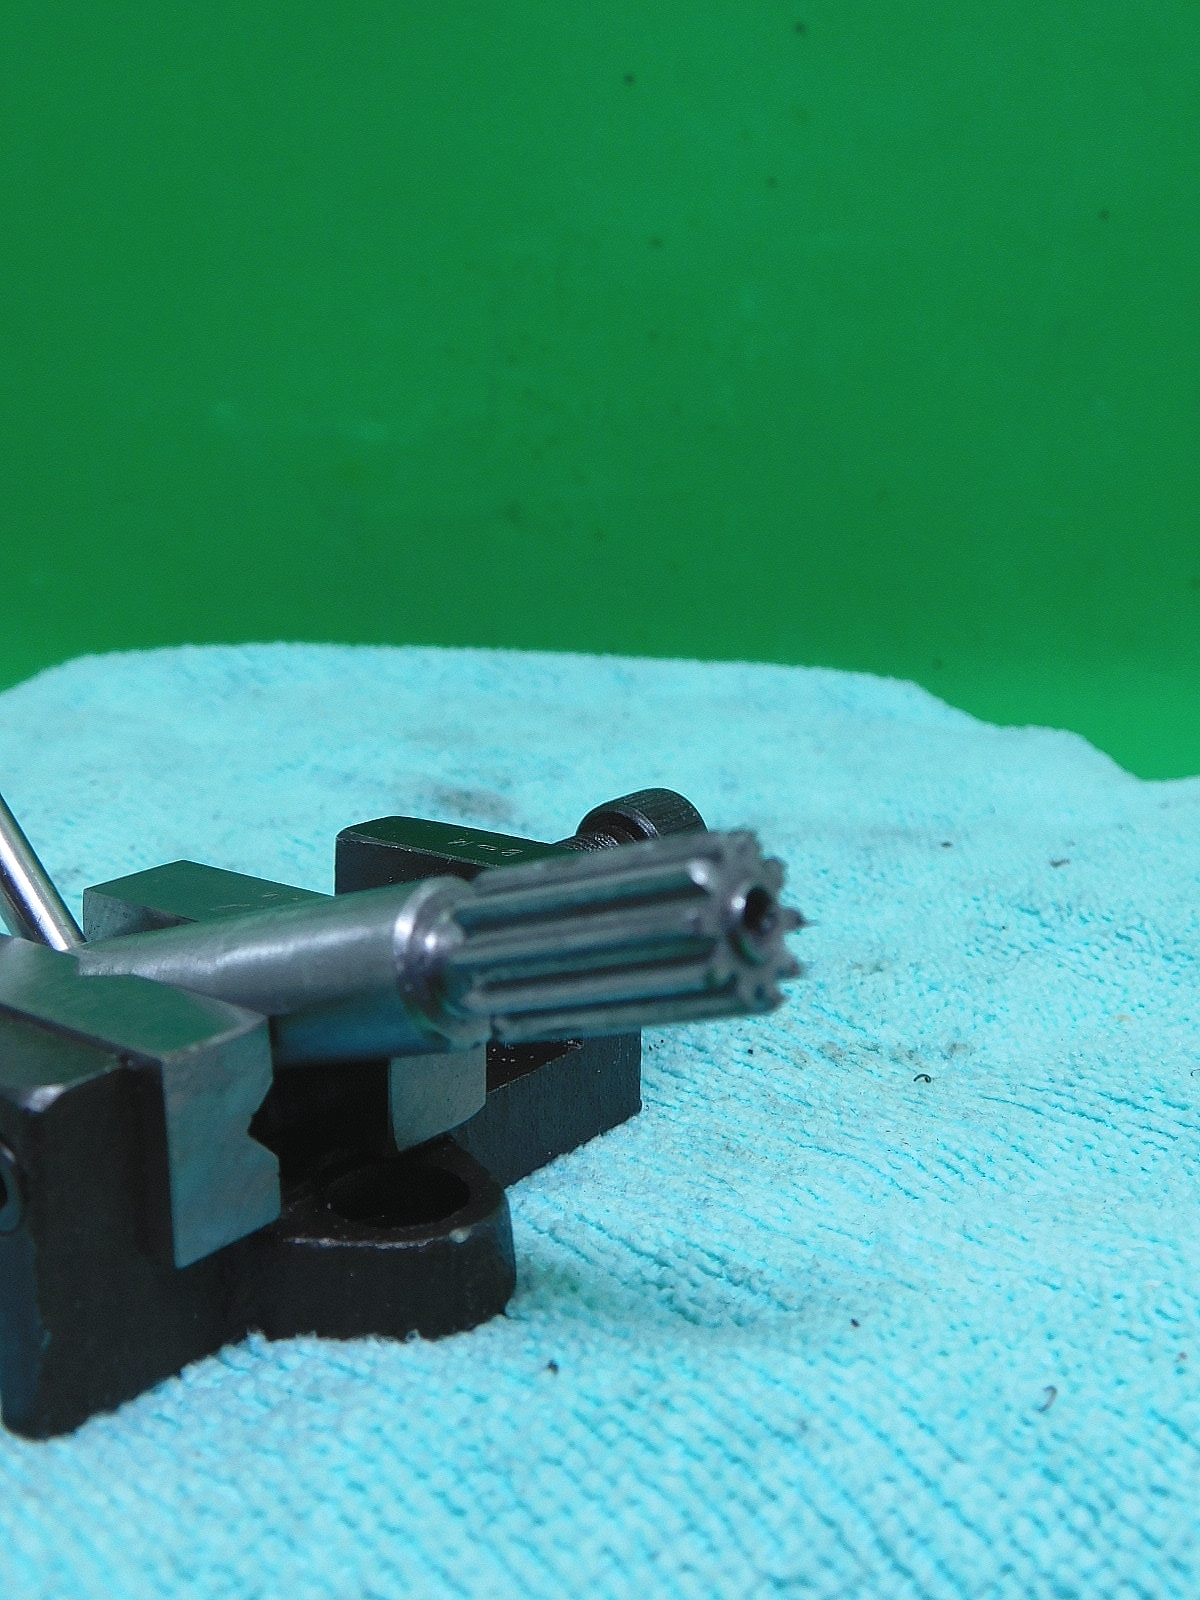
Ich habe mit Modul 1 Ritzel mit 10 Zähnen bei E-Bay geordert. Ich benötigte für einen Pinol-Antrieb insgesamt 2 Ritzel. Diese sind 10 mm lang ohne Nabe und Madenschraube. Das restliche Material war noch im Fundus vorhanden.
Die Welle wurde in der Spannzange gedreht. Die Ritzel wurden auf Ø5 mm aufgebohrt und gerieben. Mit Loctite Hochfest wurden alle Teile zusammen gefügt und die beiden Zahnräder mit den Zähnen ausgerichtet. Nach dem Aushärten des Klebers wurden die Übergänge der beiden Zahnräder mit einer sehr feinen Nadelfeile geglättet.
The Pinol drive on my Unimat MK 4 had caries. It was already missing several tooth segments. There are a few suppliers online who still sell such parts, but the freight costs were too high.
I ordered 1 pinion with 10 teeth from E-Bay. I needed a total of 2 sprockets for a Pinol drive. These are 10 mm long without hub and grub screw. The rest of the material was still available in the stock.
The shaft was turned in the collet chuck. The pinions were drilled out to Ø5 mm and reamed. All parts were joined together with Loctite High Strength and the two gear wheels were aligned with the teeth. After the adhesive had hardened, the transitions between the two gears were smoothed with a very fine needle file.
Spannzangenhalter für meine Unimat
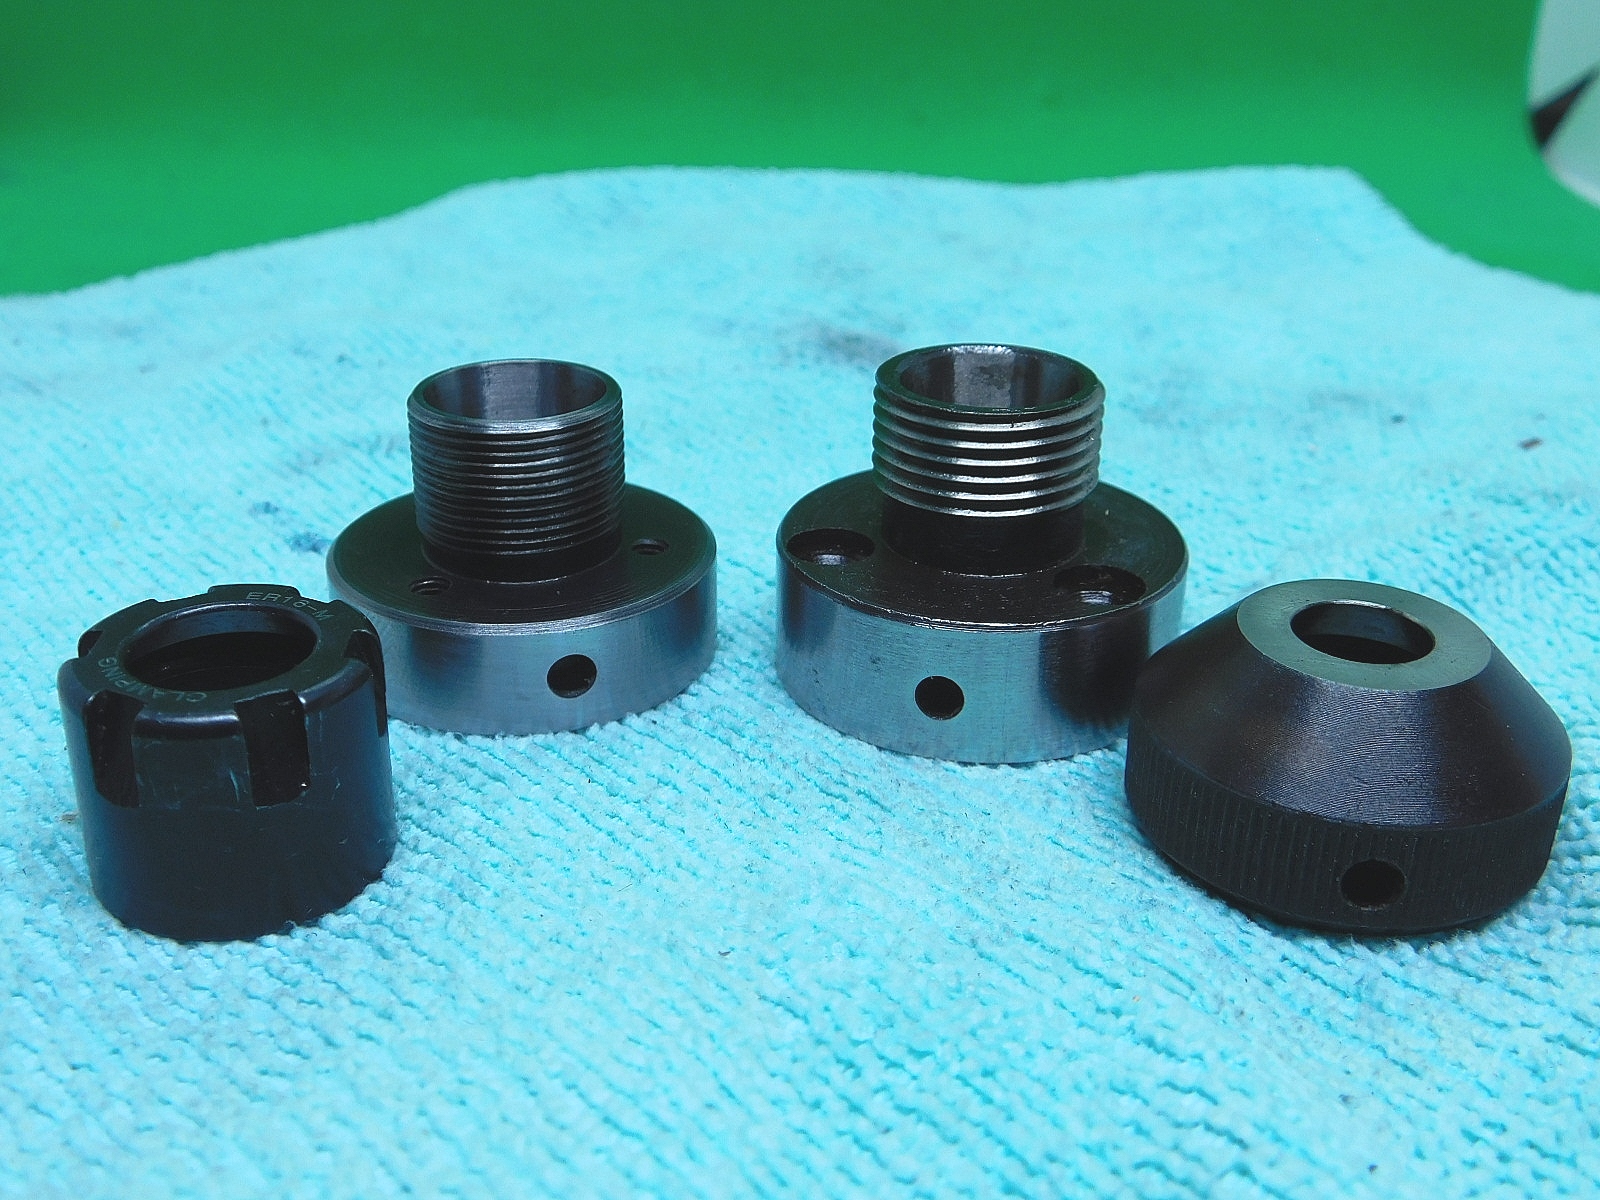
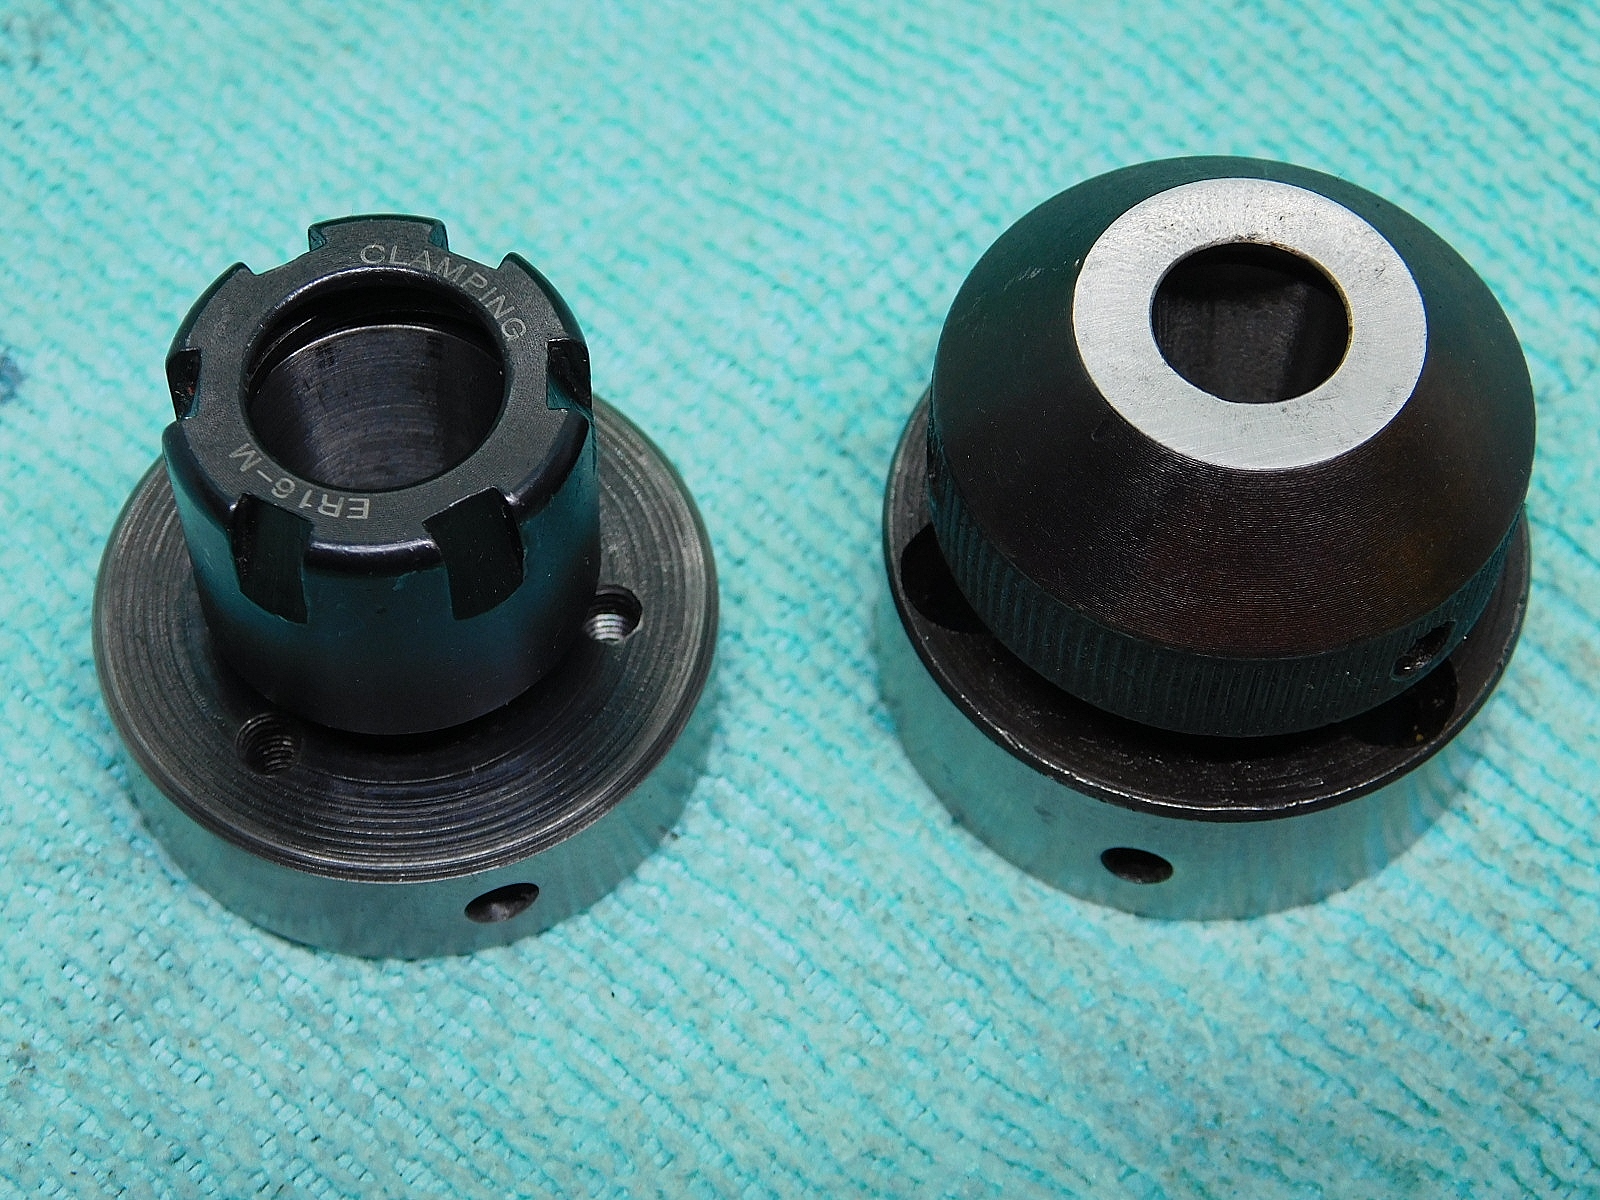
Ich habe schon lange nach einem Spannzangenhalter für meine Unimat Ausschau gehalten, bin aber nicht fündig geworden. Ich habe mir eine Spannzangenhalter selbst gefertigt. Material 42 Cr Mo 4 hatte ich noch ein Stück. Daraus habe ich den Halter für ER 16 Spannzangen gefertigt.
Der originale Halter verwendet ES 16 Spannzangen, die es aber nirgendwo mehr zu kaufen gibt.
Ich habe mir eine Mutter M-Mutter für er 16 Zangen besorgt. Diese hat ein Gewinde M 19 x 1 mm.
Einen originalen Futteradapter hatte ich noch. Diesen habe ich etwas modifiziert, damit ich den neuen Zangenhalter montieren kann. Die drei Gewinde habe ich mit 4,1 mm Durchbohrt und Senkungen angebracht.
Den Zangenhalter habe ich Spindelseitig auf der Drehmaschine fertig bearbeitet und den Gewindeteil und den Innenkonus vor gedreht.
Den Halter auf die kleine Unimat geschraubt und den Gewindeteil auf 18,9 mm Abgedreht. Dann ging es wieder auf die große Drehmaschine.
Den Zangenhalter mit der Messuhr an dem Gewindeteil genau ausgerichtet und mit dem Reitstock abgestützt. Nun wurde das Gewinde mit der Leitspindel geschnitten. Die Spannmutter diente zur Kontrolle für das Gewinde. Im Anschluss den Innenkonus fertig gedreht. Eine Spannzange diente zur Kontrolle.
Den finalen Zangenkonus wurde auf der Unimat fertig gedreht. Dazu wurde der Spindelstock entsprechend dem Konus verstellt.
Zum Schluss noch eine Bohrung für den Spannstift und das Teil war fertig.
Eine Kontrolle auf der Unimat ergab einen Gesamtausschlag der Messuhr von 2/100 mm.
I have been looking for a collet holder for my Unimat for a long time, but have not been able to find one. I made a collet holder myself. I still had a piece of 42 Cr Mo 4 material. I used it to make the holder for ER 16 collets.
The original holder uses ES 16 collets, but these are no longer available to buy anywhere.
I bought an M nut for ER 16 collets. This has an M 19 x 1 mm thread.
I still had an original chuck adapter. I modified it slightly so that I could fit the new pliers holder. I drilled 4.1 mm holes in the three threads and added countersinks.
I finished the spindle side of the pliers holder on the lathe and pre-machined the threaded part and the inner cone.
I screwed the holder onto the small Unimat and turned the threaded part to 18.9 mm. Then it was back to the large lathe.
The collet holder was precisely aligned with the threaded part using the dial gauge and supported with the tailstock. Now the thread was cut with the lead screw. The clamping nut was used to check the thread. The inner cone was then turned. A collet chuck was used for checking.
The final collet cone was turned on the Unimat. To do this, the headstock was adjusted to match the cone.
Finally, a hole was drilled for the dowel pin and the part was finished.
A check on the Unimat showed a total deflection of the dial gauge of 2/100 mm.


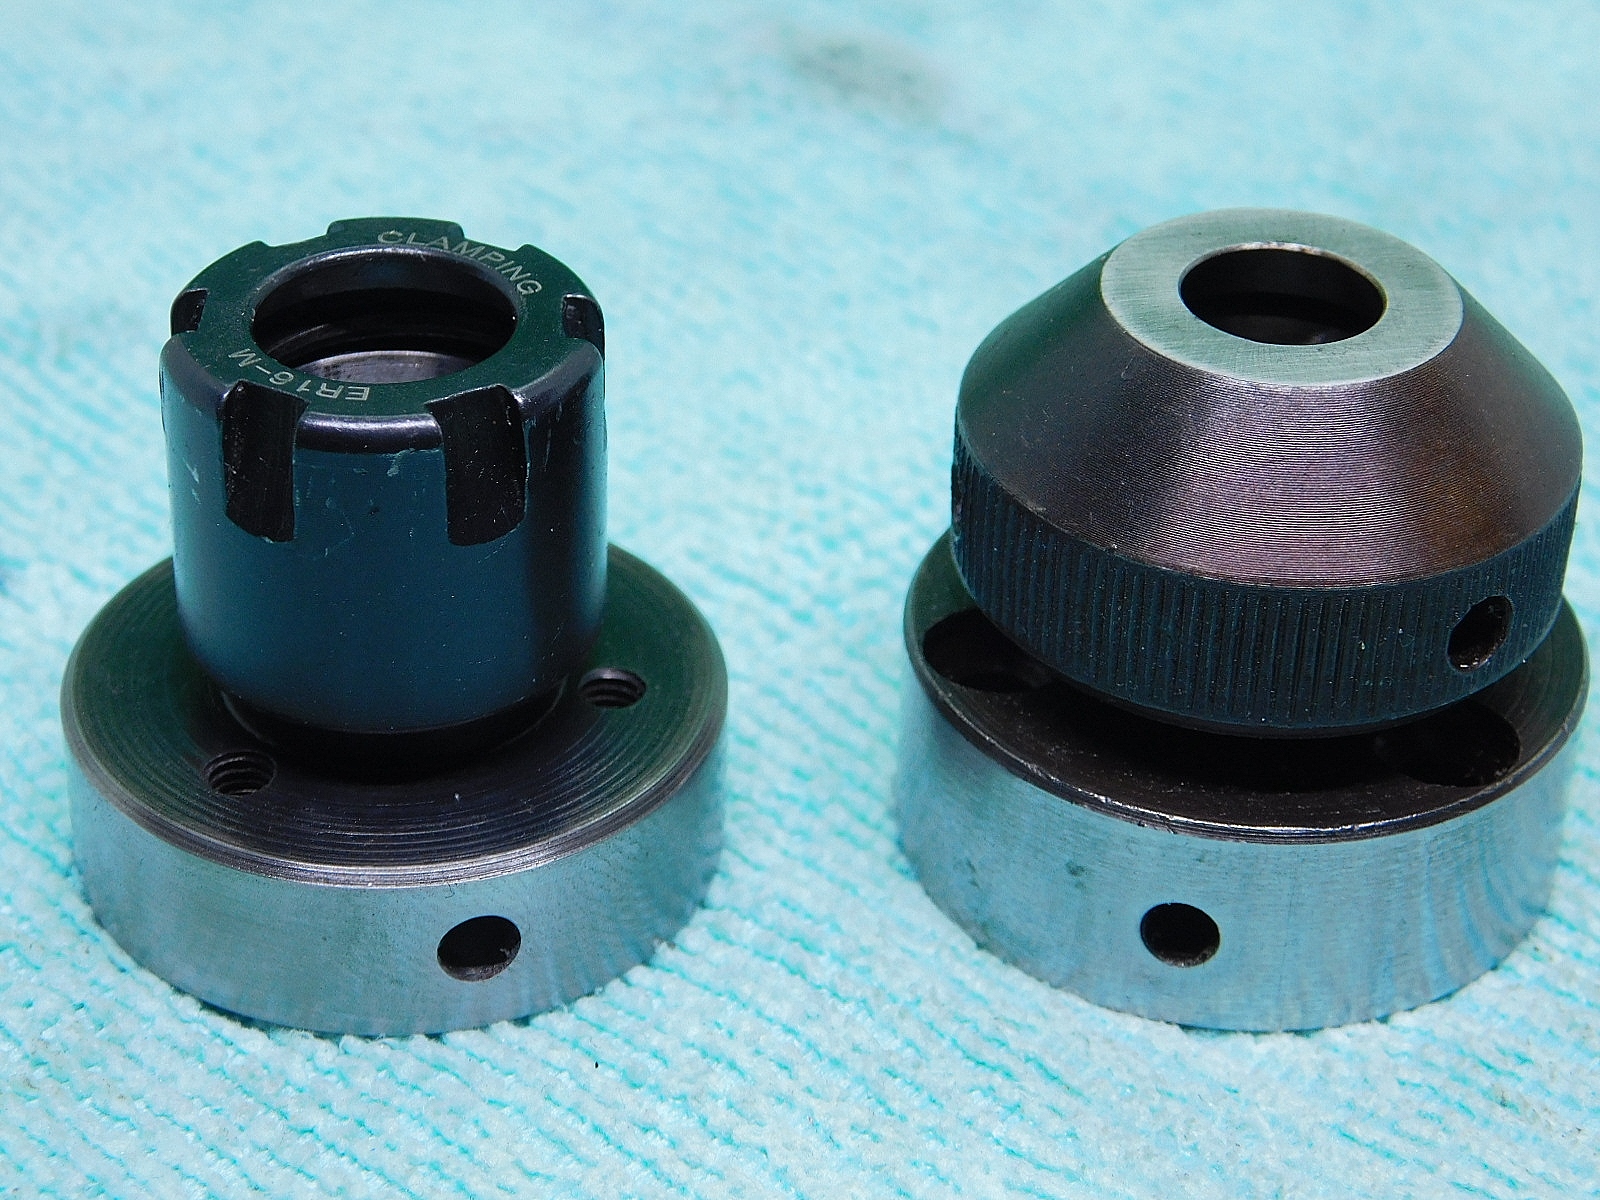
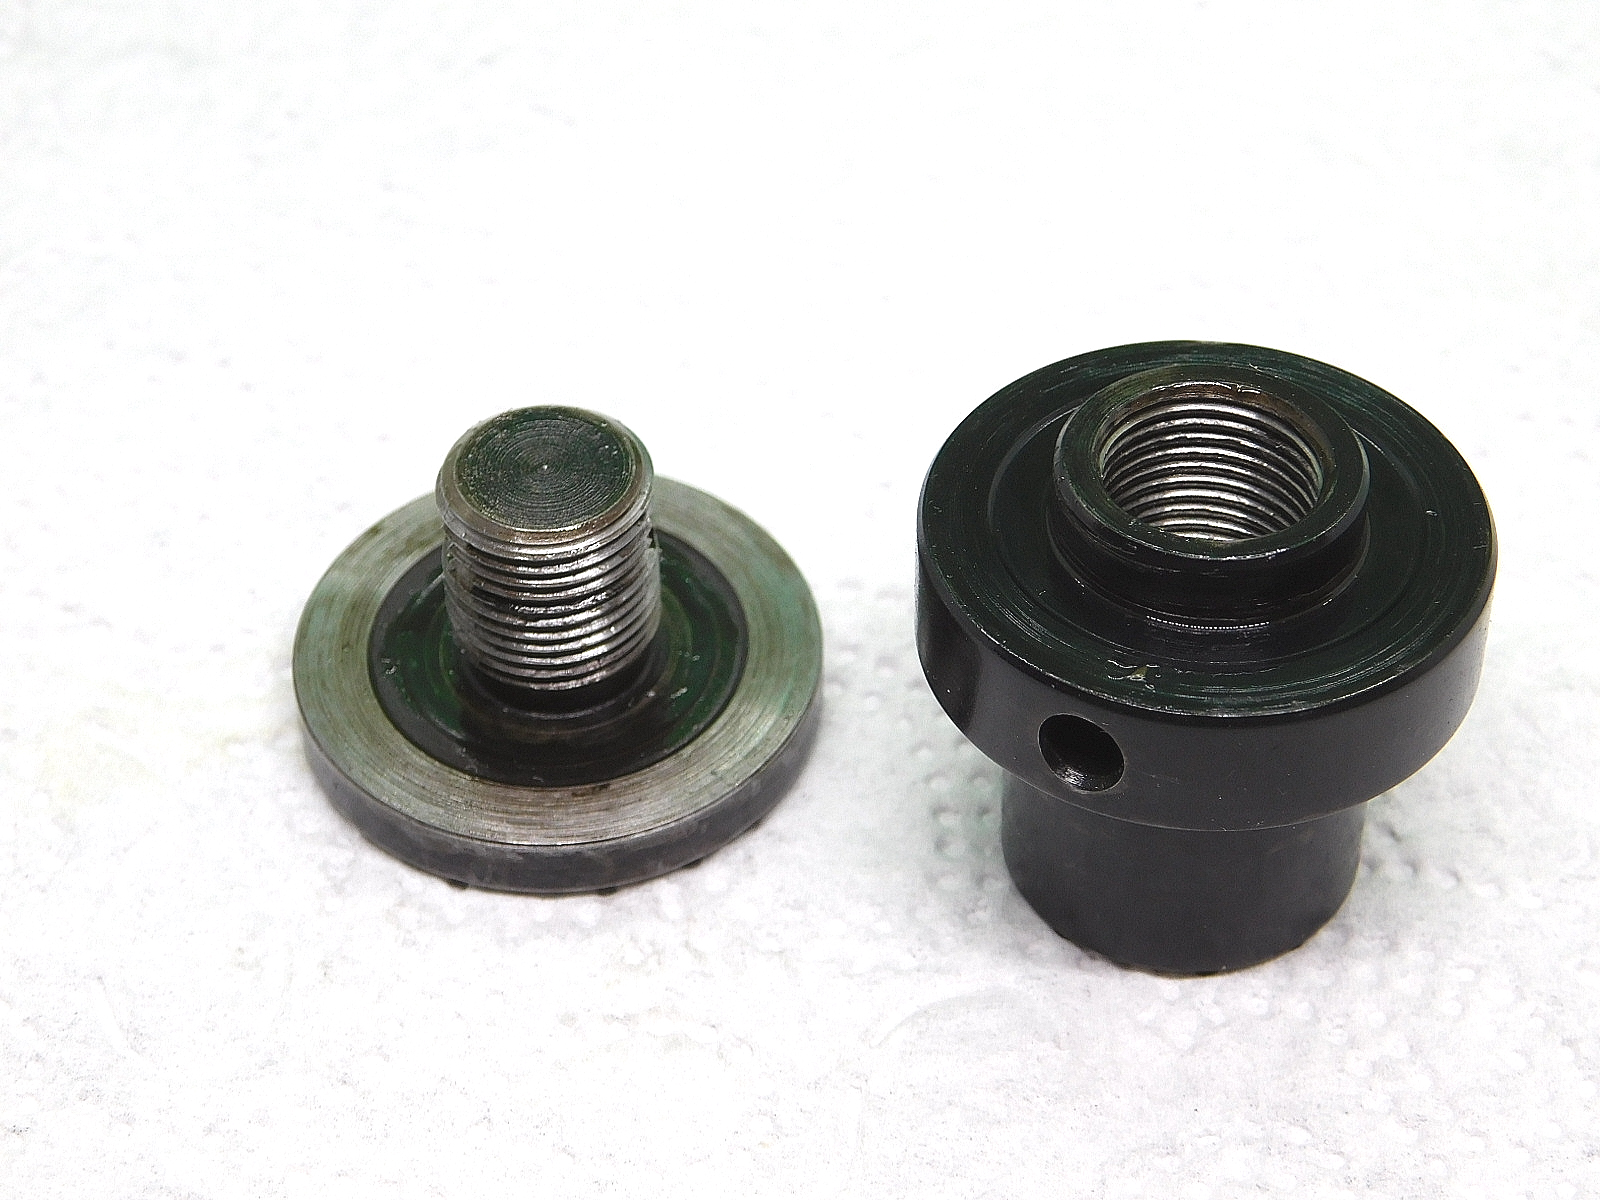
Links, der von mir gefertigte ER 16 Zangenhalter für die Unimat DB/SL.
On the left, the ER 16 collet holder I made for the Unimat DB/SL.
Rechts, der originale ES Zankenhalter für die Unimat 3.
On the right, the original ES collet holder for the Unimat 3.

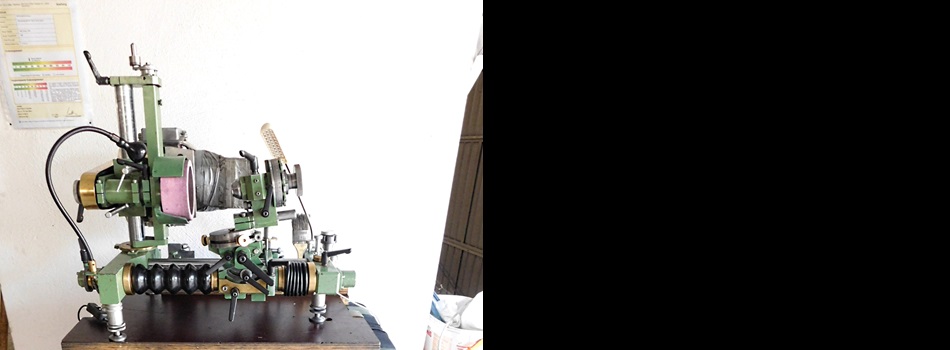
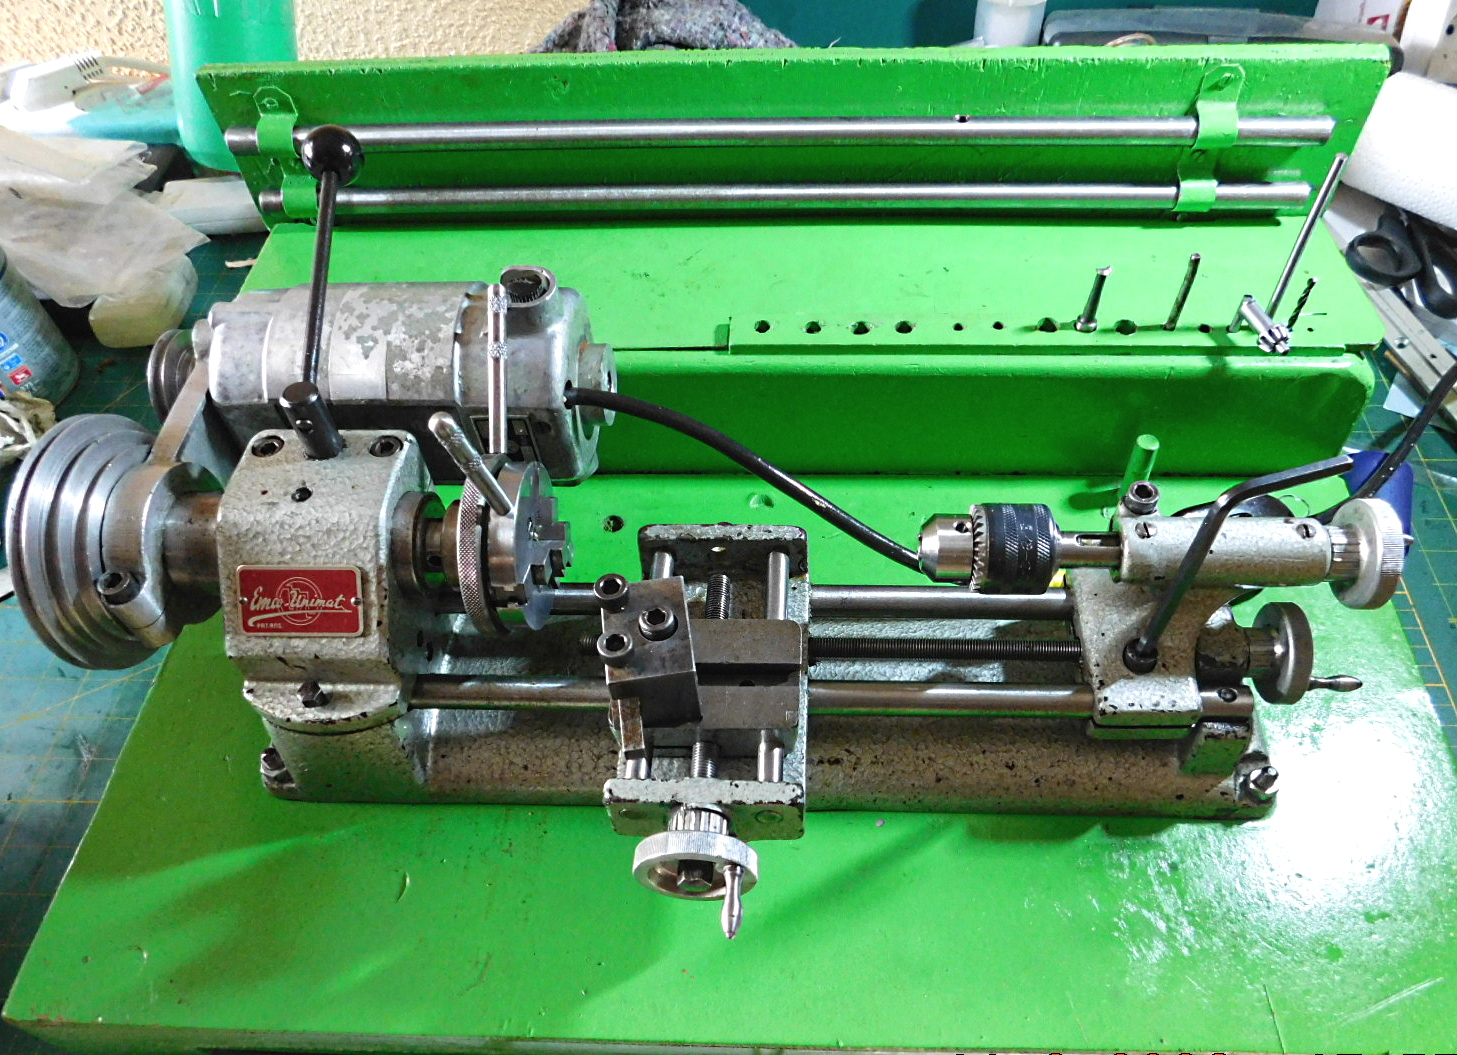
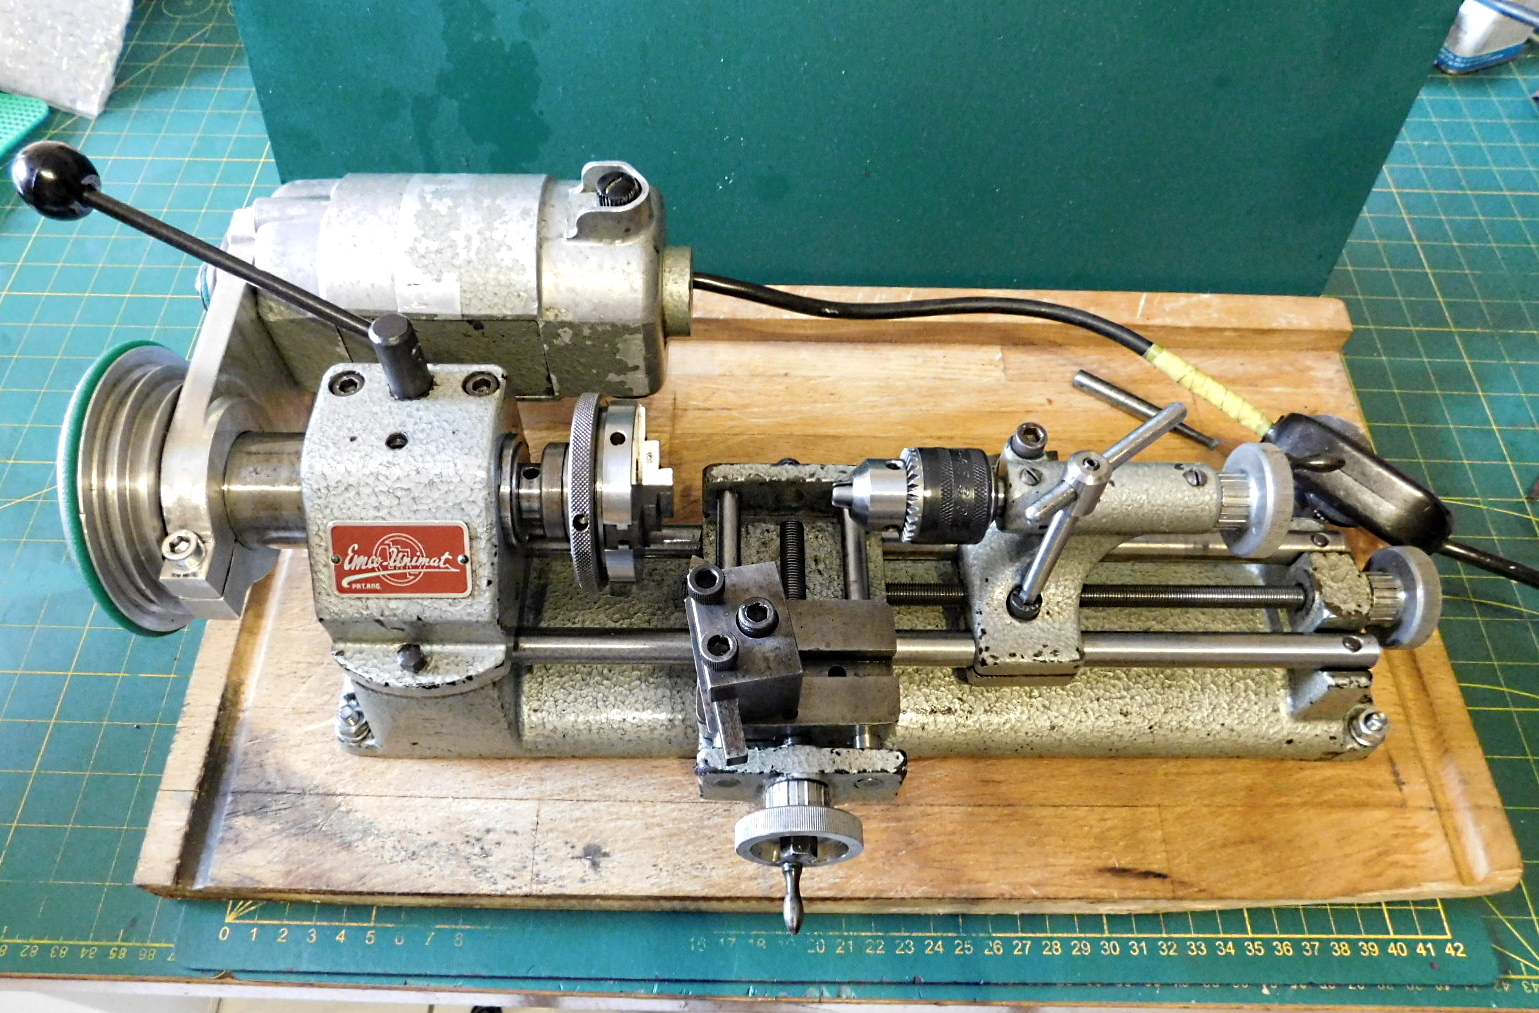
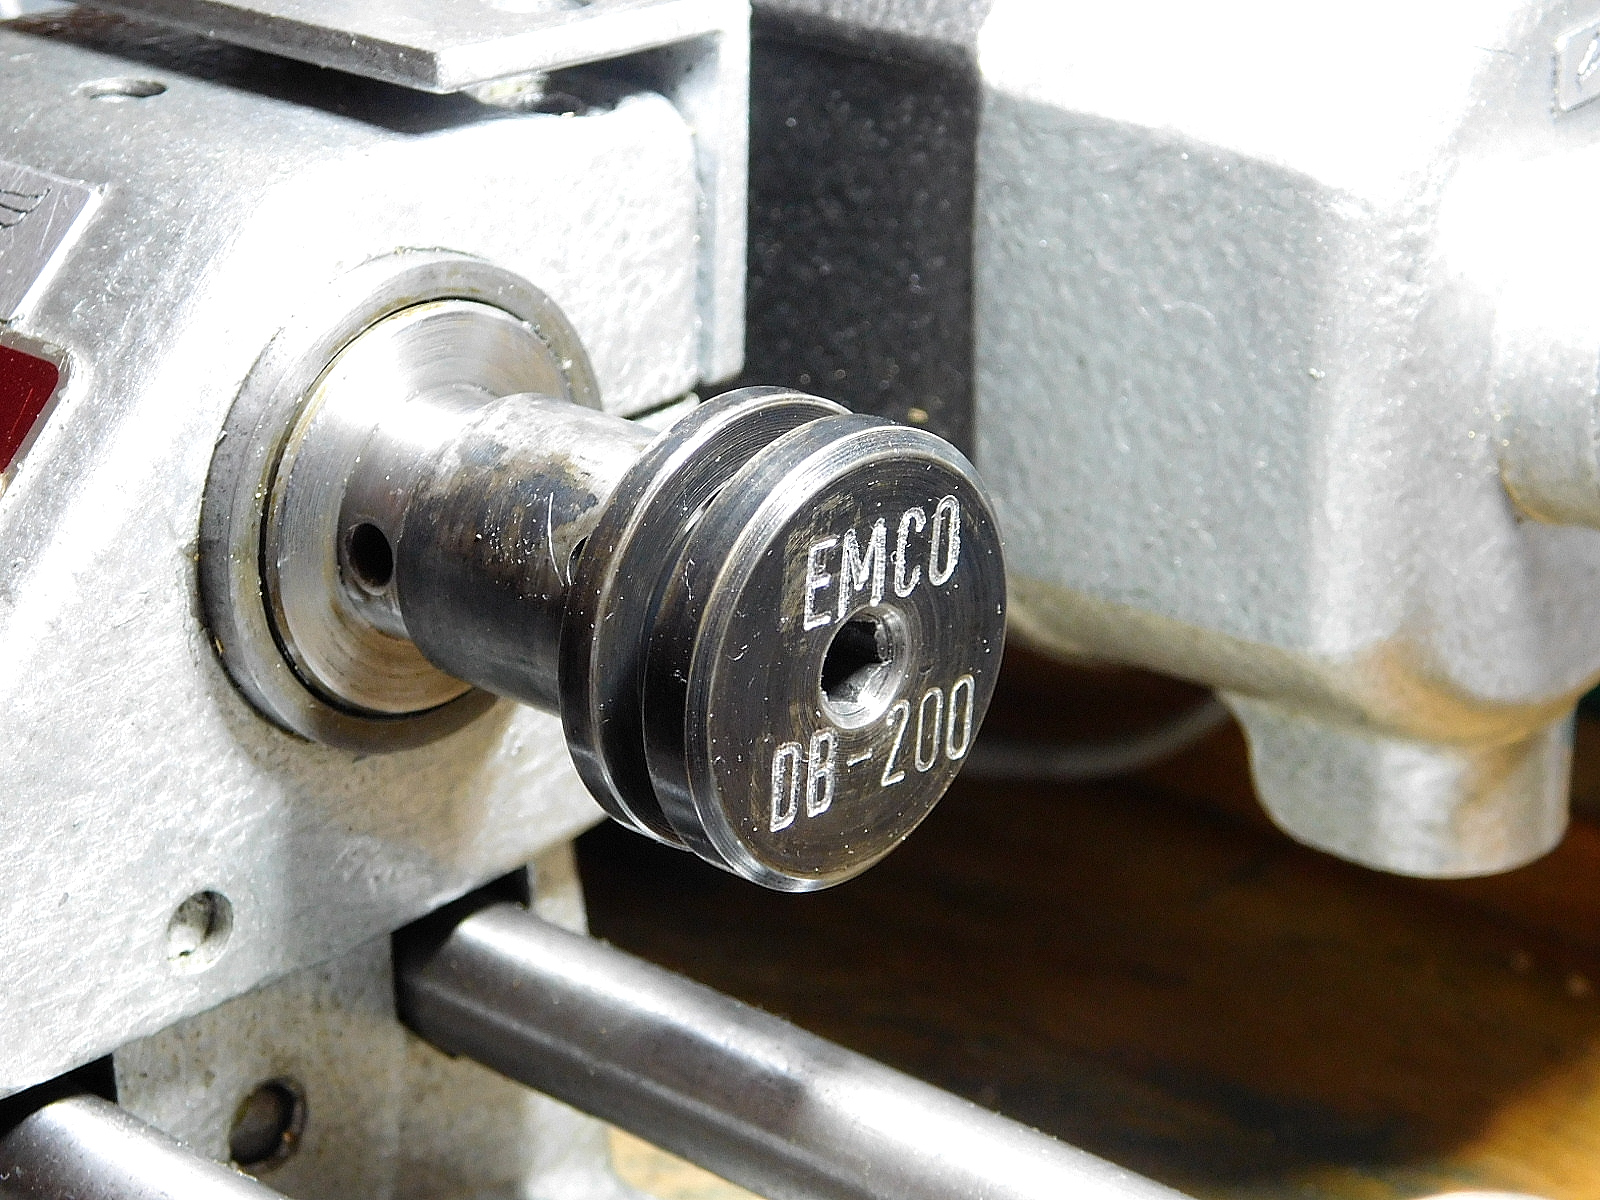
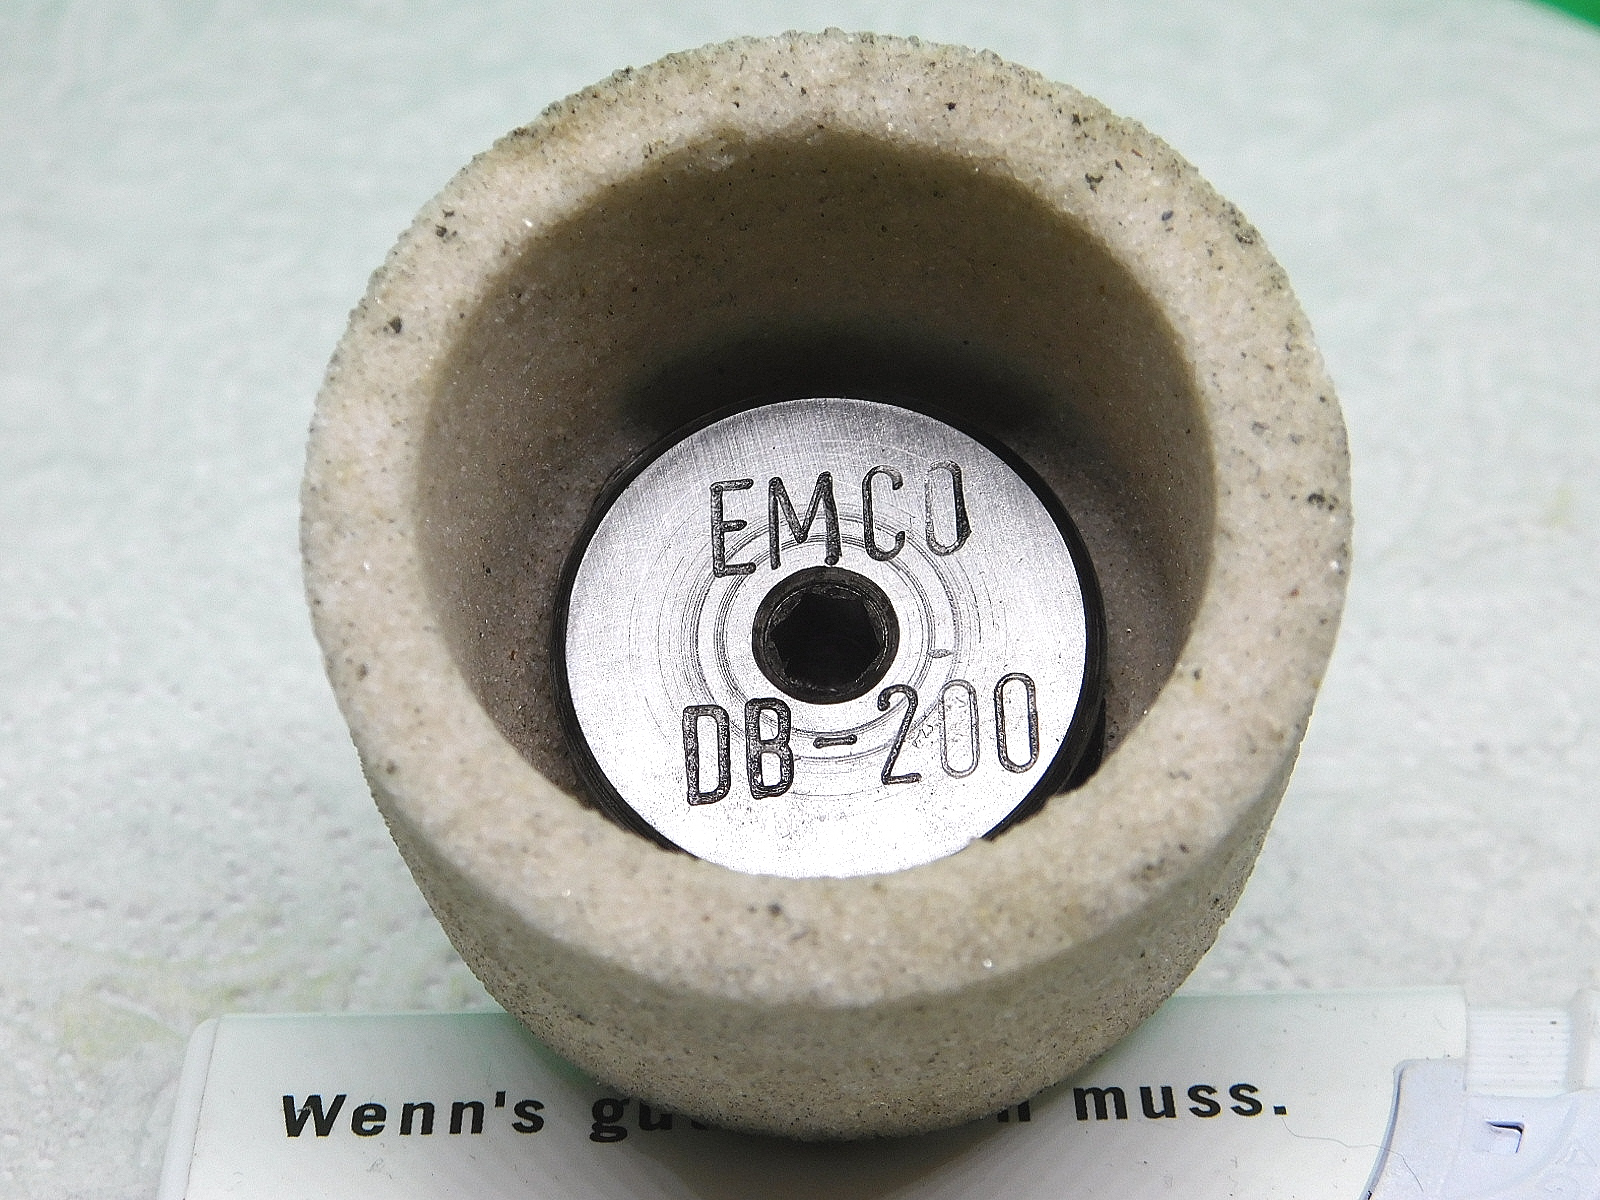
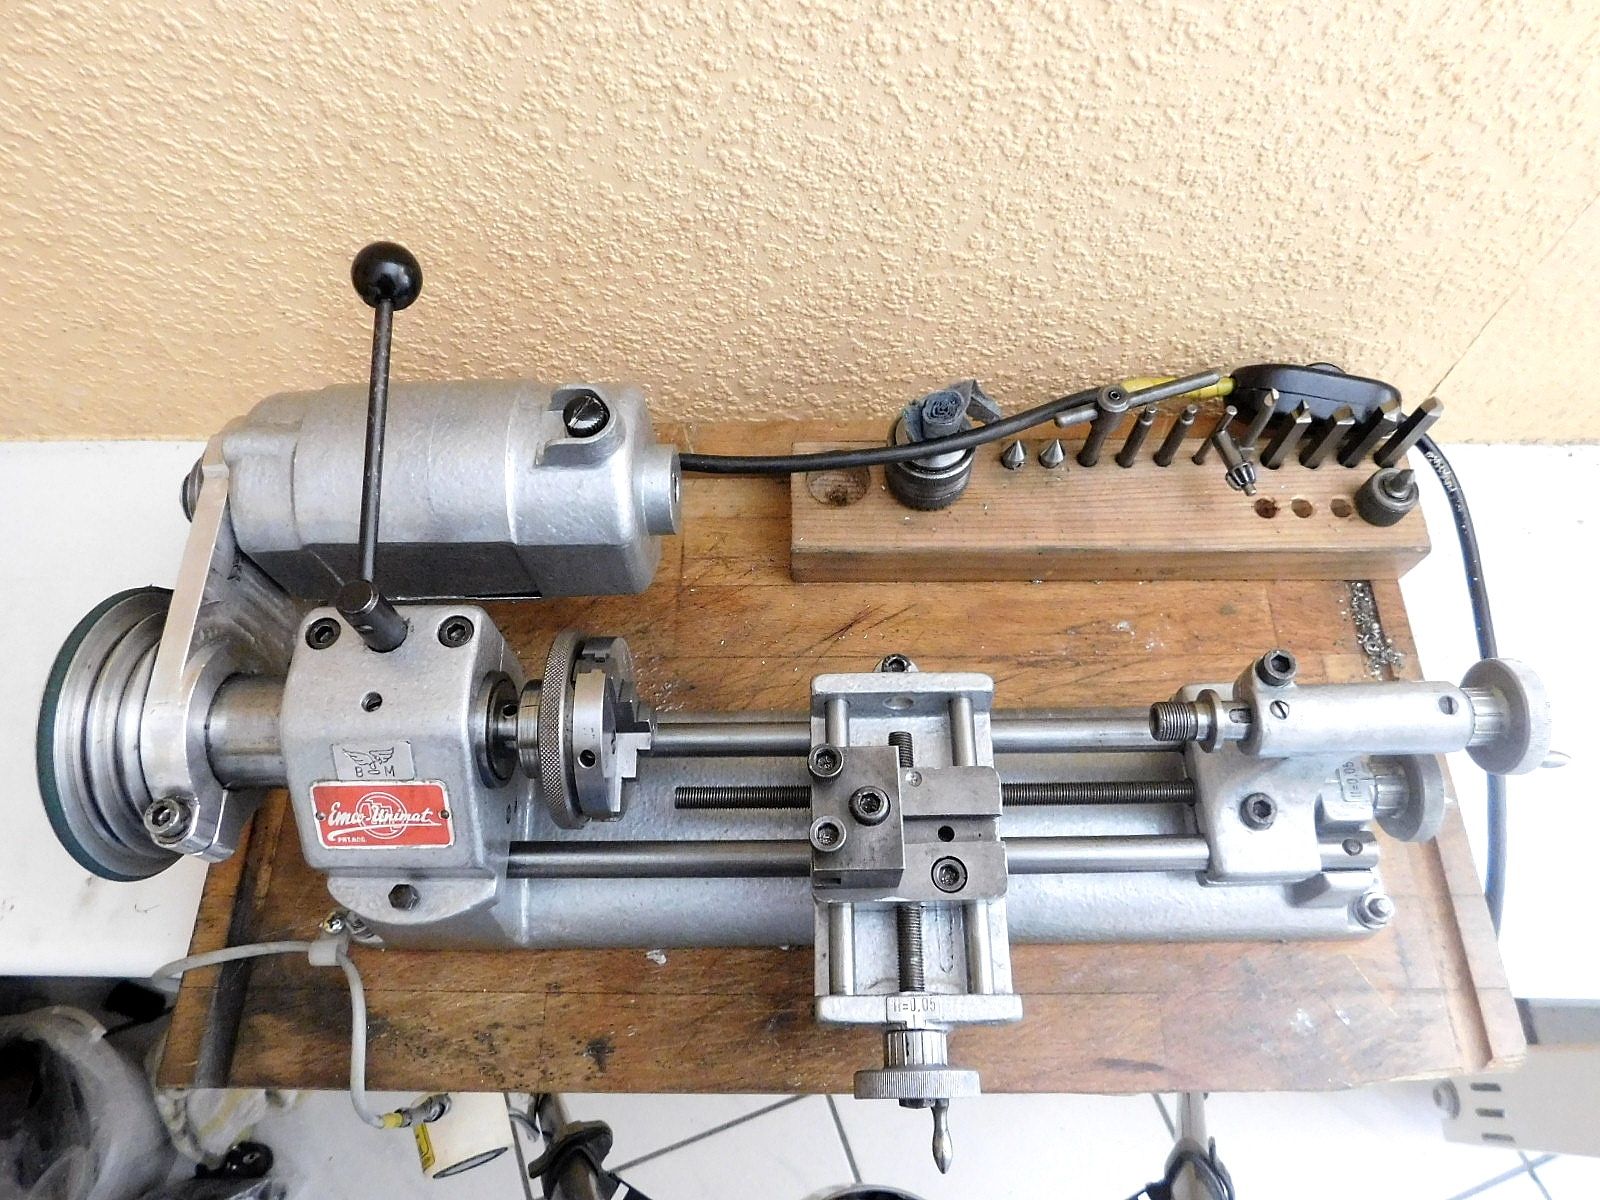
Die Unimat DB 200 im Lieferzustand.
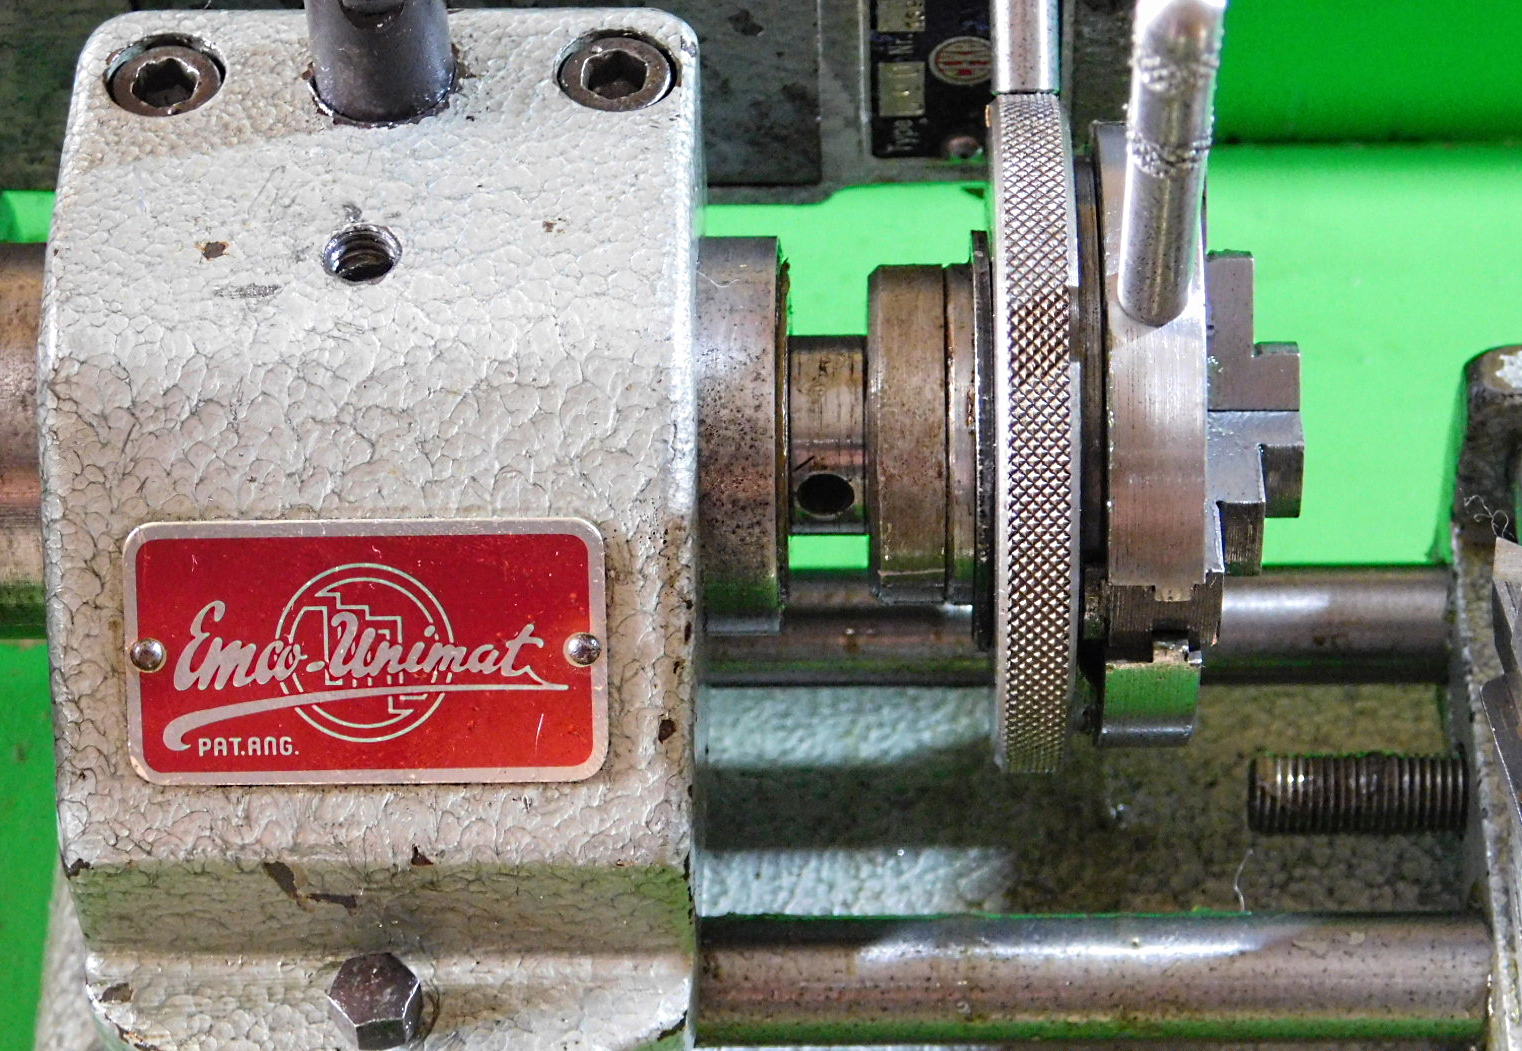
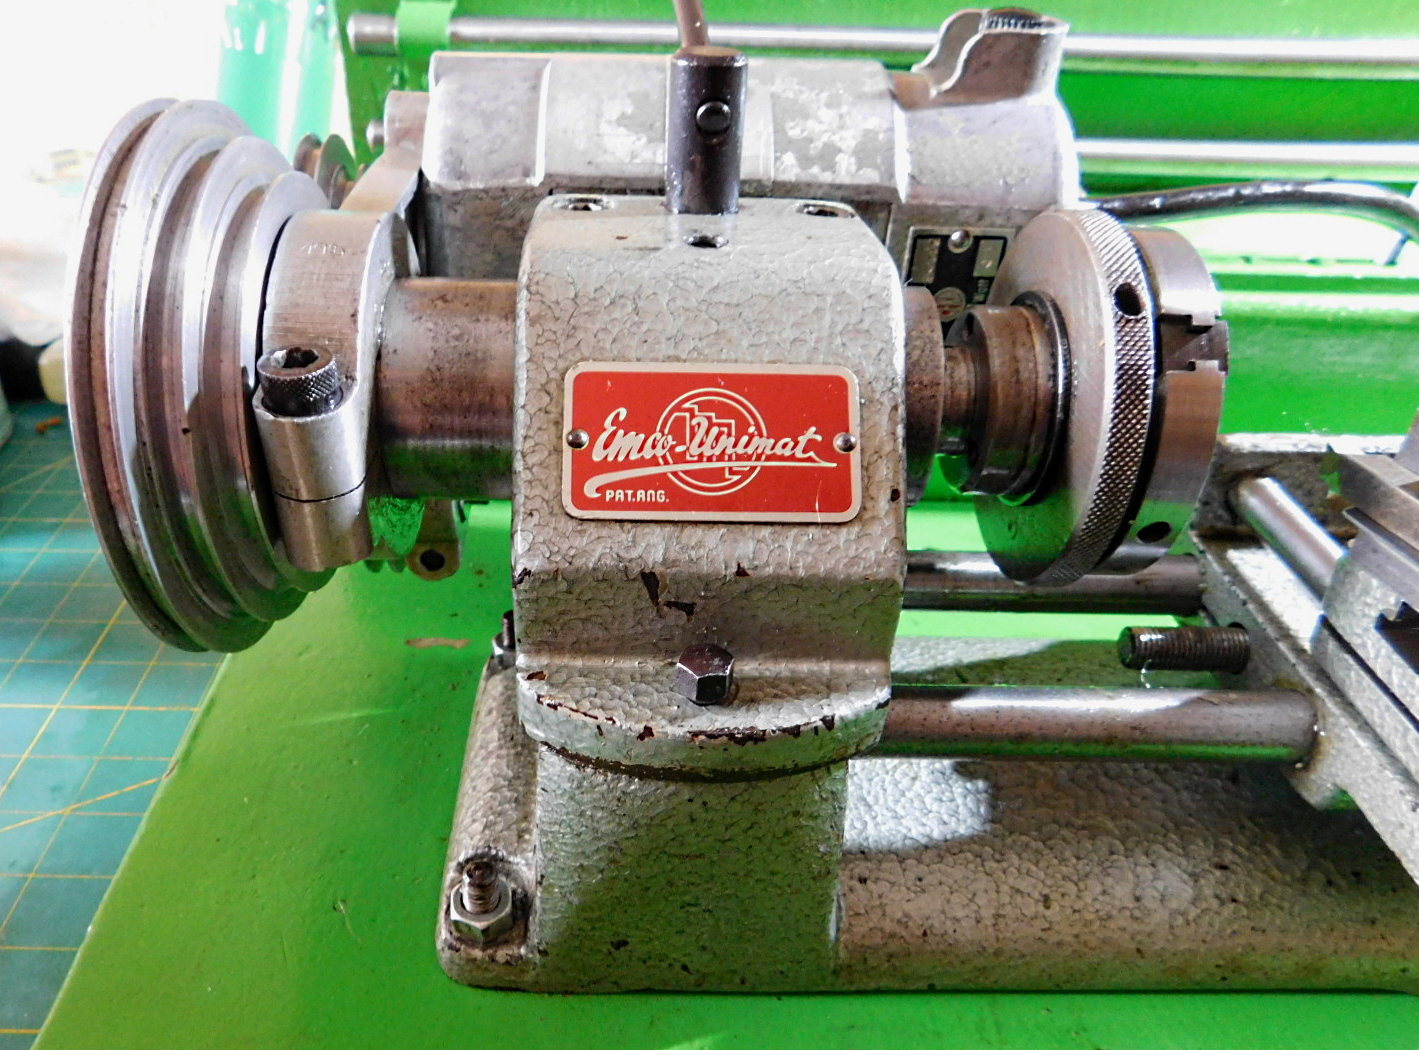
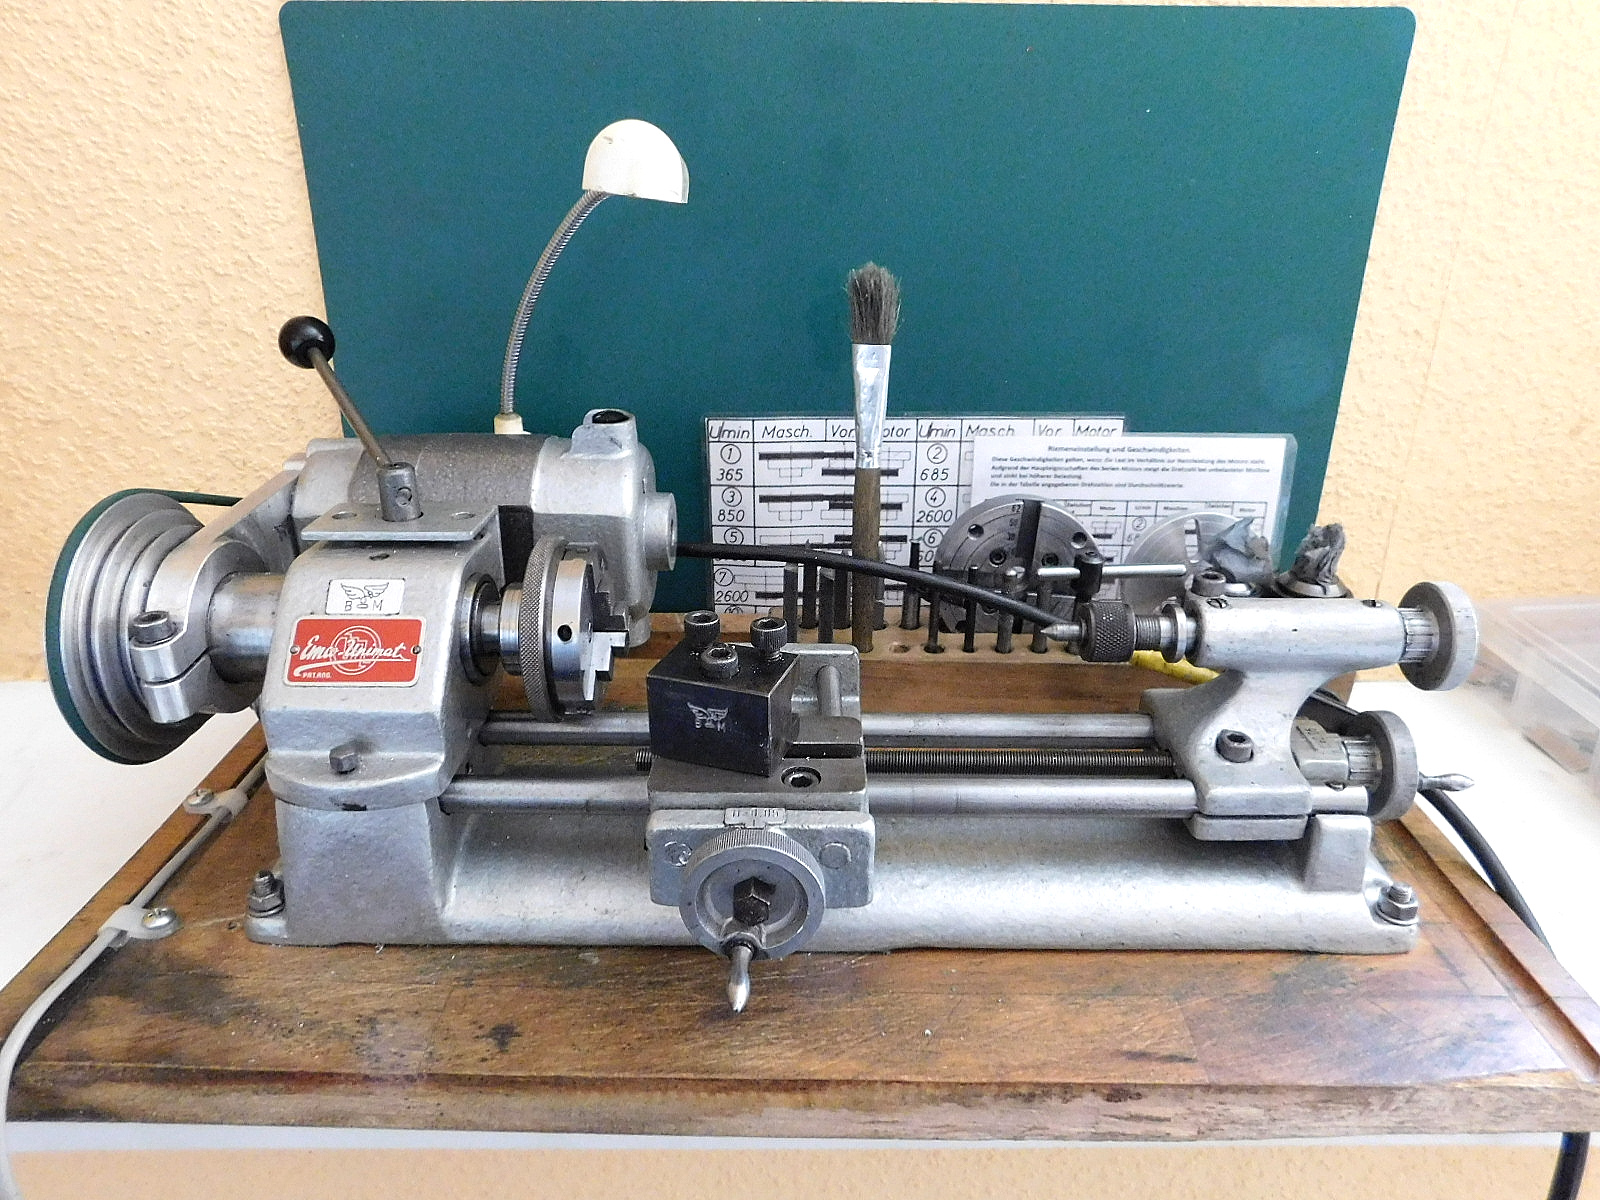
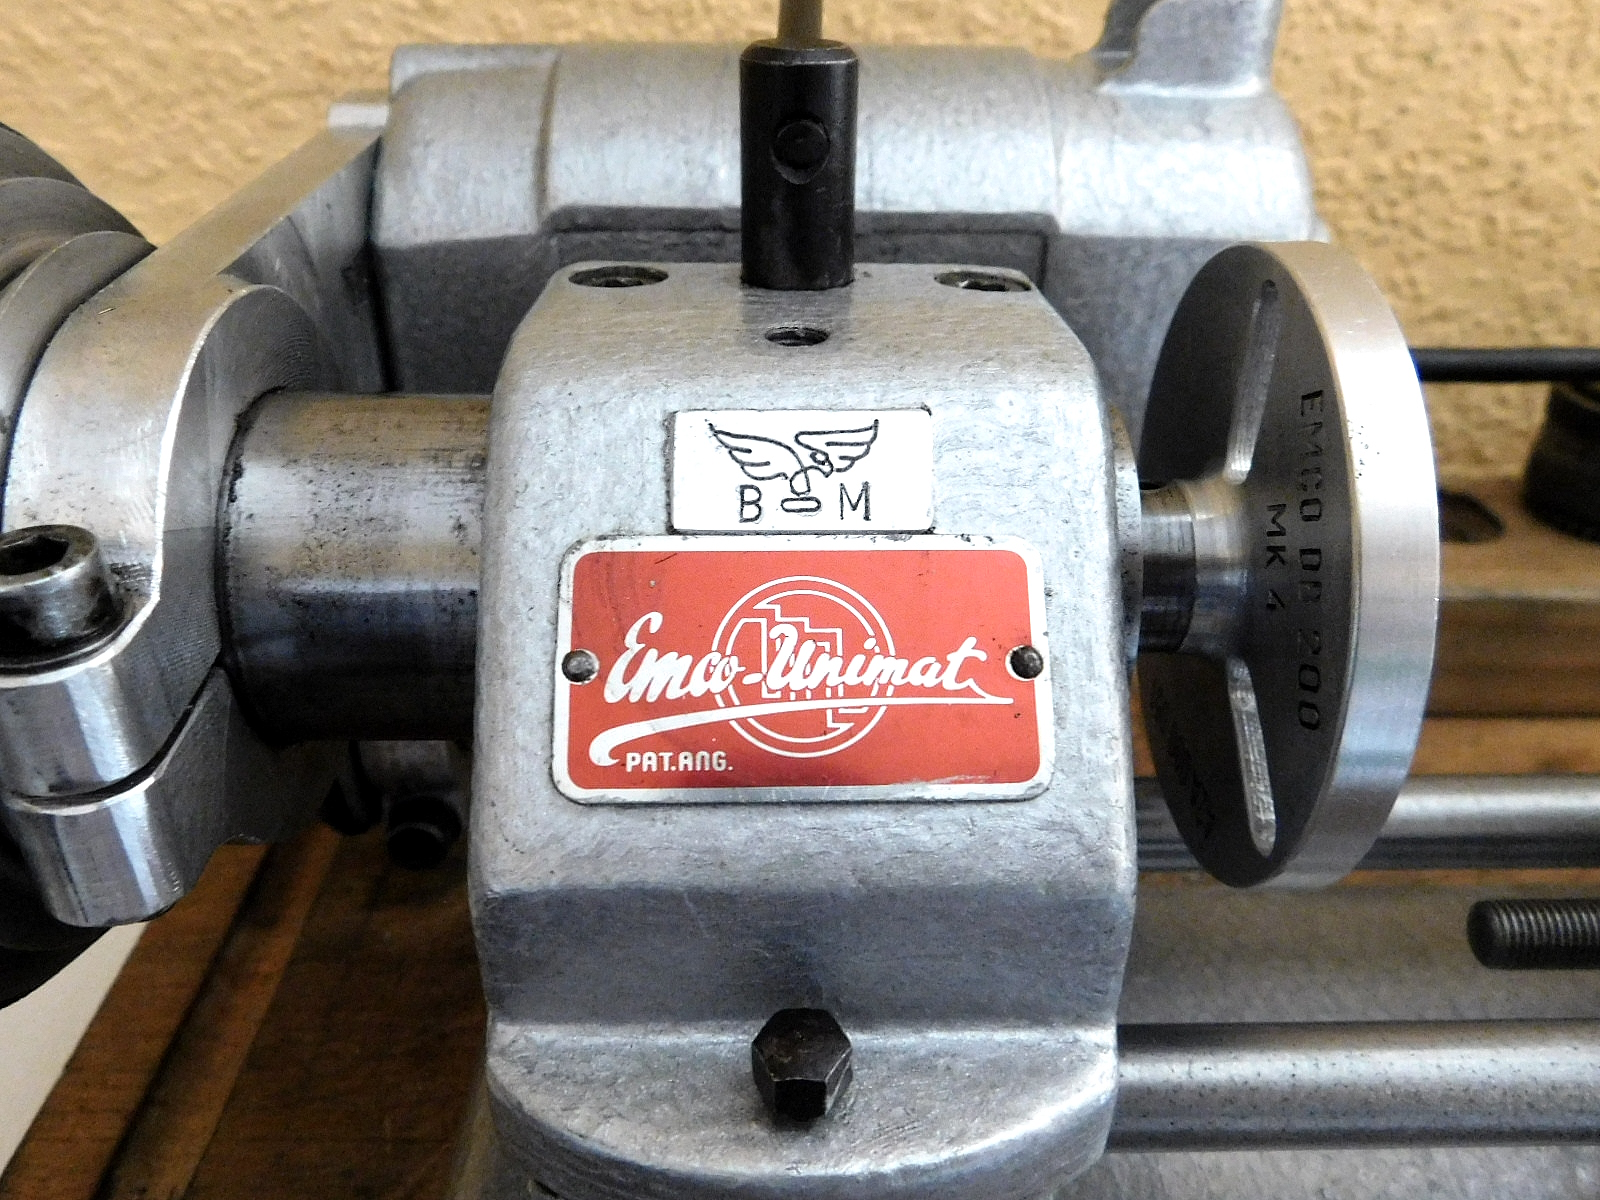
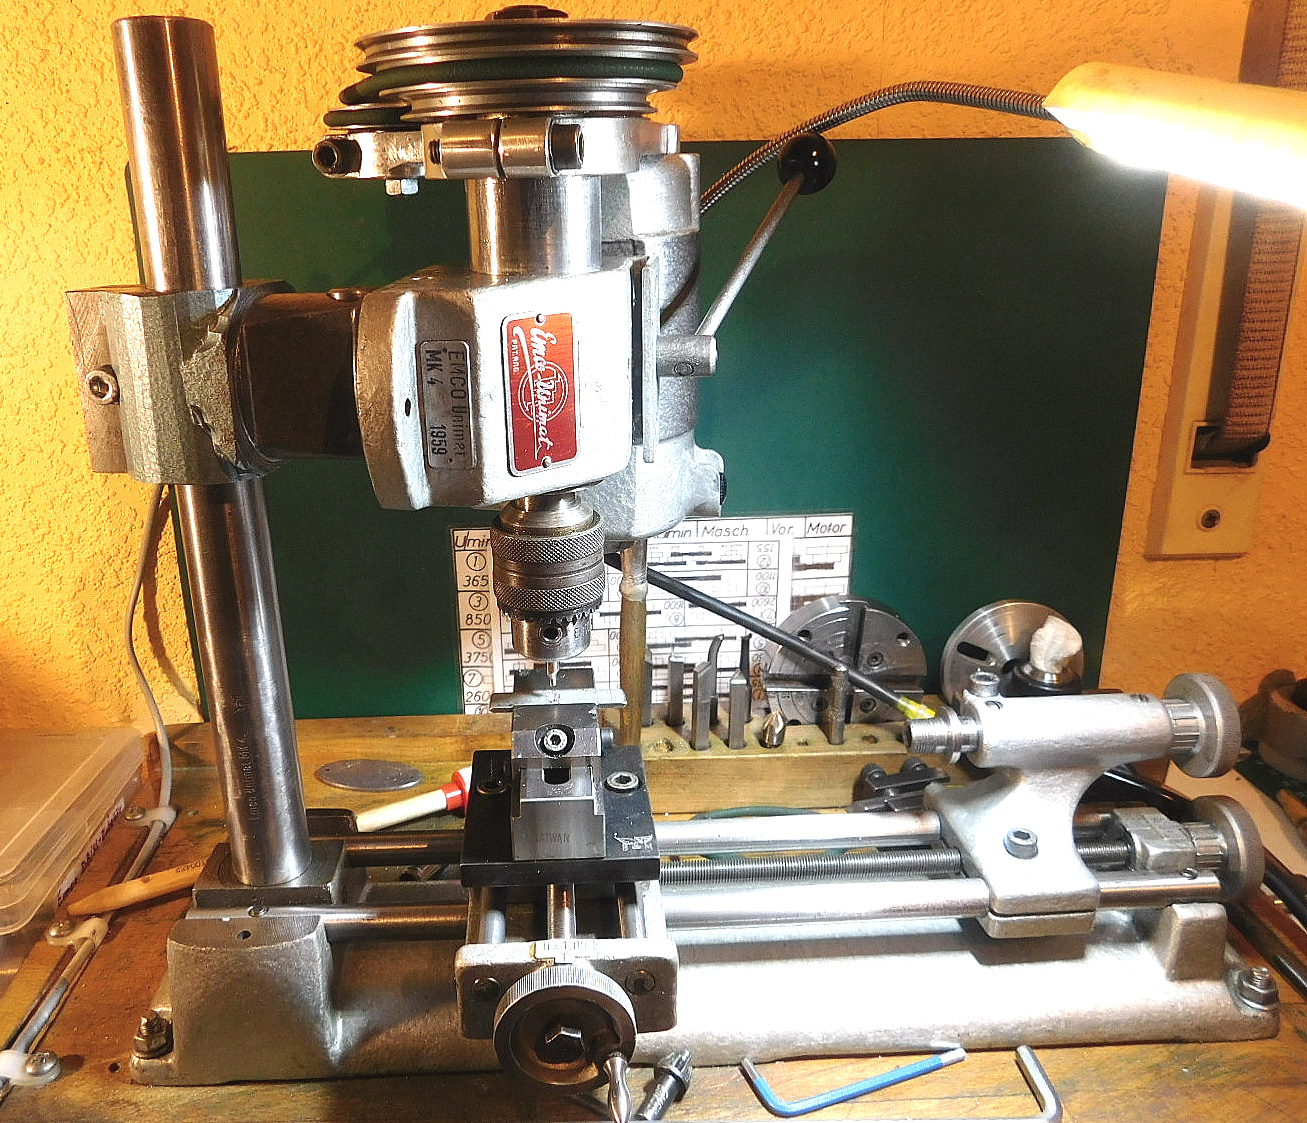
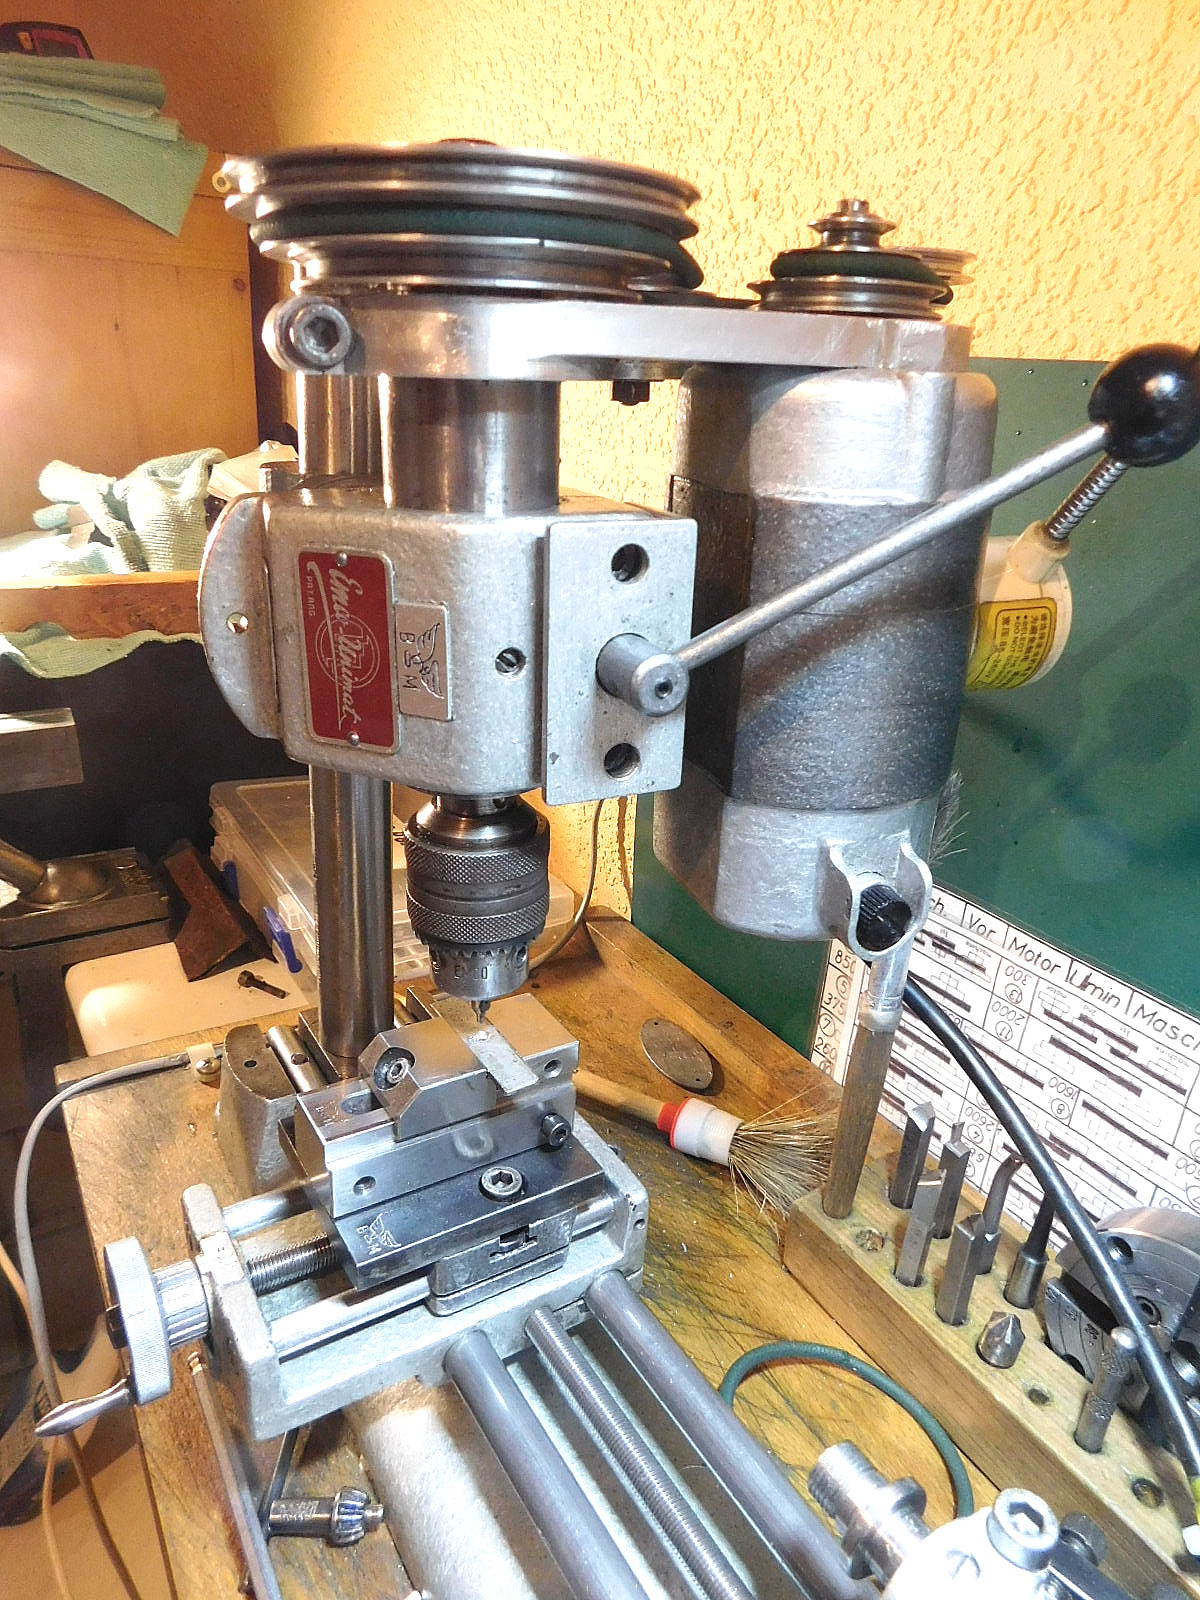
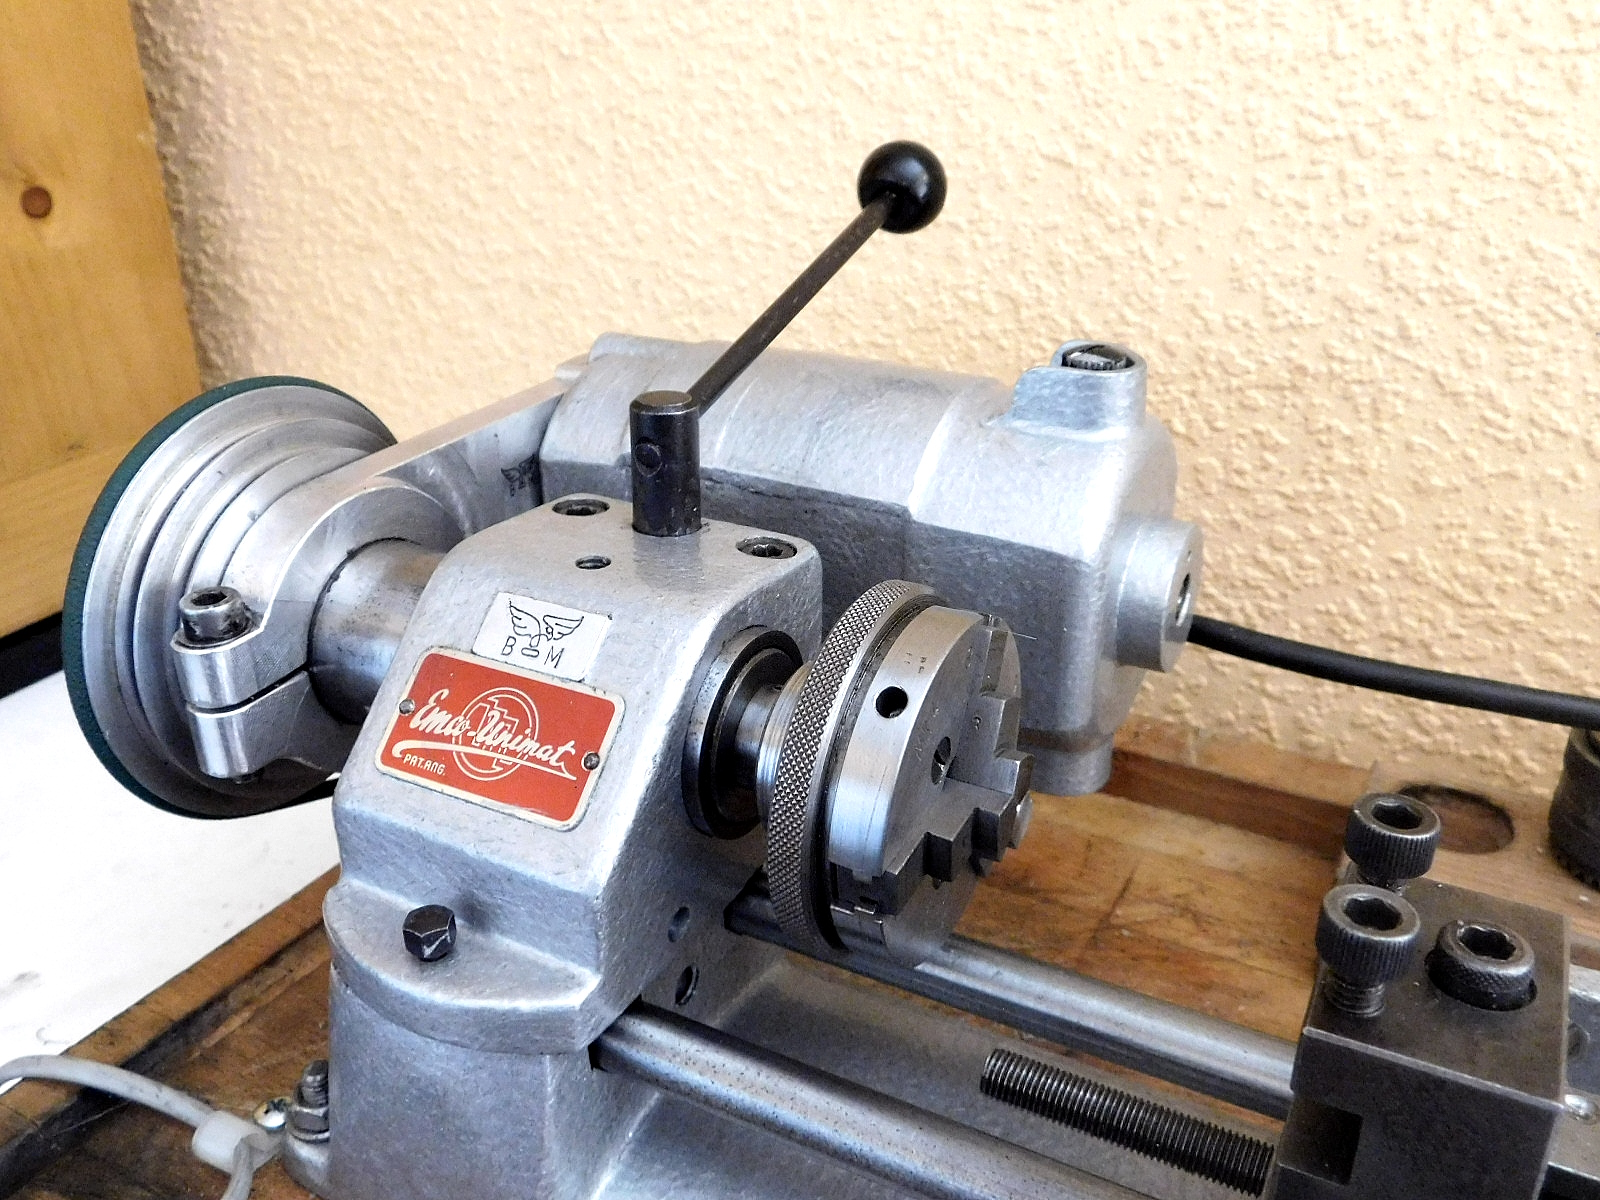
Emco Unimat DB 200 MK4
Meine aller erste Drehmaschine war eine Emco Unimat 3. Für diese Maschine hatte ich alle Zubehörteile zur Metallbearbeitung.
Leider habe ich diese Maschine verkauft.
Ich habe schon lange überlegt mir wieder so ein kleines Spielzeug für den Schreibtisch zuzulegen.
Ich habe im Internet sehr günstig eine Emco Unimat erstanden.
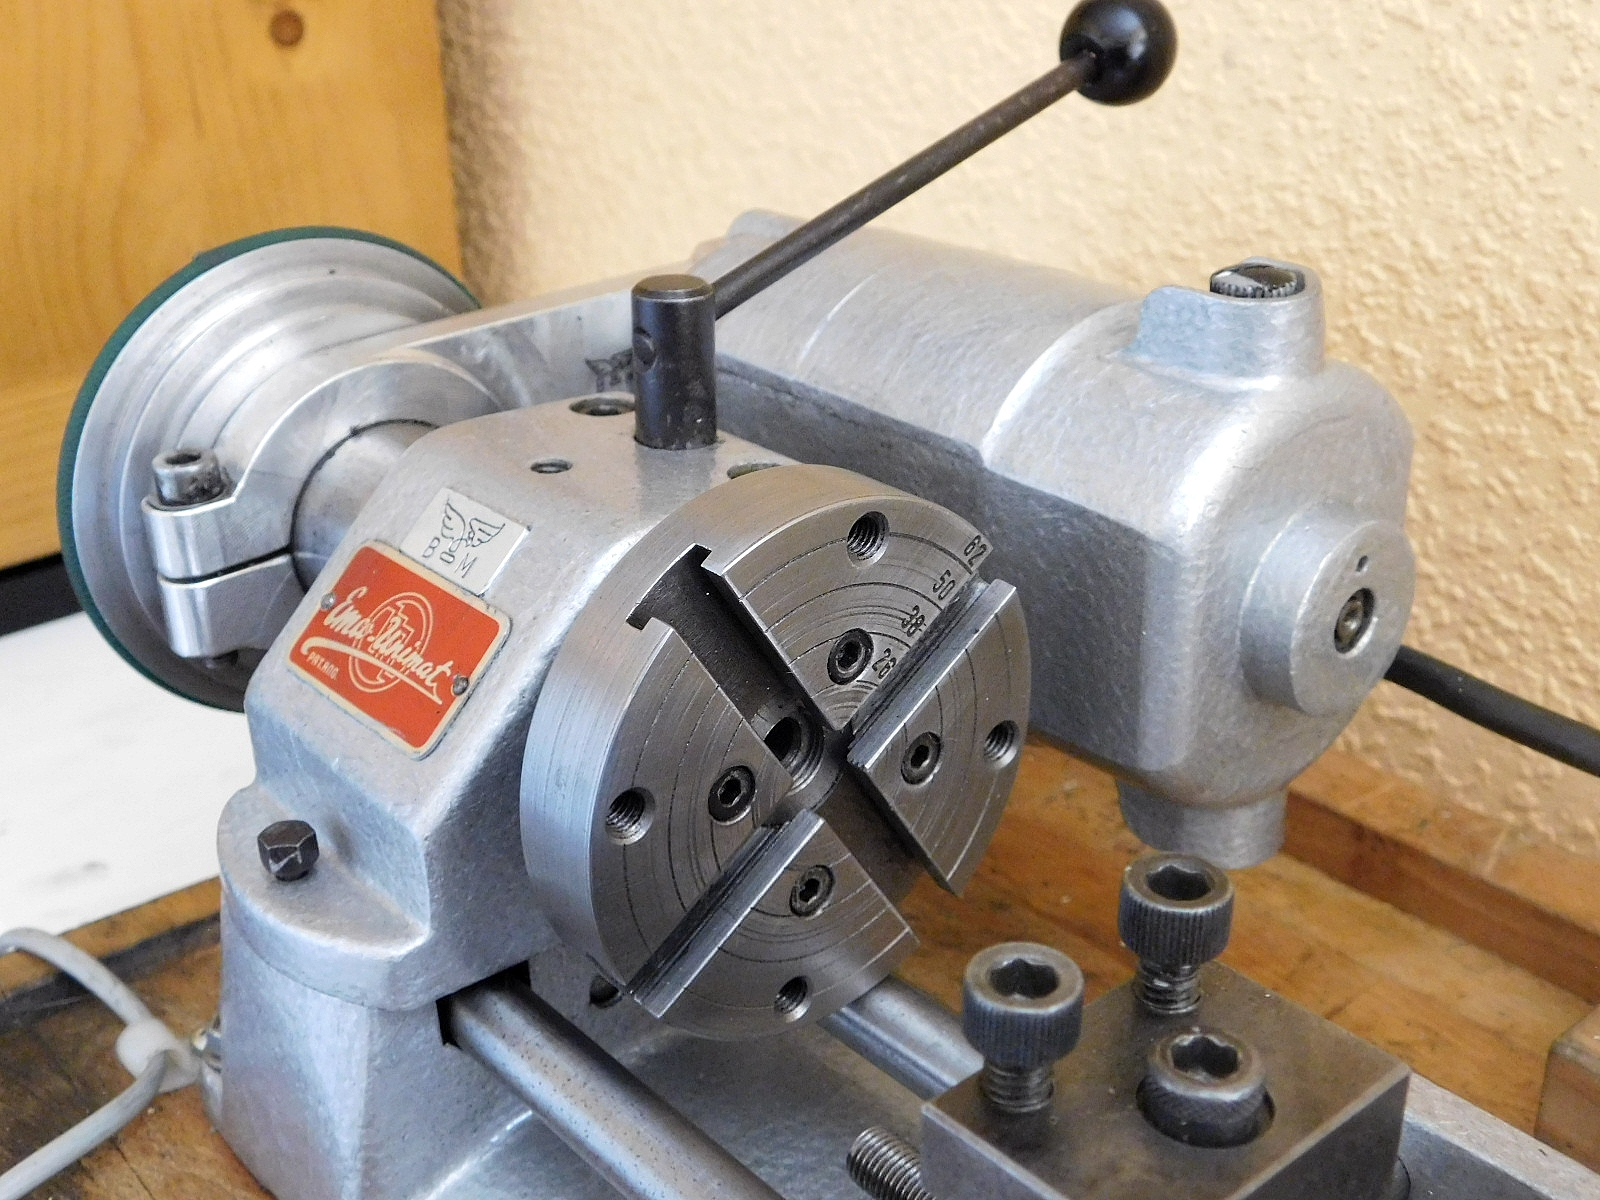
Bei dem Modell handelt es sich um die MK 4, das letzte Modell welches komplett in Grauguss gefertigt wurde. Die Handräder bestehen aus Aluminium-Guss mit Wespentaille-Griffen aus Stahl. Der Spindelstock wird über einen Stift arretiert. Der Sockel hat keine Grad-Einteilung wie die Späteren SL Maschinen.
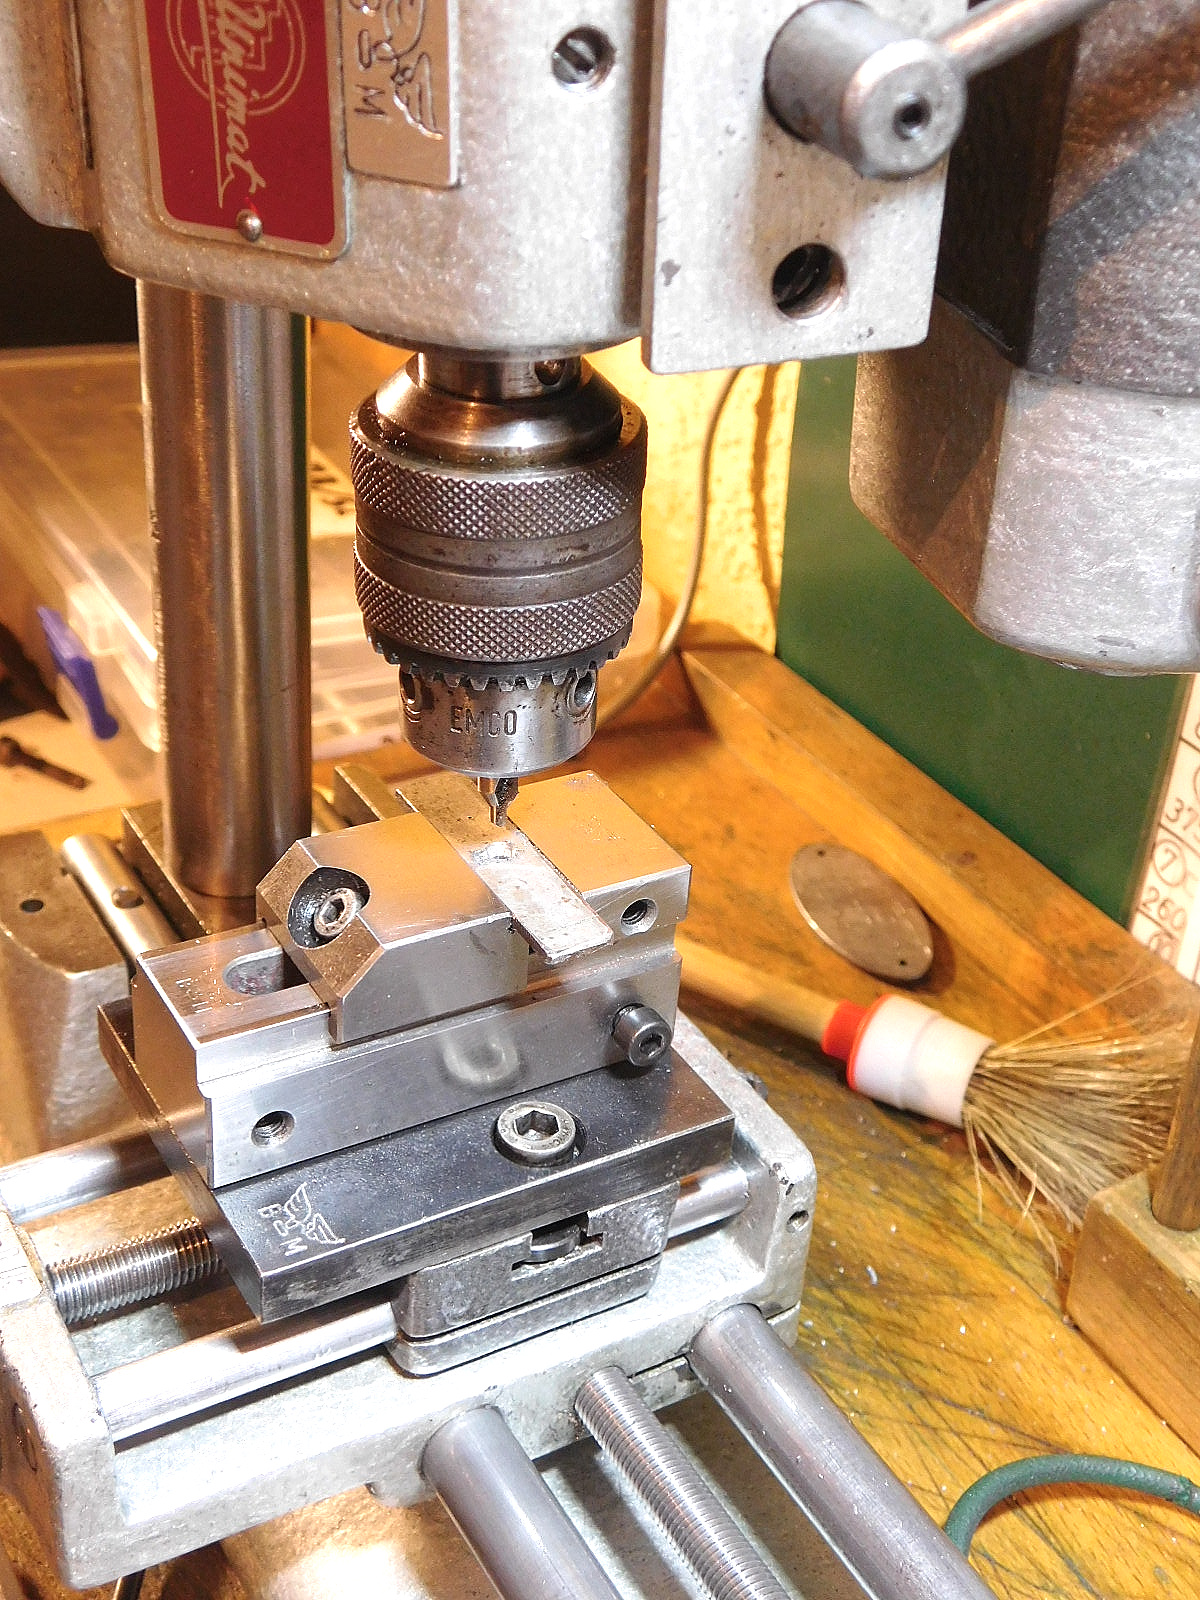
Bei der Maschine war kein Bohrfutter dabei, deshalb habe ich ein Bohrfutter mit 3/8" x 24 modifiziert. Ich habe statt des Zollgewindes ein M 12 x 1 Gewinde eingeschnitten und einen 12 mm Pass-Sitz eingedreht. Das Futter wurde im Anschluss mit 6,6 mm durchbohrt, so, können auch max. 6,5 mm Bohrer gespannt werden.
Die Riemen, welche dabei waren, taugten nur noch für die Tonne. Ich habe mir PU-Riemen-Material in Ø 4 mm bestellt. Daraus werde ich neue Riemen fertigen. Spätere Modelle hatten Riemenscheiben für Ø 5 mm Riemen. Ich habe solche auch hier ausprobiert, aber der Biege-Radius der kleinen Scheiben Beansprucht die Riemen sehr und gelegentlich reißen sie dann auch.
Die Spindel habe ich zerlegt und gereinigt. Die Lager bekamen neues Fett.
Beim originalen Drehfutter fehlten die Betätigungs-Stifte. Diese habe ich aus C 45 Stahl angefertigt.
So nach und nach werde ich nach Zubehör Ausschau halten oder selbst anfertigen.
My very first lathe was an Emco Unimat 3. For this machine I had all the accessories for metalworking.
Unfortunately, I have sold this machine.
I've been thinking about getting another little toy like this for my desk for a long time.
I bought an Emco Unimat very cheaply on the internet.
The model is the MK 4, the last model that was made entirely of grey cast steel. The handwheels are made of cast aluminium with steel wasp-waist handles. The headstock is locked by a pin. The base has no degree graduation like the later SL machines.
The machine did not come with a drill chuck, so I modified a 3/8" x 24 drill chuck. I cut an M 12 x 1 thread instead of the inch thread and screwed in a 12 mm fitting seat. The chuck was then drilled with 6.6 mm, so that max. 6.5 mm drills can also be clamped.
The belts that came with it were only good for the bin. I ordered PU belt material in Ø 4 mm. I will use it to make new belts. Later models had pulleys for Ø 5 mm belts. I tried them here too, but the bending radius of the small pulleys puts a lot of strain on the belts and occasionally they break.
I disassembled and cleaned the spindle. The bearings got new grease.
The original chuck was missing the operating pins. I made them out of C 45 steel.
So by and by I will look for accessories or make them myself.
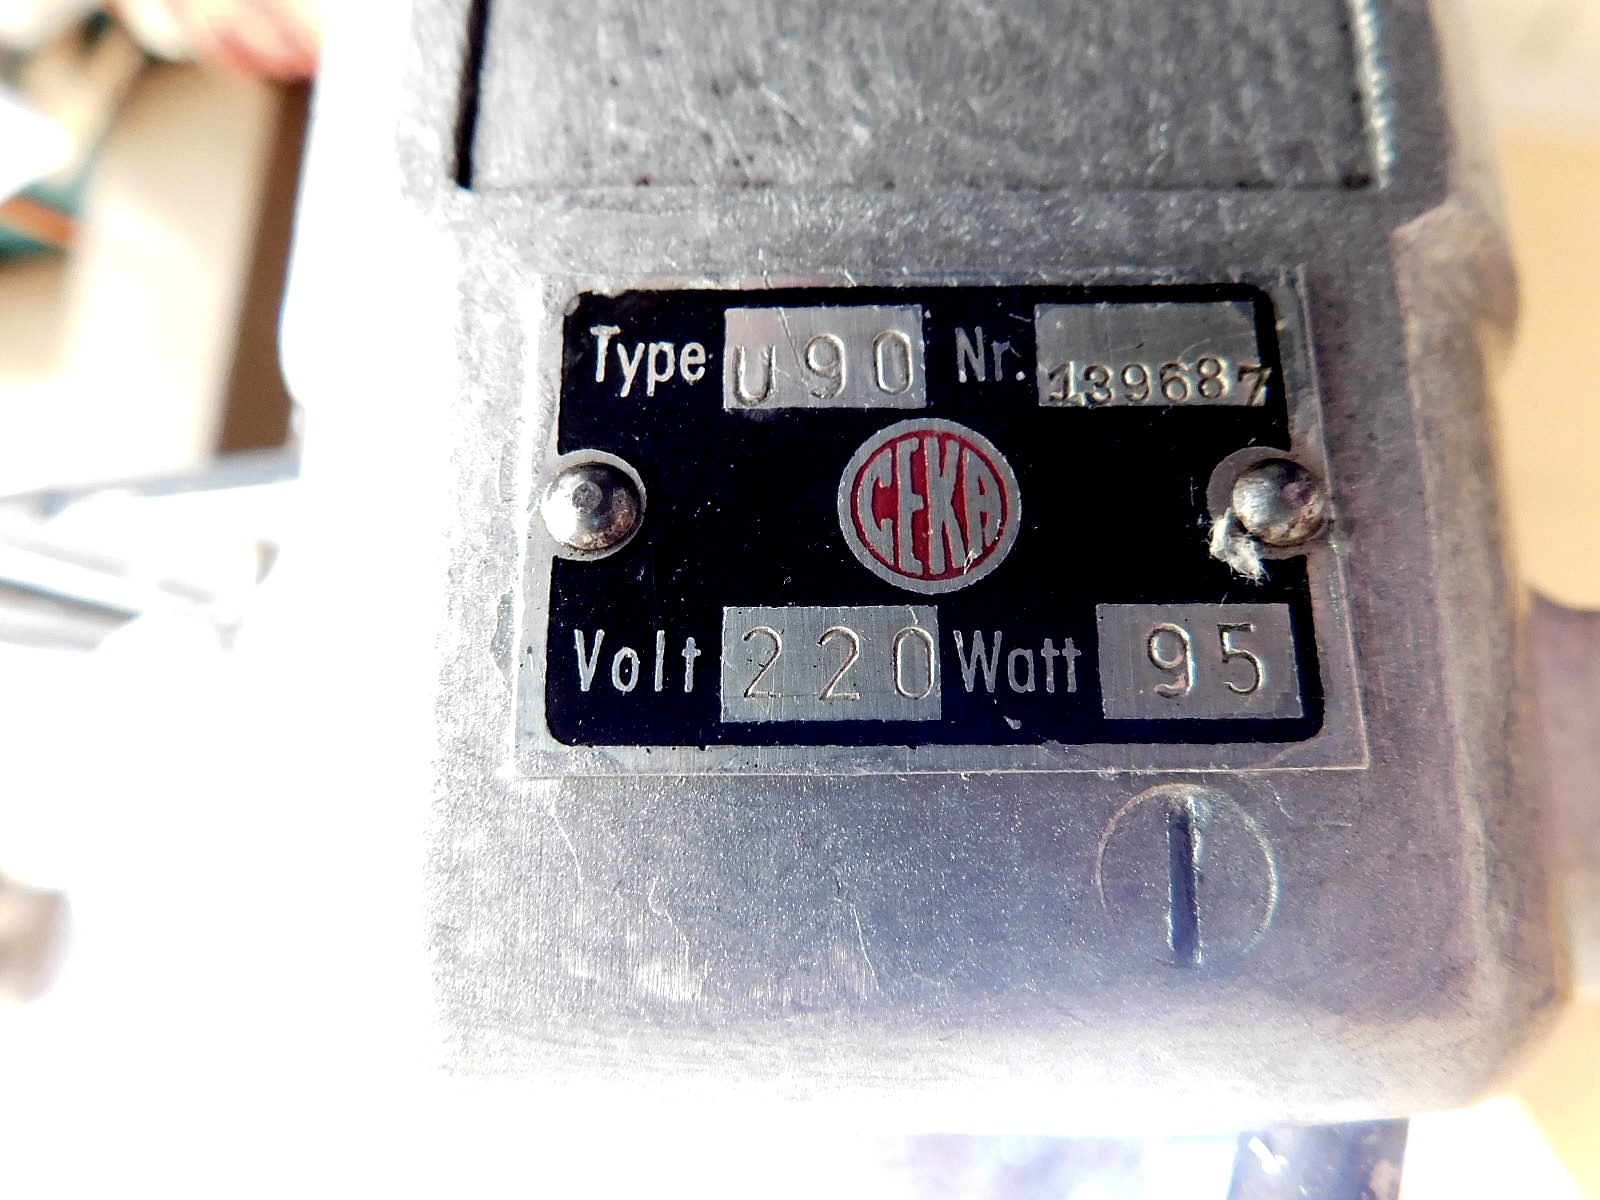
 Das Typenschild weist auf eine Maschine, welche für den amerikanischen Markt gefertigt wurde.
The nameplate indicates a machine that was manufactured for the American market.
Mehr zu den Typenschildern finden sie unter-
You can find more about the nameplates under-
 Die selbst gefertigten Betätigungsstifte für das Drehfutter.
The self-made clamping pins for the lathe chuck.
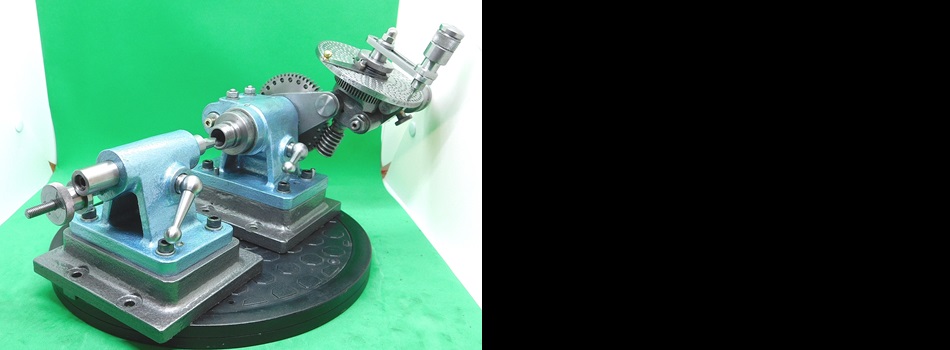
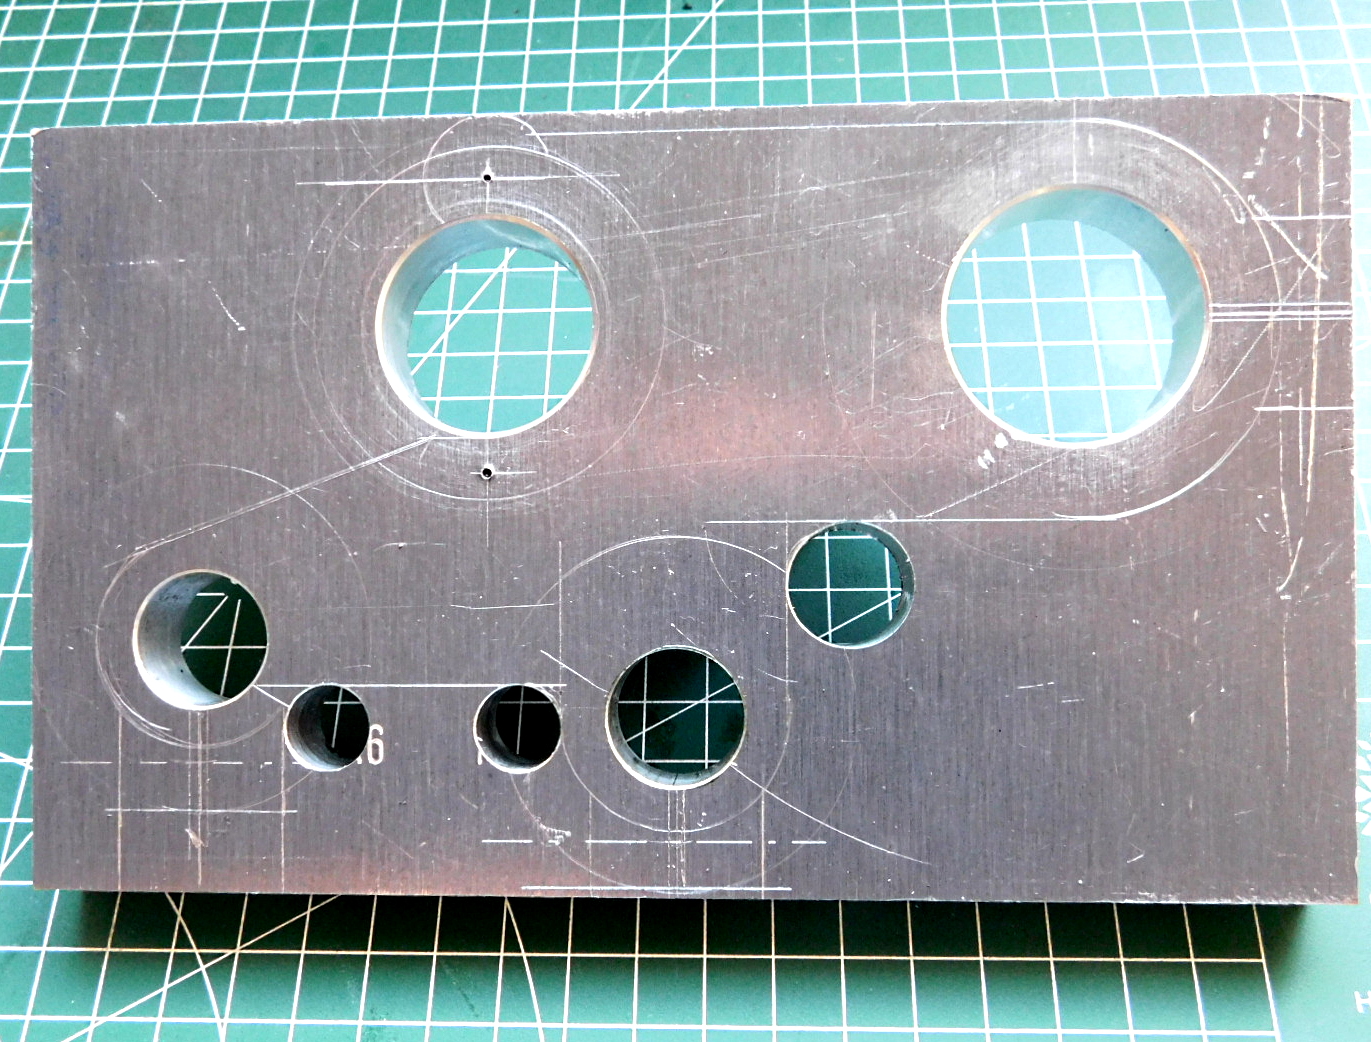
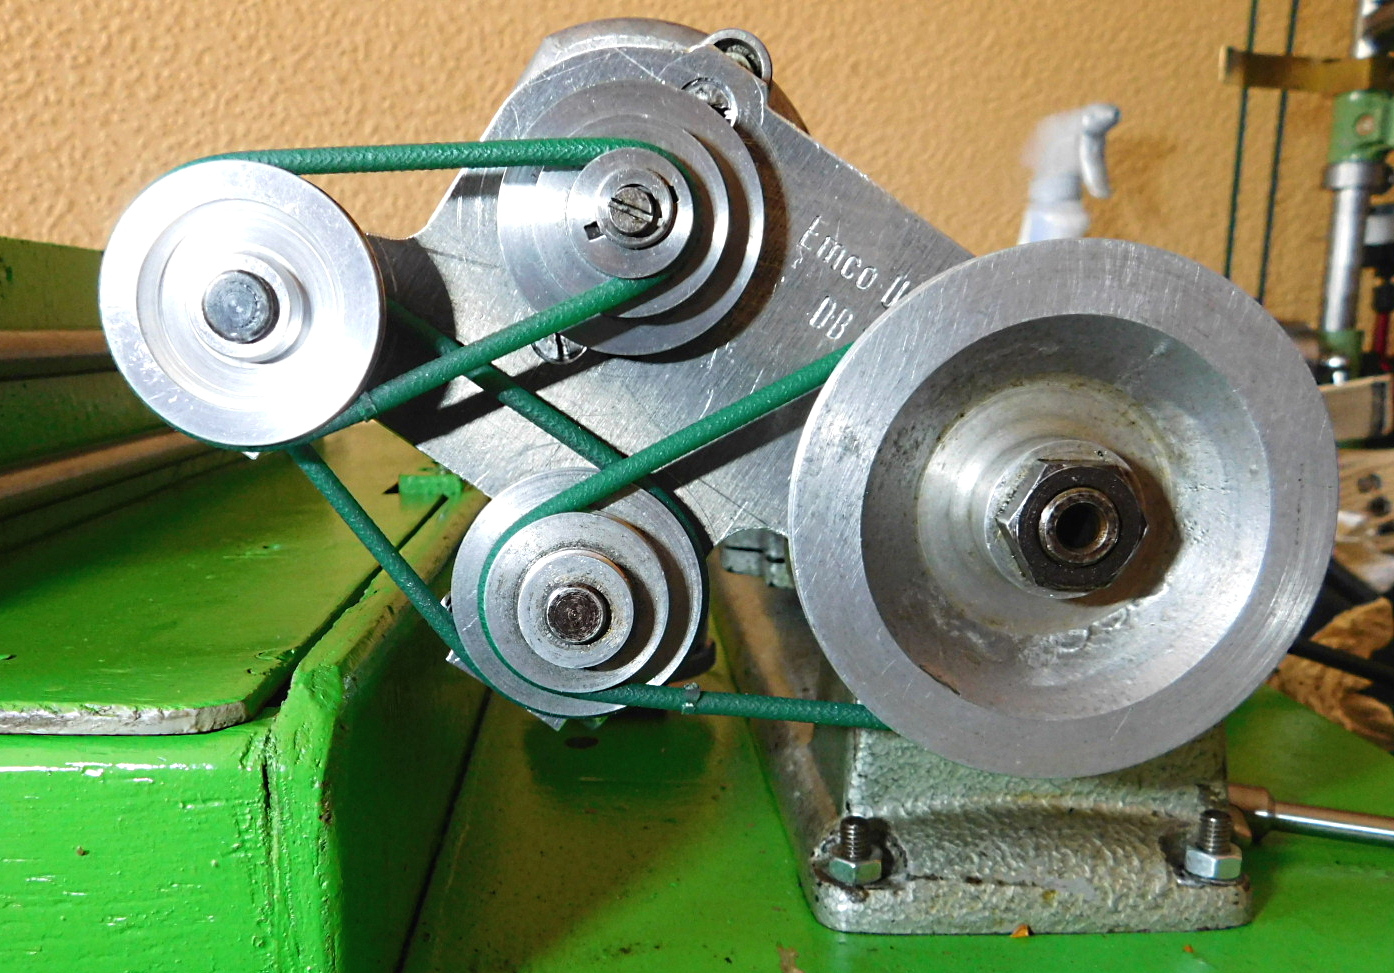
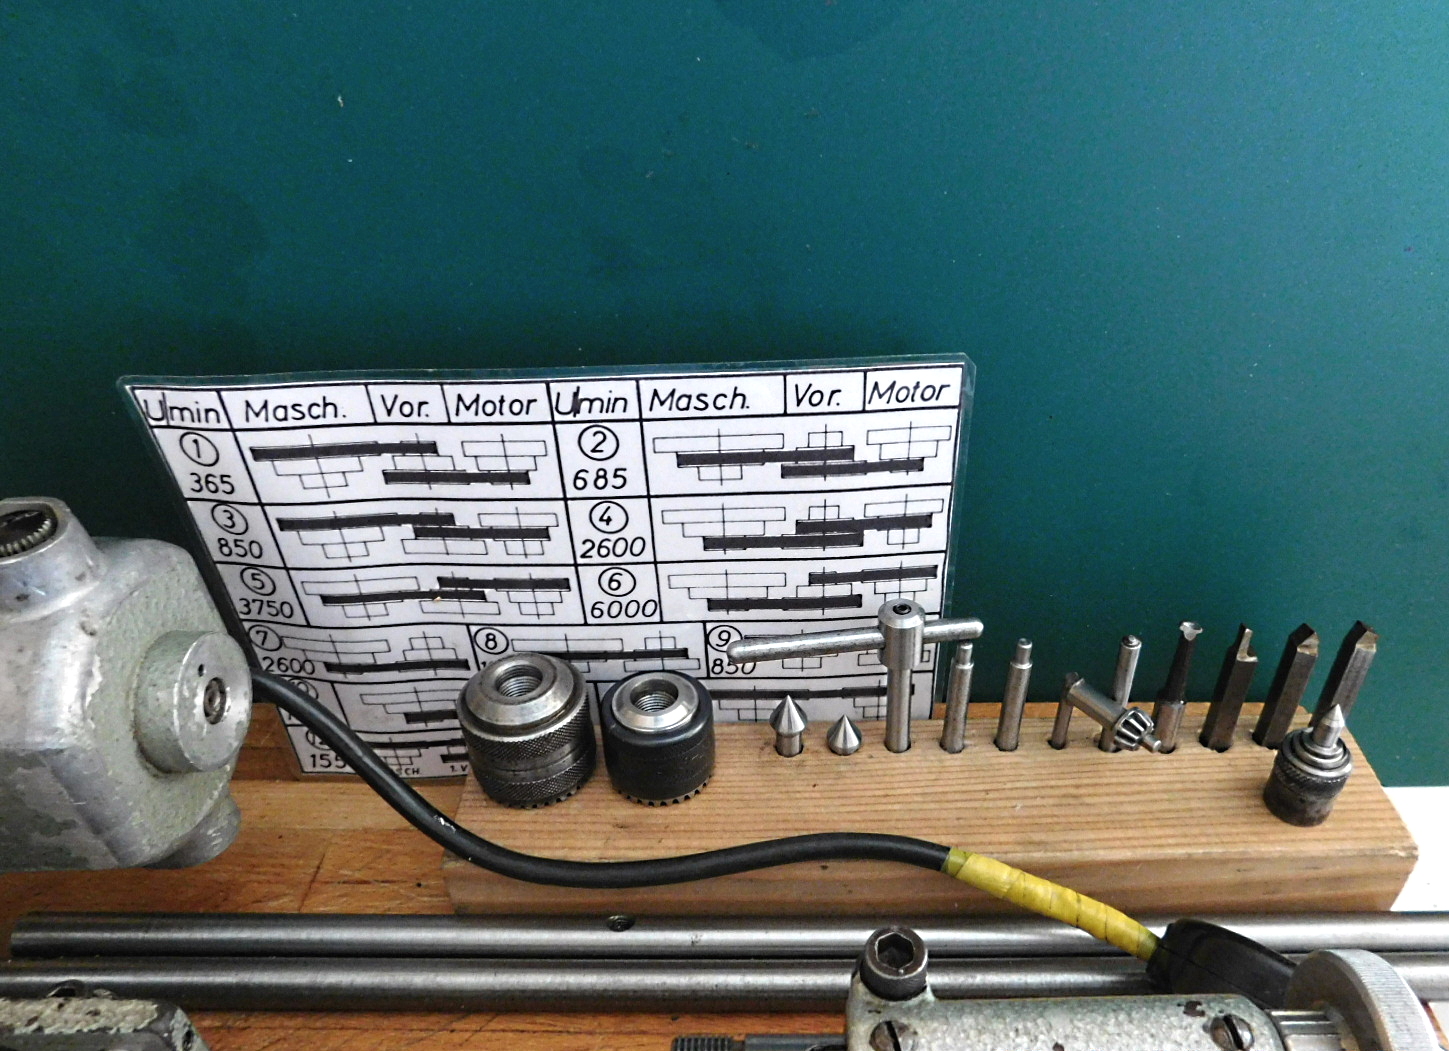
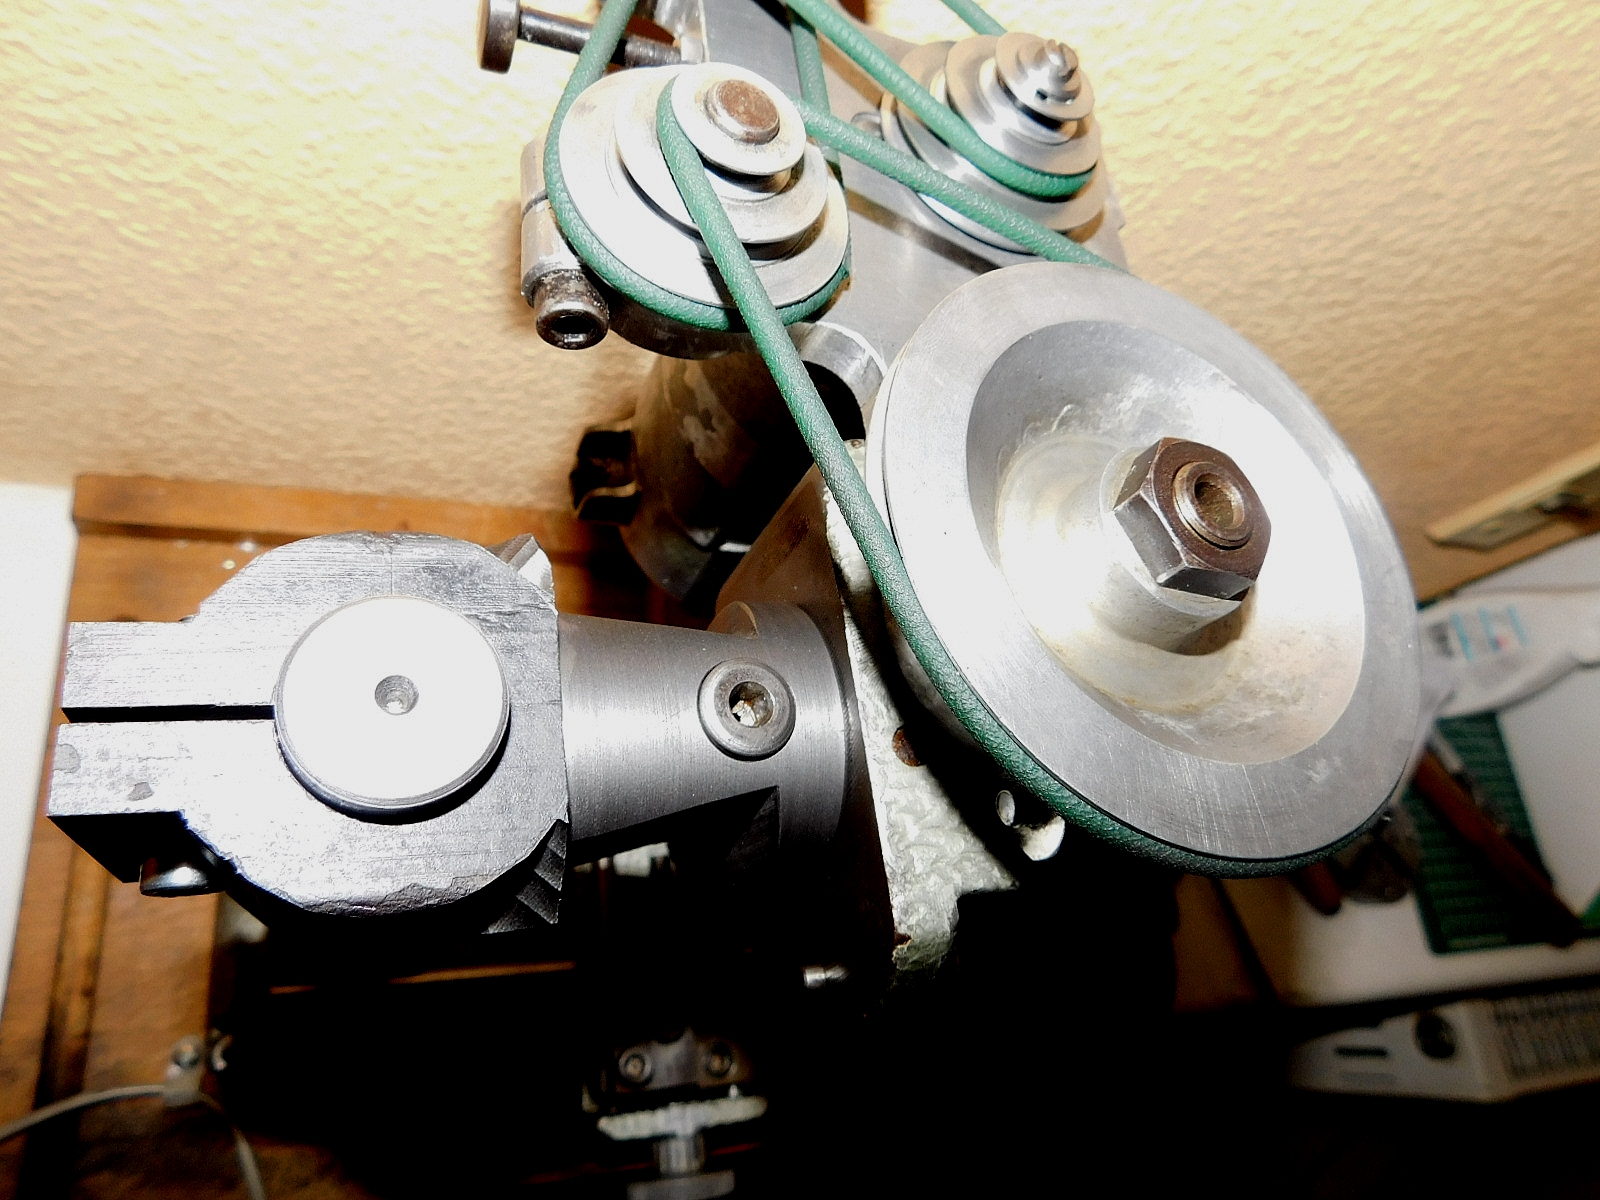
Für die Emco Unimat gab es als Zubehör ein Reduziergetriebe, mit dem die Drehzahl nochmals auf 155 U/min reduziert werden konnte.
Dieses Zubehör gibt es kaum mehr zu erwerben. Wenn man dann mal so ein Teil auf einer Auktionsplattform finden, dann verlangen die Verkäufer unglaubliche Preise dafür.
Ich hab mich dazu entschlossen so ein Getriebe nachzubauen.
Eine Aluplatte mit einer Dicke von 15 mm war die Grundlage. Von einem freundliche User habe ich eine Zeichnung der einzelnen Lochabstände erhalten.
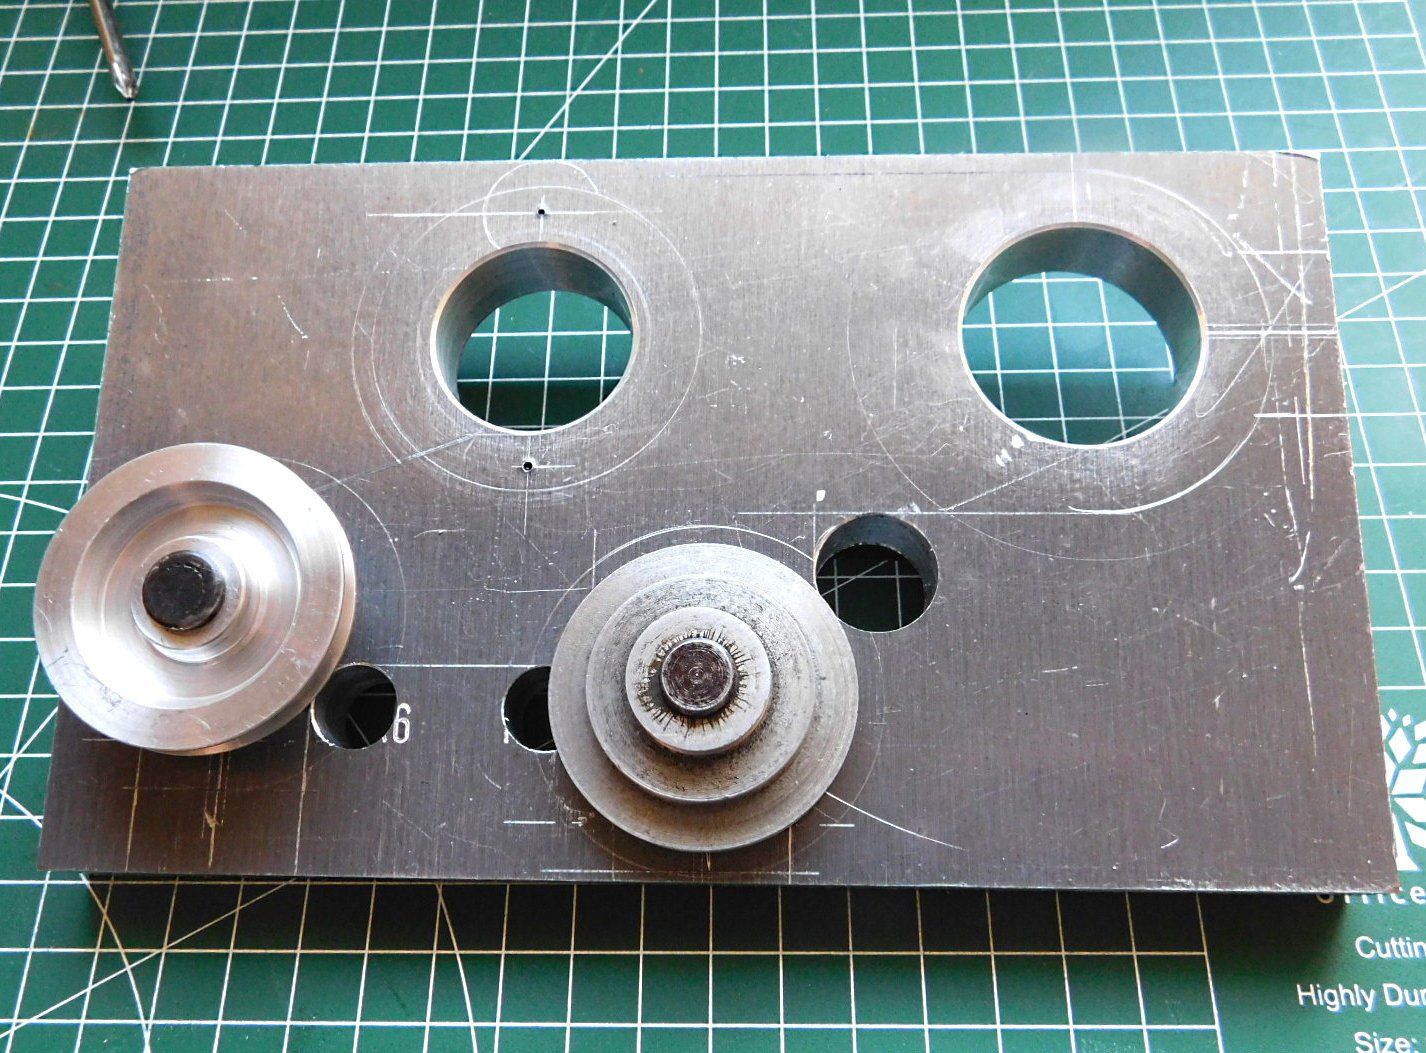
Heute habe ich schon mal los gelegt. Die Aufnahmebohrungen für den Motor und die Befestigungsbohrung für die Spindel wurden mit einem Ausbohrkopf genau gefertigt. Ebenso die Aufnahmebohrungen für die zwei Riemenscheiben.
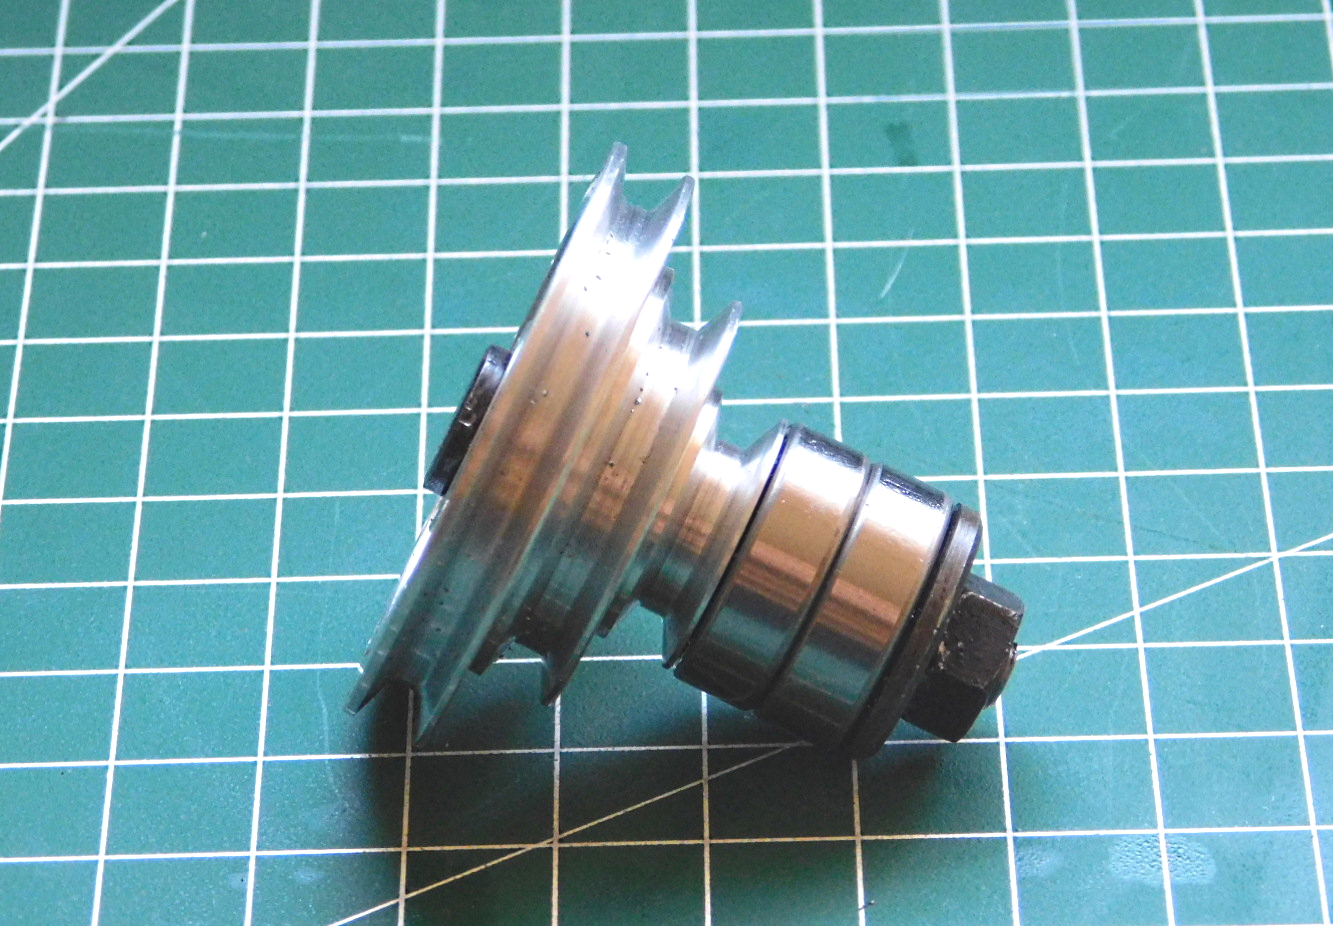
Eine zusätzliche Riemenscheibe mit Kugellager habe ich nach der vorhandenen Riemenscheibe angefertigt. Die Kugellager haben die Abmessung 6x19x6 mm (Innendurchmesser-Außendurchmesser-Höhe).
Die Achse habe ich aus 42 Cr Mo 4 Stahl gefertigt.
For the Emco Unimat, a reduction gear was available as an accessory, with which the speed could be reduced again to 155 rpm.
These accessories are hardly available any more. If you find such a part on an auction platform, the sellers ask unbelievable prices for it.
I decided to rebuild such a gearbox.
An aluminium plate with a thickness of 15 mm was the basis. A friendly user gave me a drawing of the individual hole distances.
Today I started to work on it. The mounting holes for the motor and the mounting holes for the spindle were made exactly with a boring head. The same goes for the holes for the two pulleys.
I made an additional pulley with ball bearings according to the existing pulley. The bearings have the dimensions 6x19x6 mm (inner diameter-outer diameter-height).
I made the axle from 42 Cr Mo 4 steel.
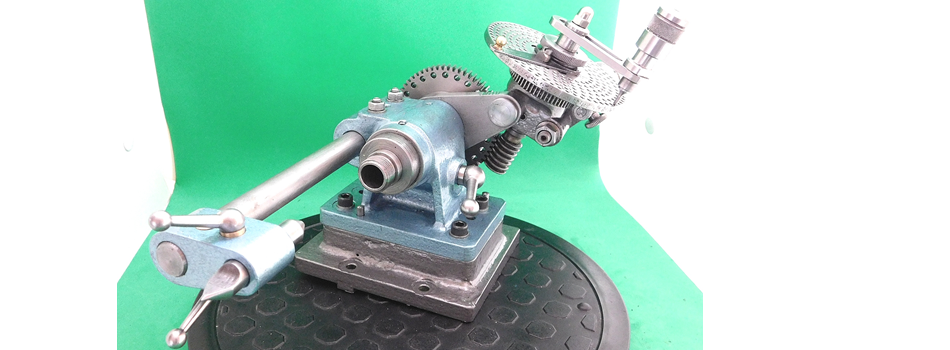
 Die endgültige Außenkontur ist zu erkennen.
The final outer contour can be seen.
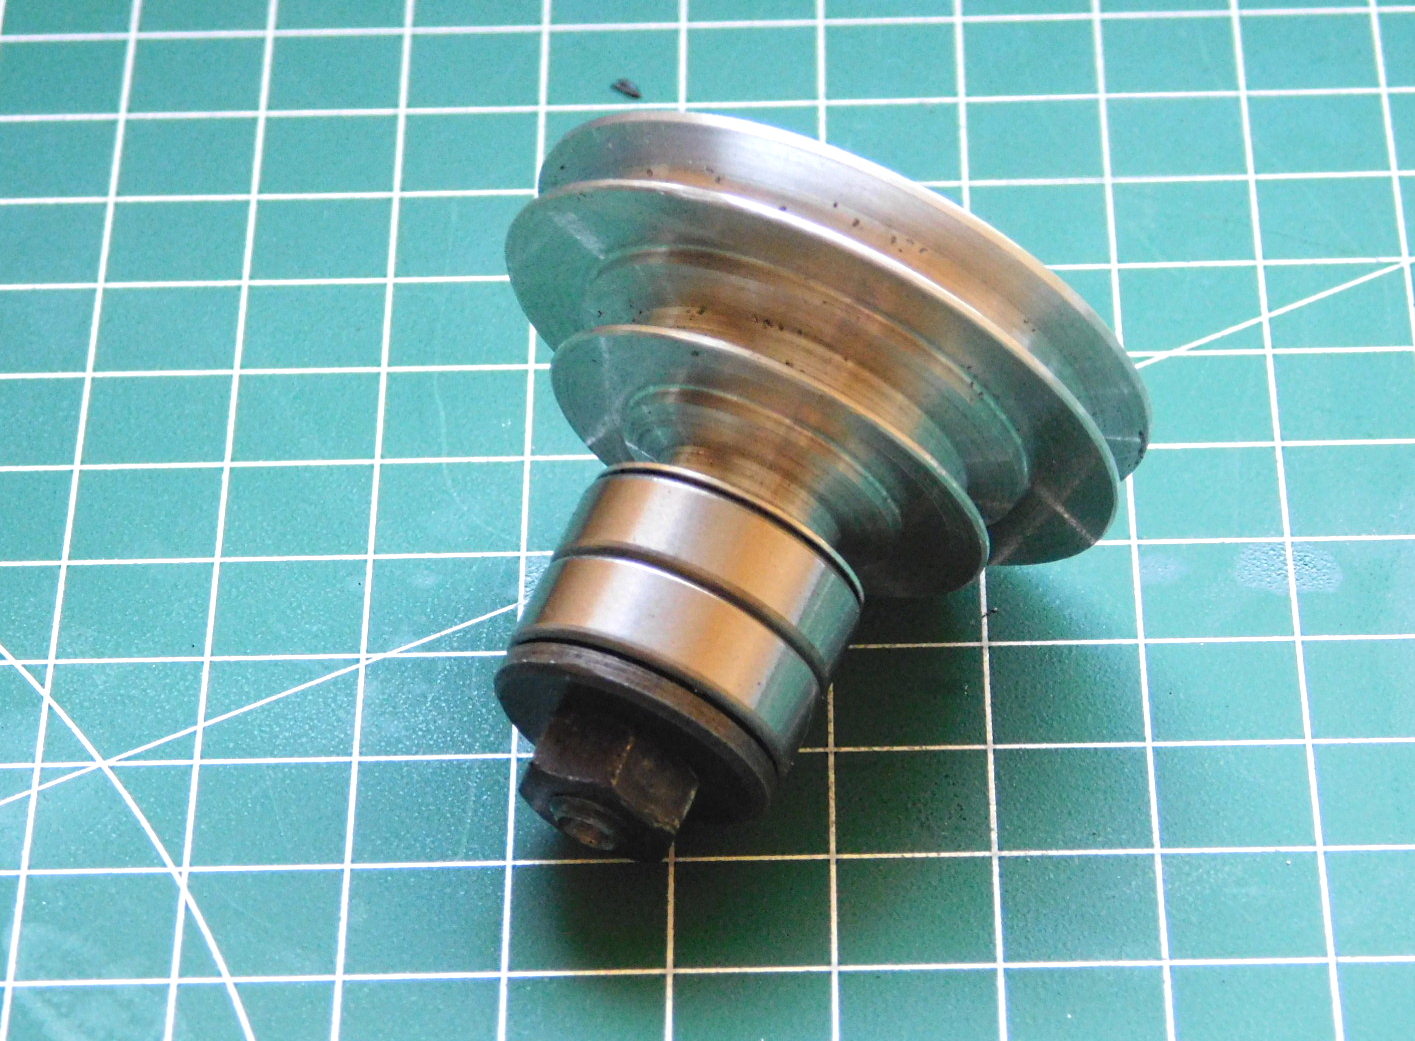
 Links ist das nachgebaute Riemenrad.
Rechts ist das originale Riemenrad.
On the left is the rebuilt belt pulley. On the right is the original belt pulley.
 Das nachgebaute zusätzliche Riemenrad.
The rebuilt additional belt wheel.
 Die Achse habe ich aus 42CrMo4 Stahl gefertigt.
The axle is made of 42 Cr Mo 4 steel.
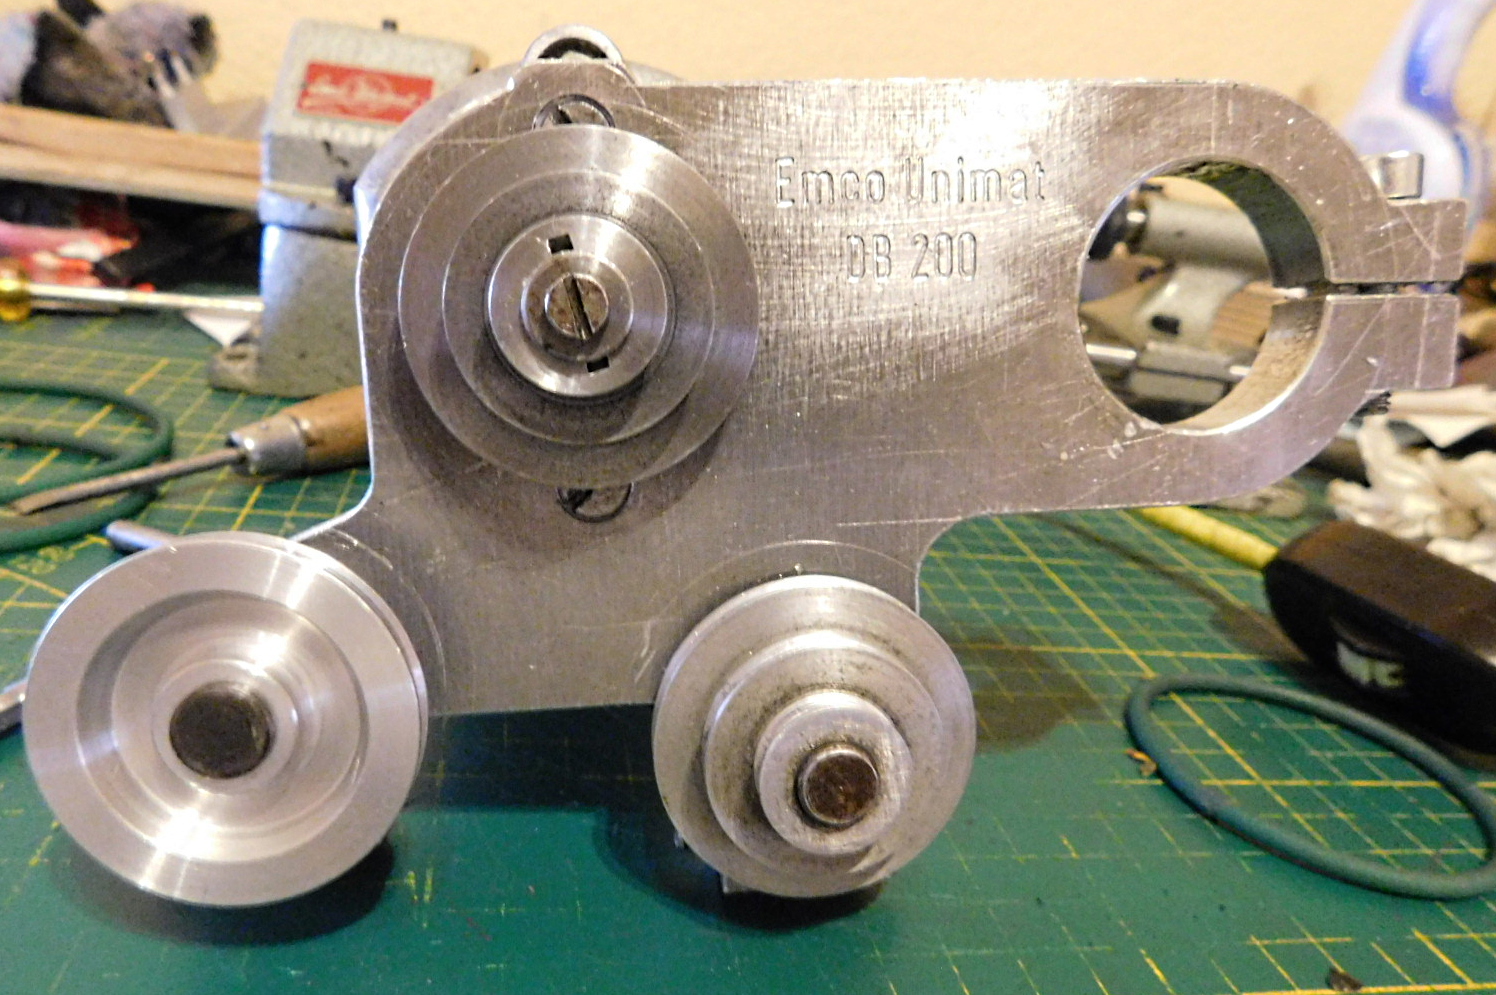
Die Vorgelege -Platte ist nun fertig und eingebaut.
Mittlerweile ist auch das Riemenmaterial angekommen.
Die Platte wurde montiert, das Riemenmaterial wurde abgelängt und verschweißt.
Unten sehen sie die Bilder des fertigen zweistufigen Vorgeleges für die Emco Unimat.
The transmission plate is now finished and installed.
In the meantime, the belt material has also arrived.
The plate was mounted, the belt material was cut to length and welded.
The pictures of the finished two-stage transmission for the Emco Unimat are shown below.
 Die Außenkontur habe ich im Bereich der Motoraufnahme etwas verändert um einen geschlossenen Rahmen zu erhalten.
I changed the outer contour in the area of the engine mount to get a closed frame.
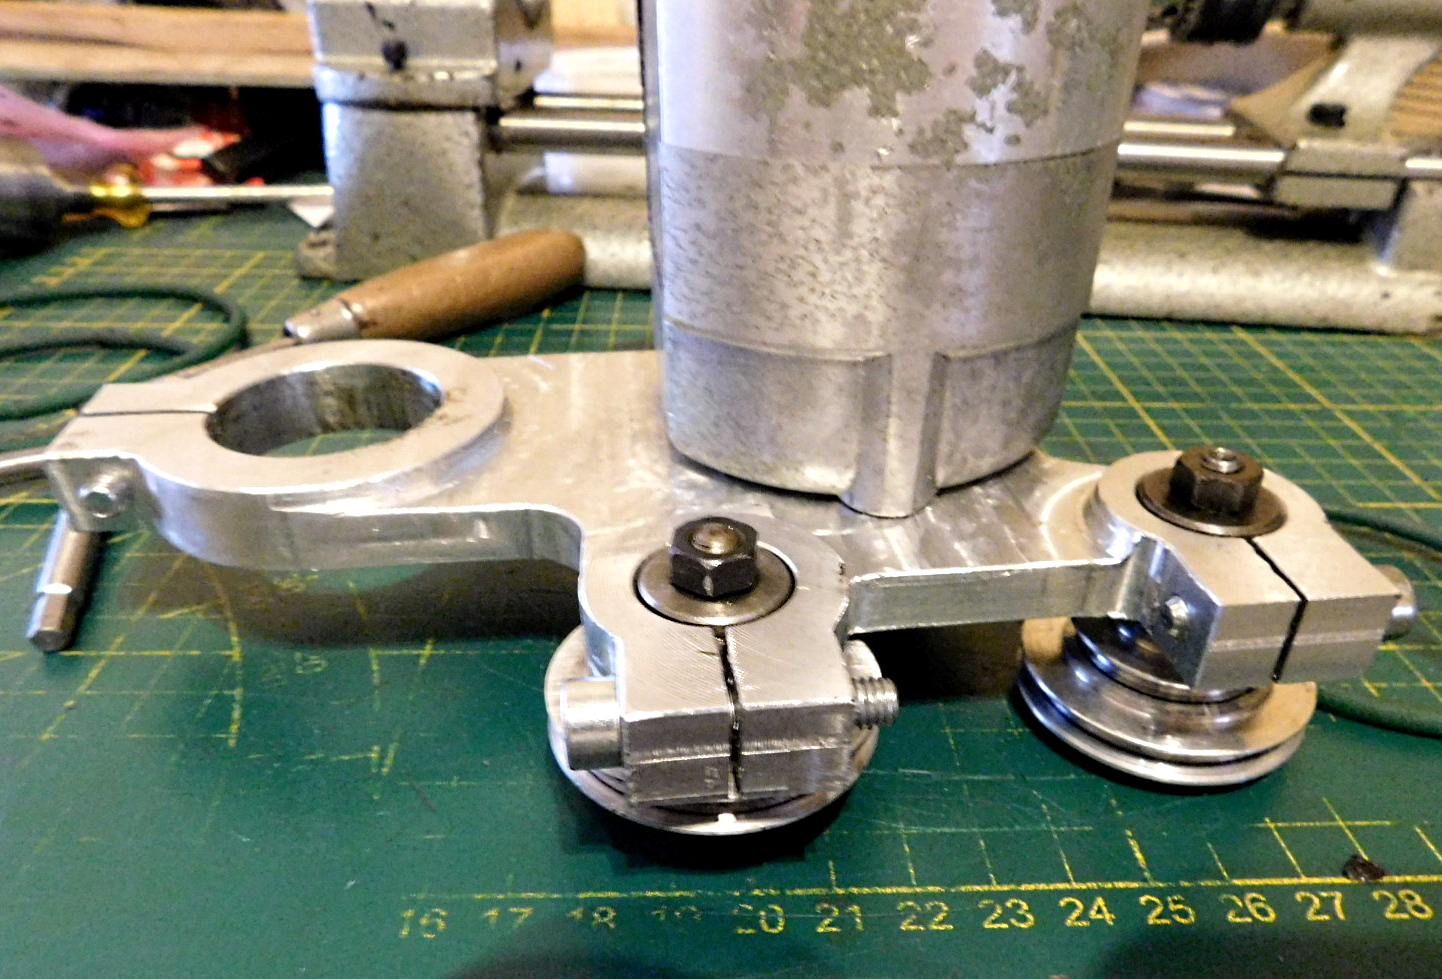 Die Vorgelege-Platte wurde auf der Rückseite im Bereich der Klemmungen auf eine Stärke von 13 mm und am Montagepunkt vom Motor auf 9 mm abgefräst.
The transmission plate was milled to a thickness of 13 mm on the rear side in the area of the clamps and to 9 mm at the mounting point of the motor.
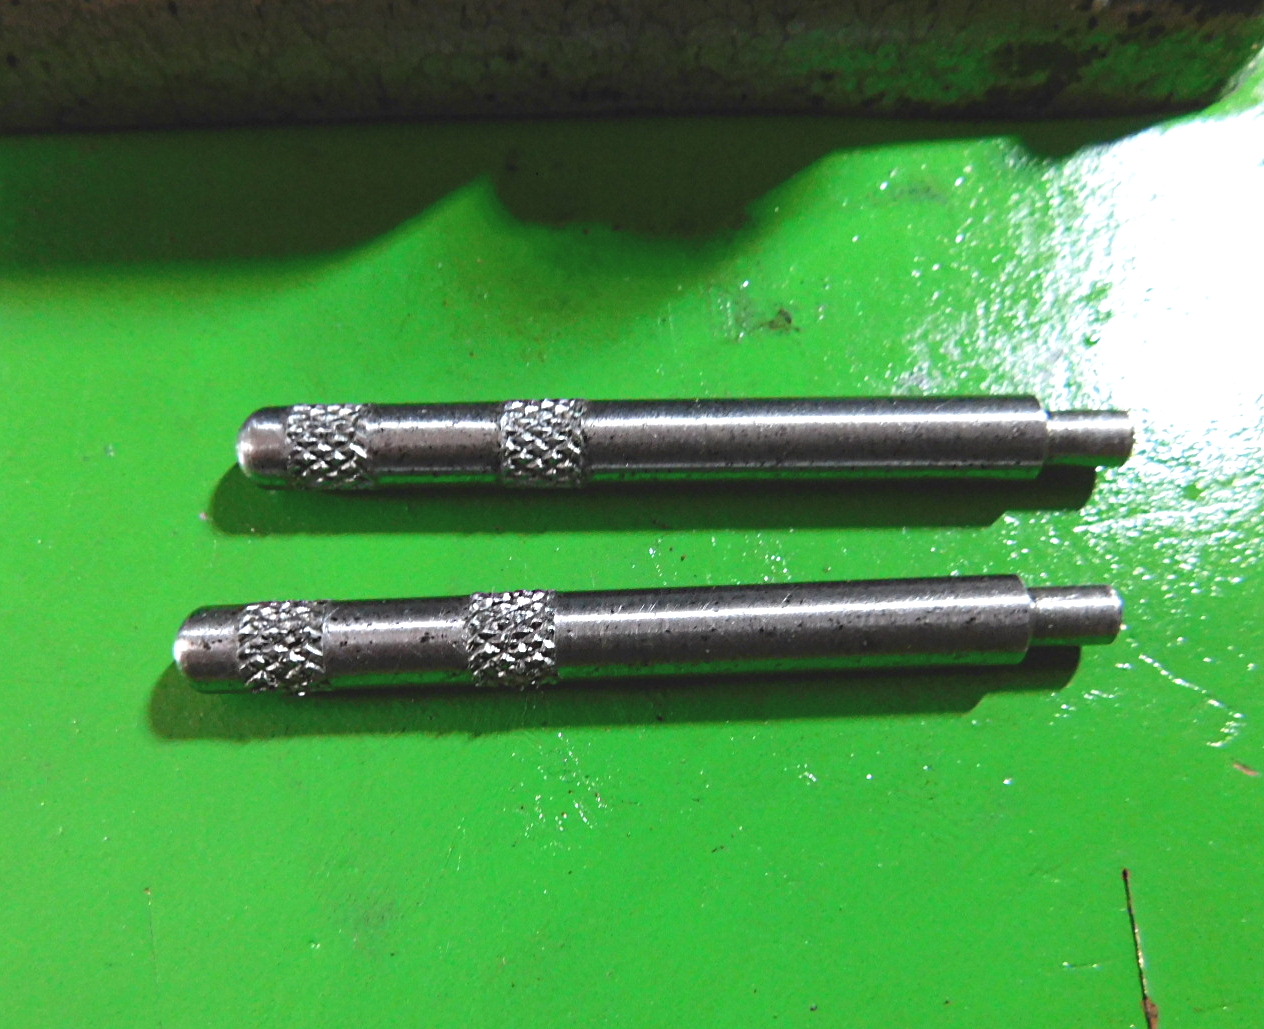
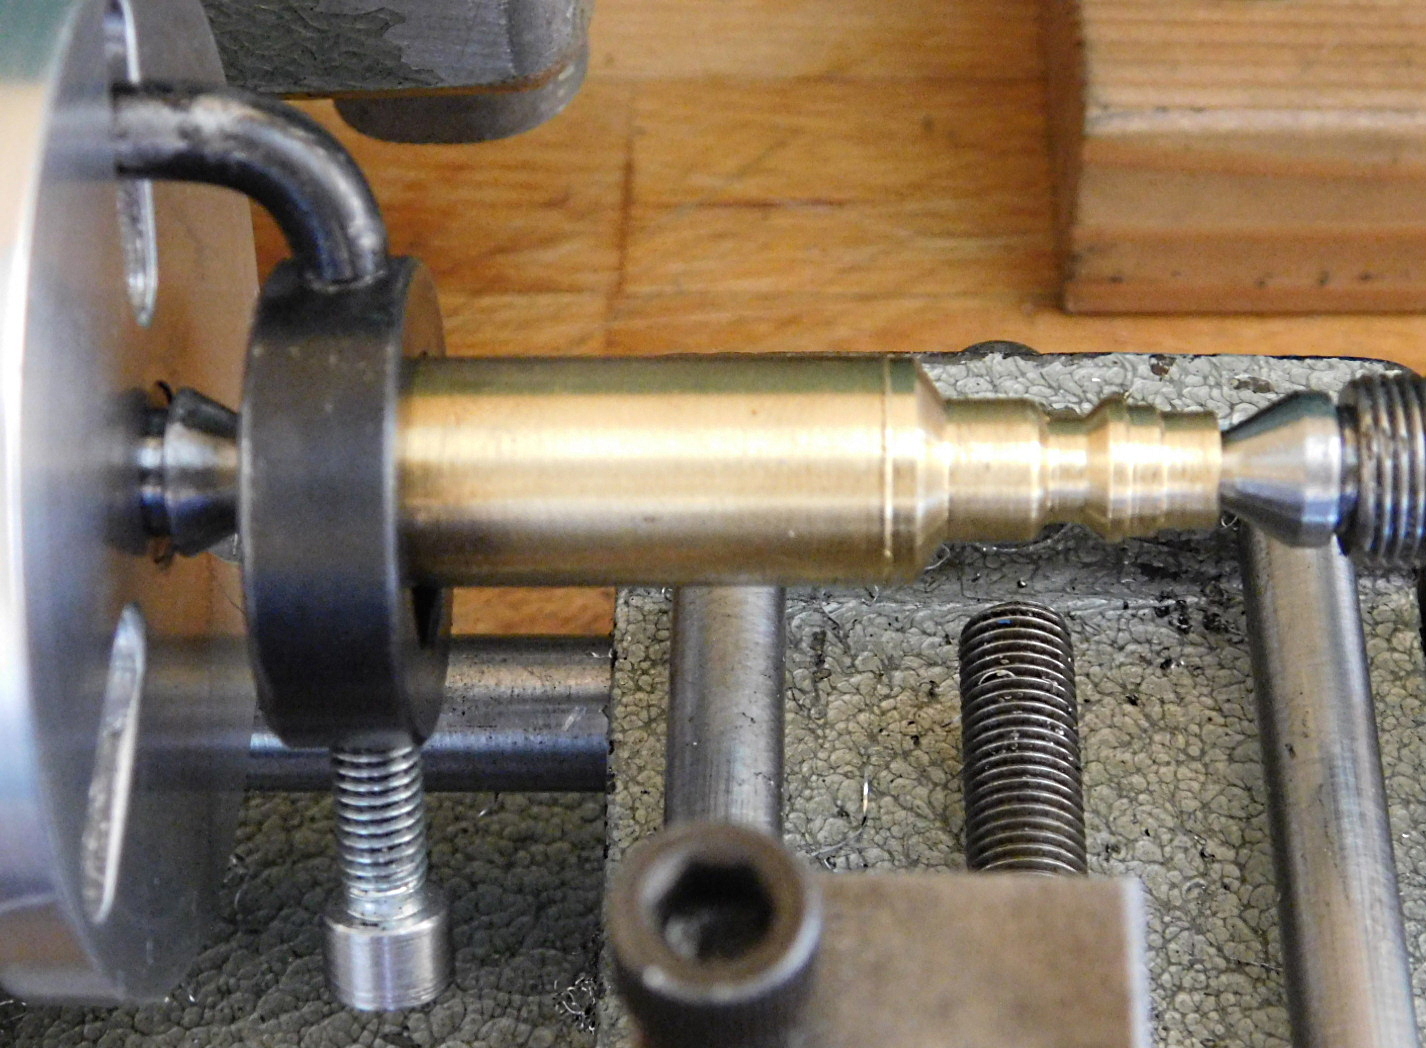
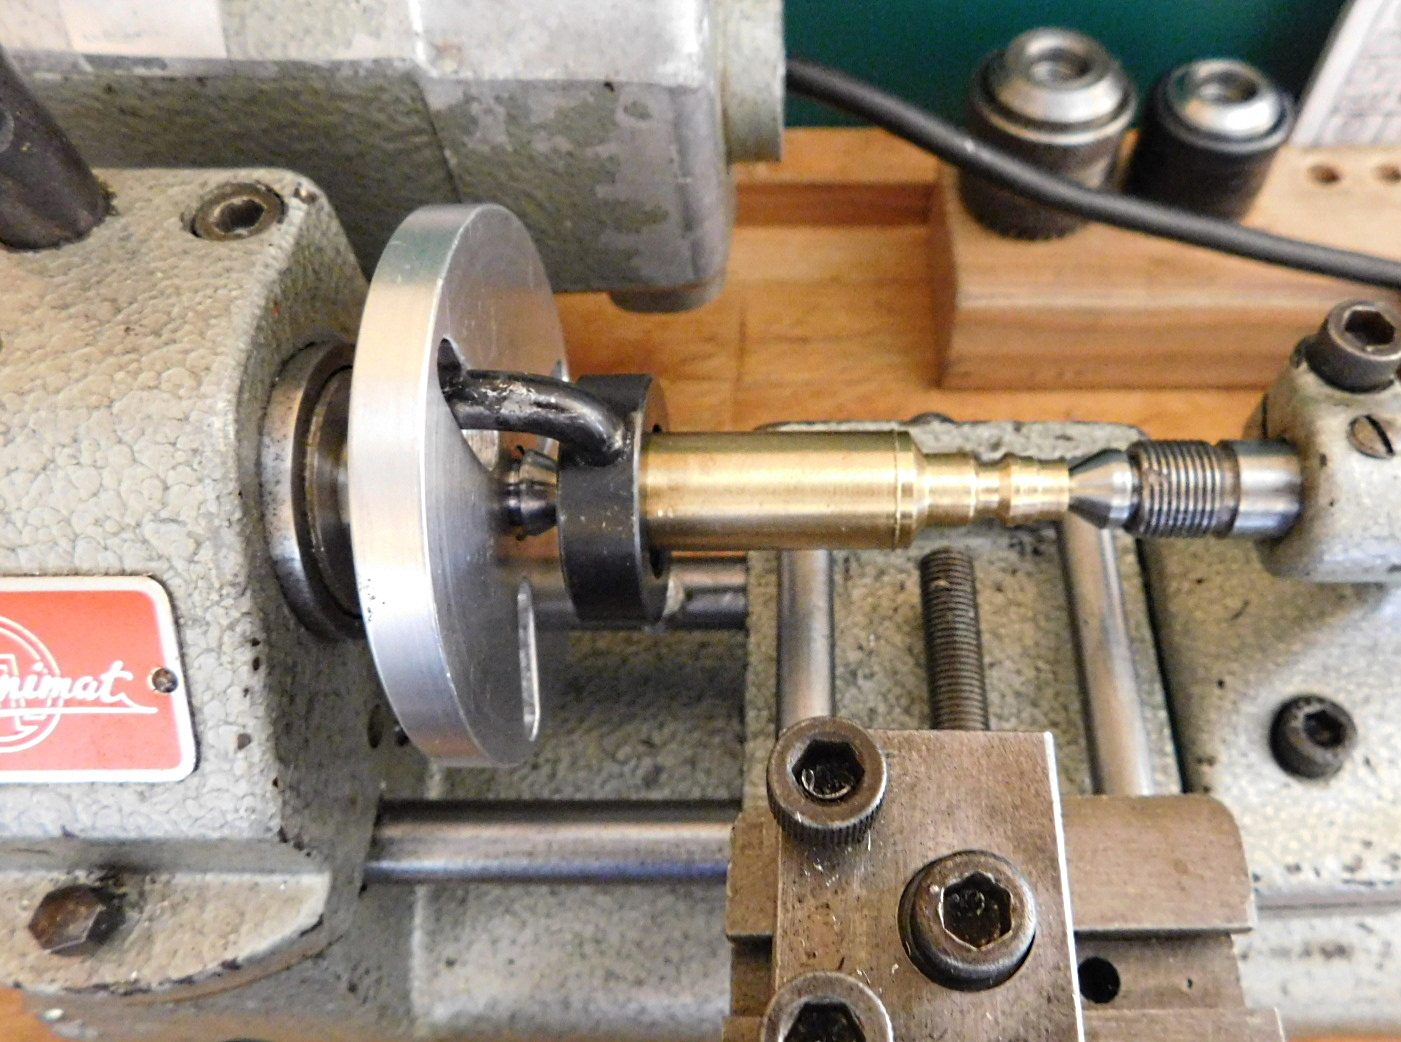
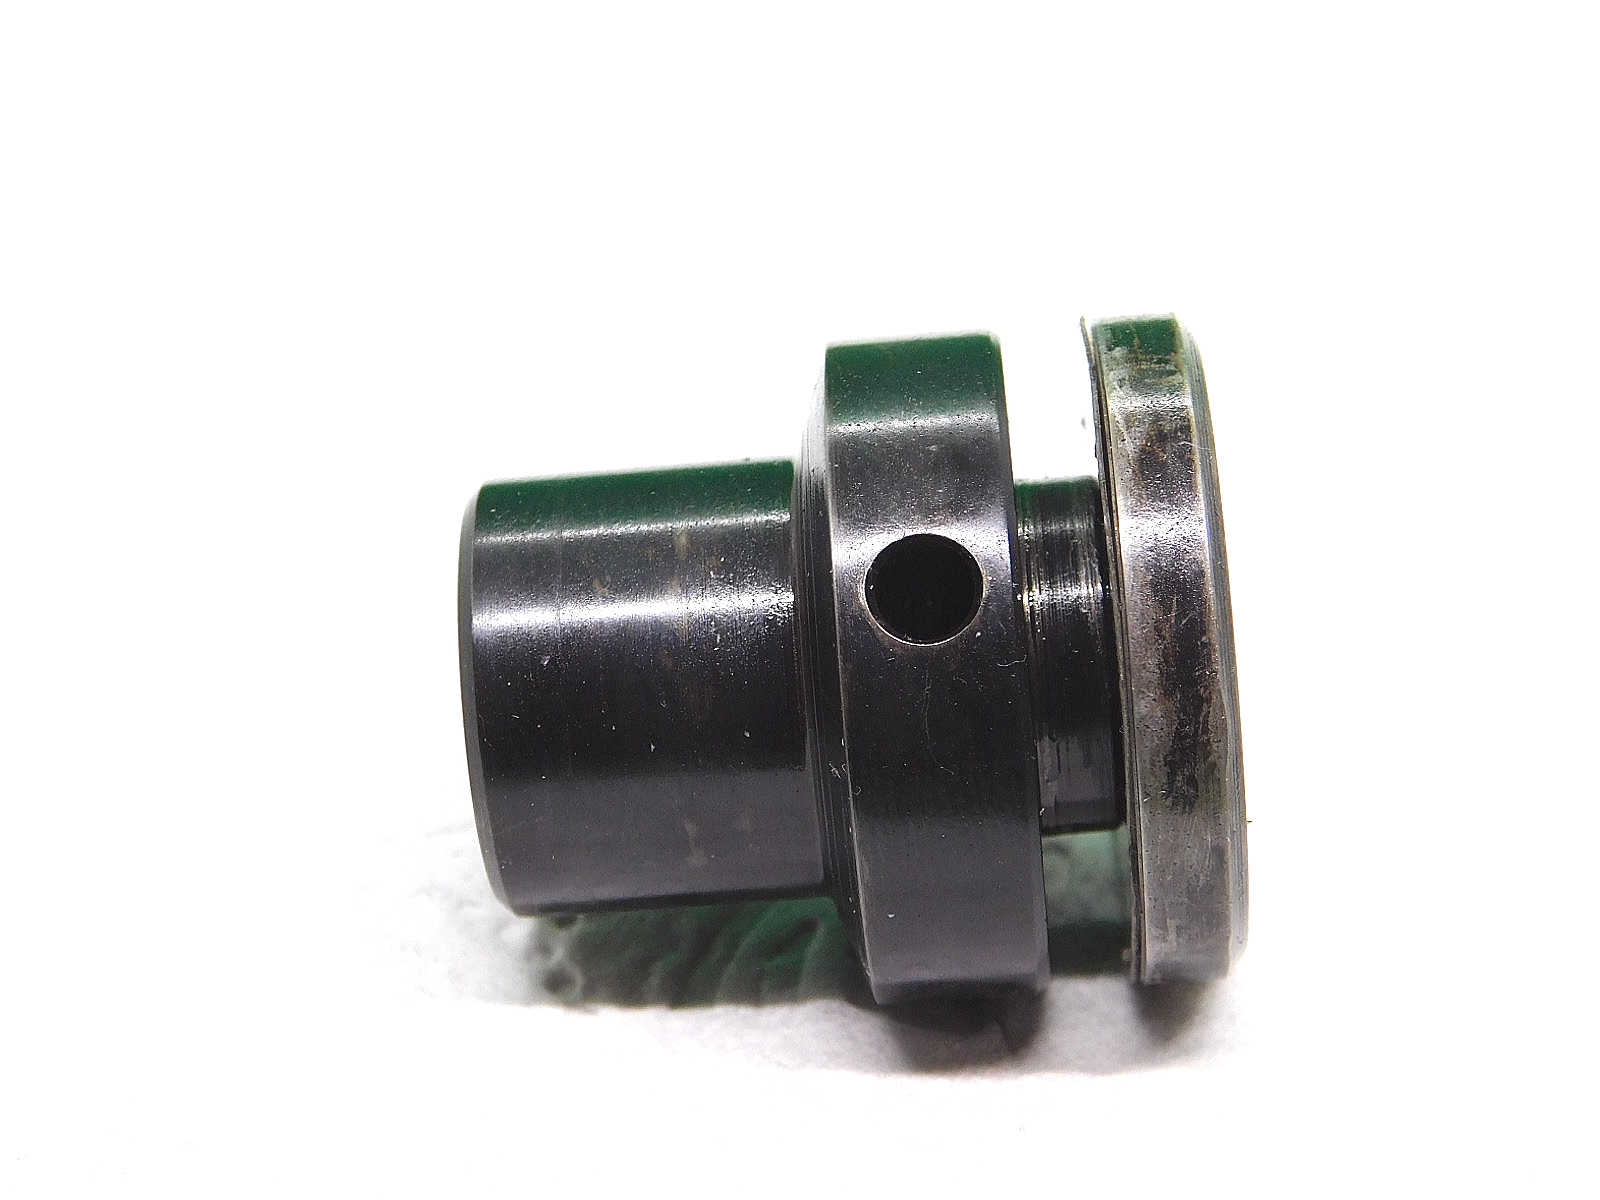
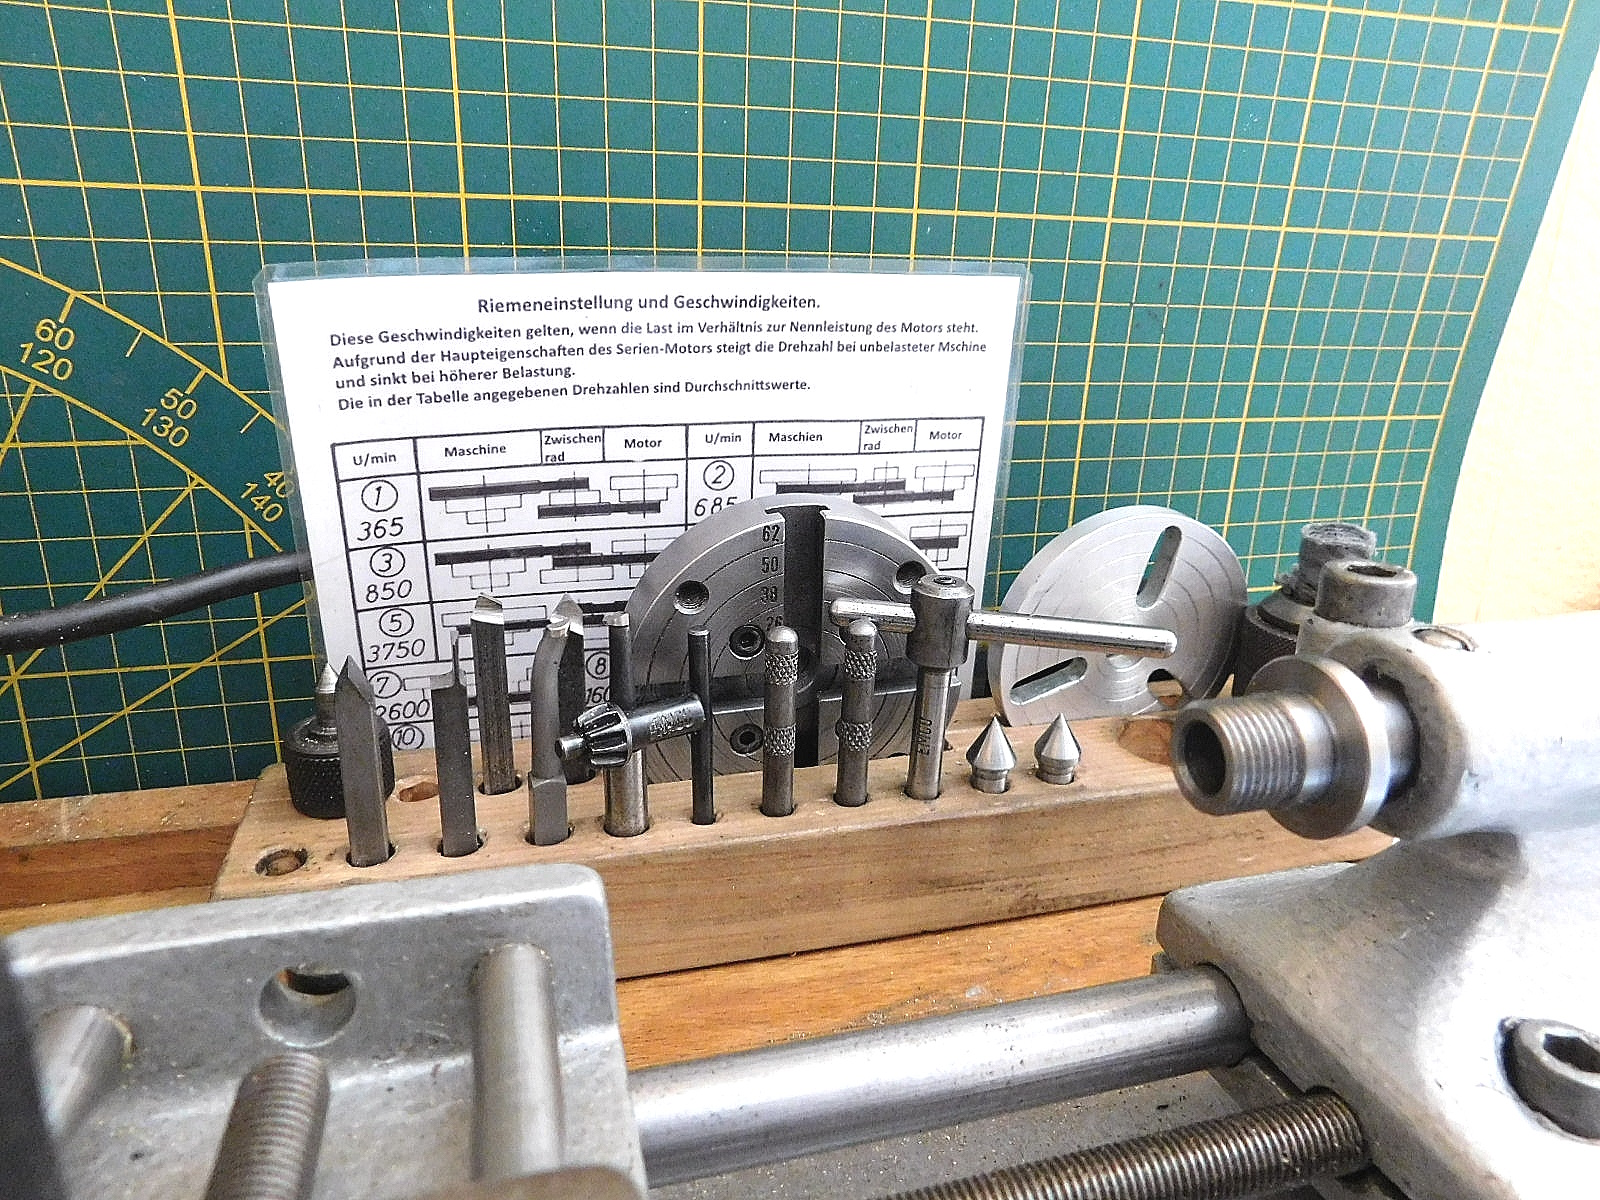
Für die kleine Unimat habe ich zwei feste Spitzen angefertigt.
Ausgangsmaterial war 42 Cr Mo 4 Stahl. Nach dem Drehen wurden die Spitzen gehärtet und im Anschluss auf der Unimat-Spindel geschliffen. So ist der Absolute Rundlauf gewährleistet.
Der Schaftdurchmesser beträgt 7,2 mm und der kleine Kurzkegel hat einen Gesamtwinkel von 40 Grad.
I made two fixed centers for the small Unimat.
The starting material was 42 Cr Mo 4 steel. After turning, the centers were hardened and then ground on the Unimat spindle. This ensures absolute concentricity.
The shank diameter is 7.2 mm and the small short taper has a total angle of 40 degrees.
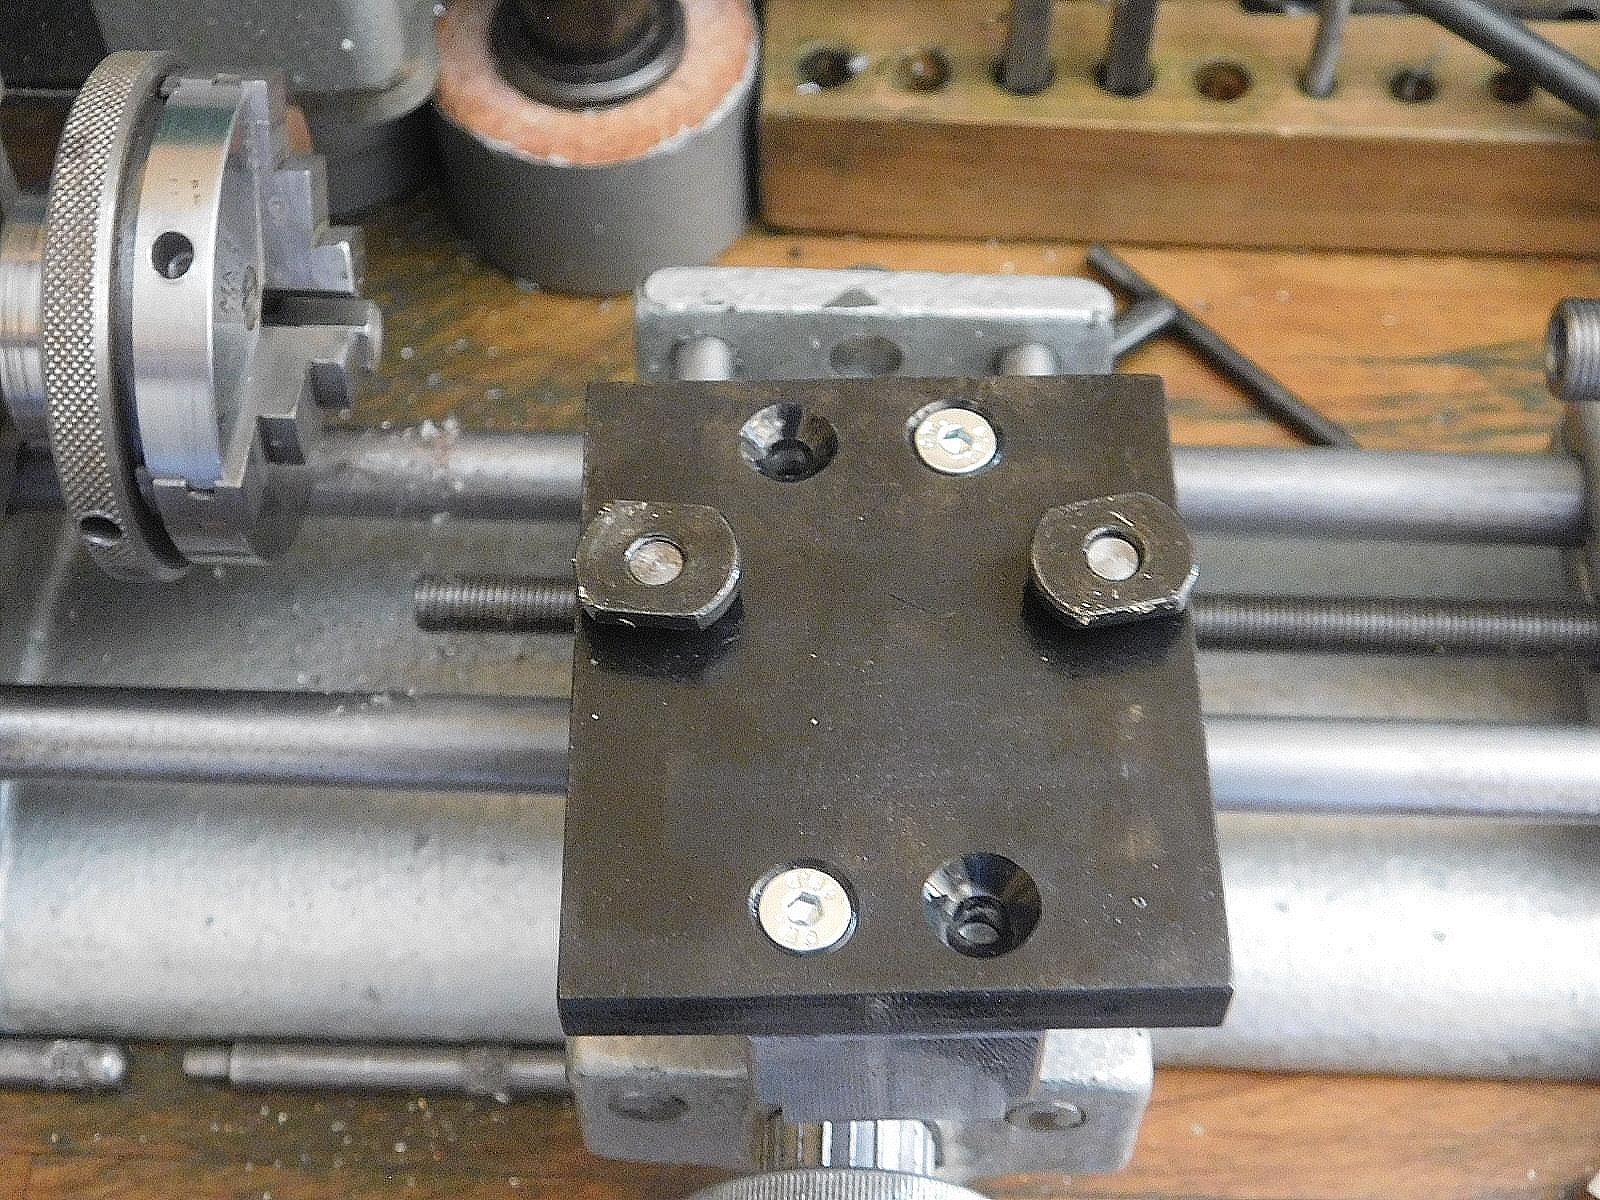
 Der Block mit den Zubehörteilen ist abnehmbar.
The block with the accessories is removable.
Ein ausrangiertes Schneidebrett aus Buchenholz wurde die neue Grundplatte.
A discarded beech wood cutting board became the new base plate.
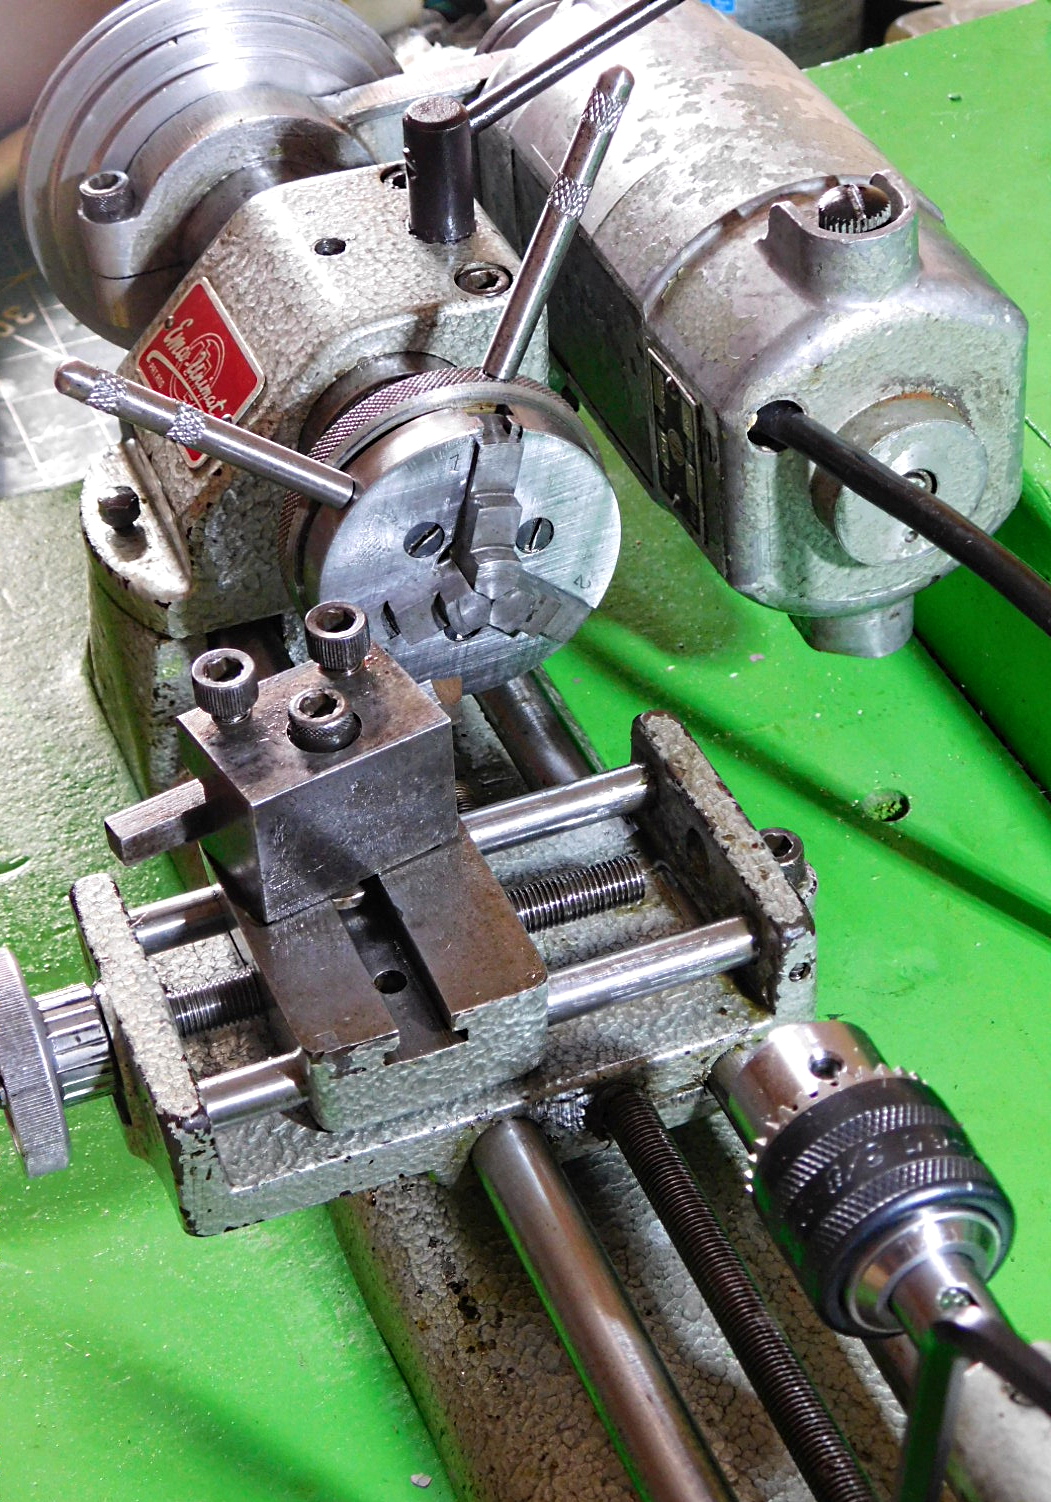
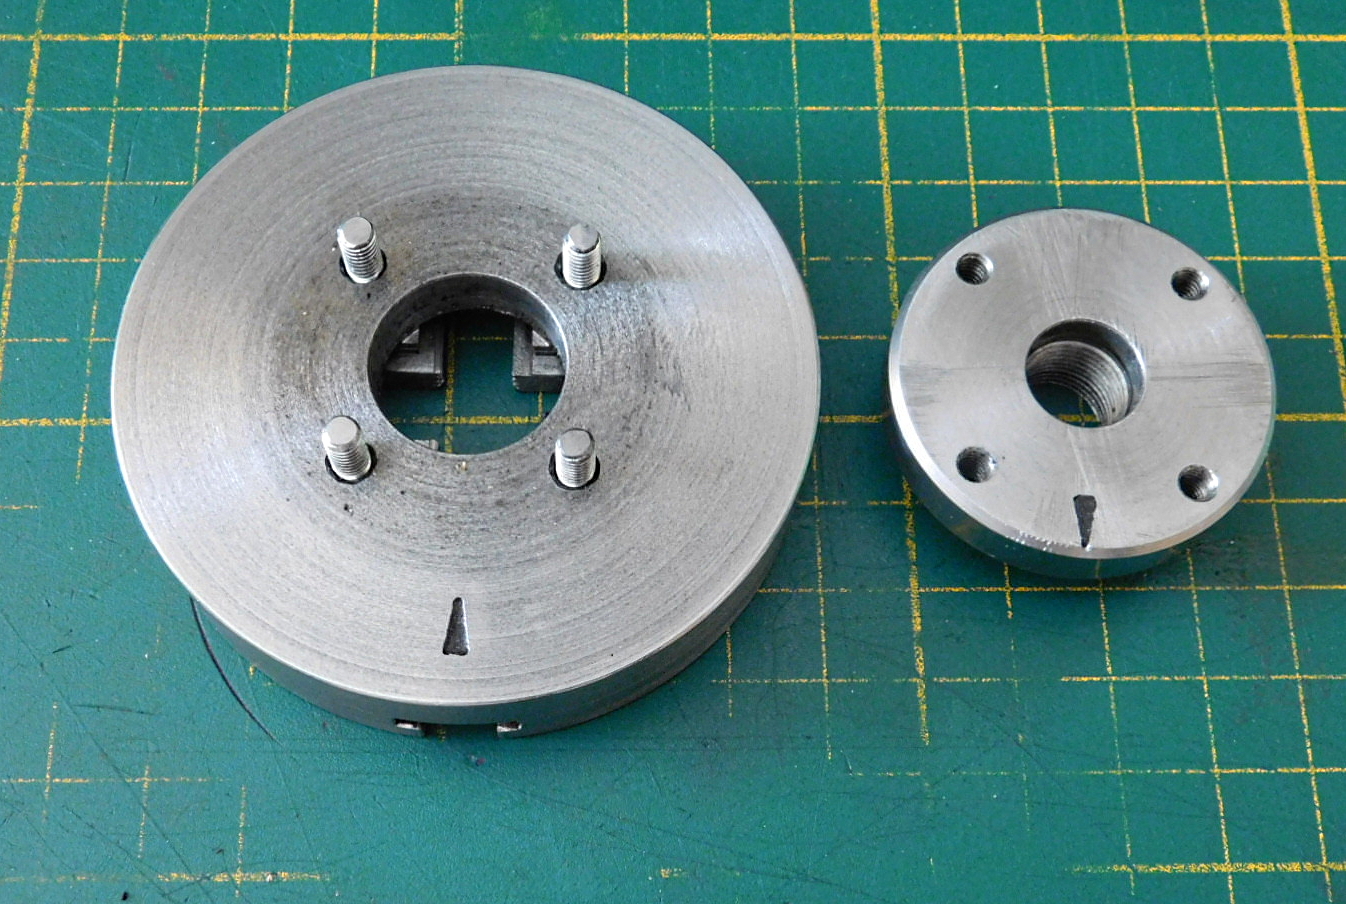
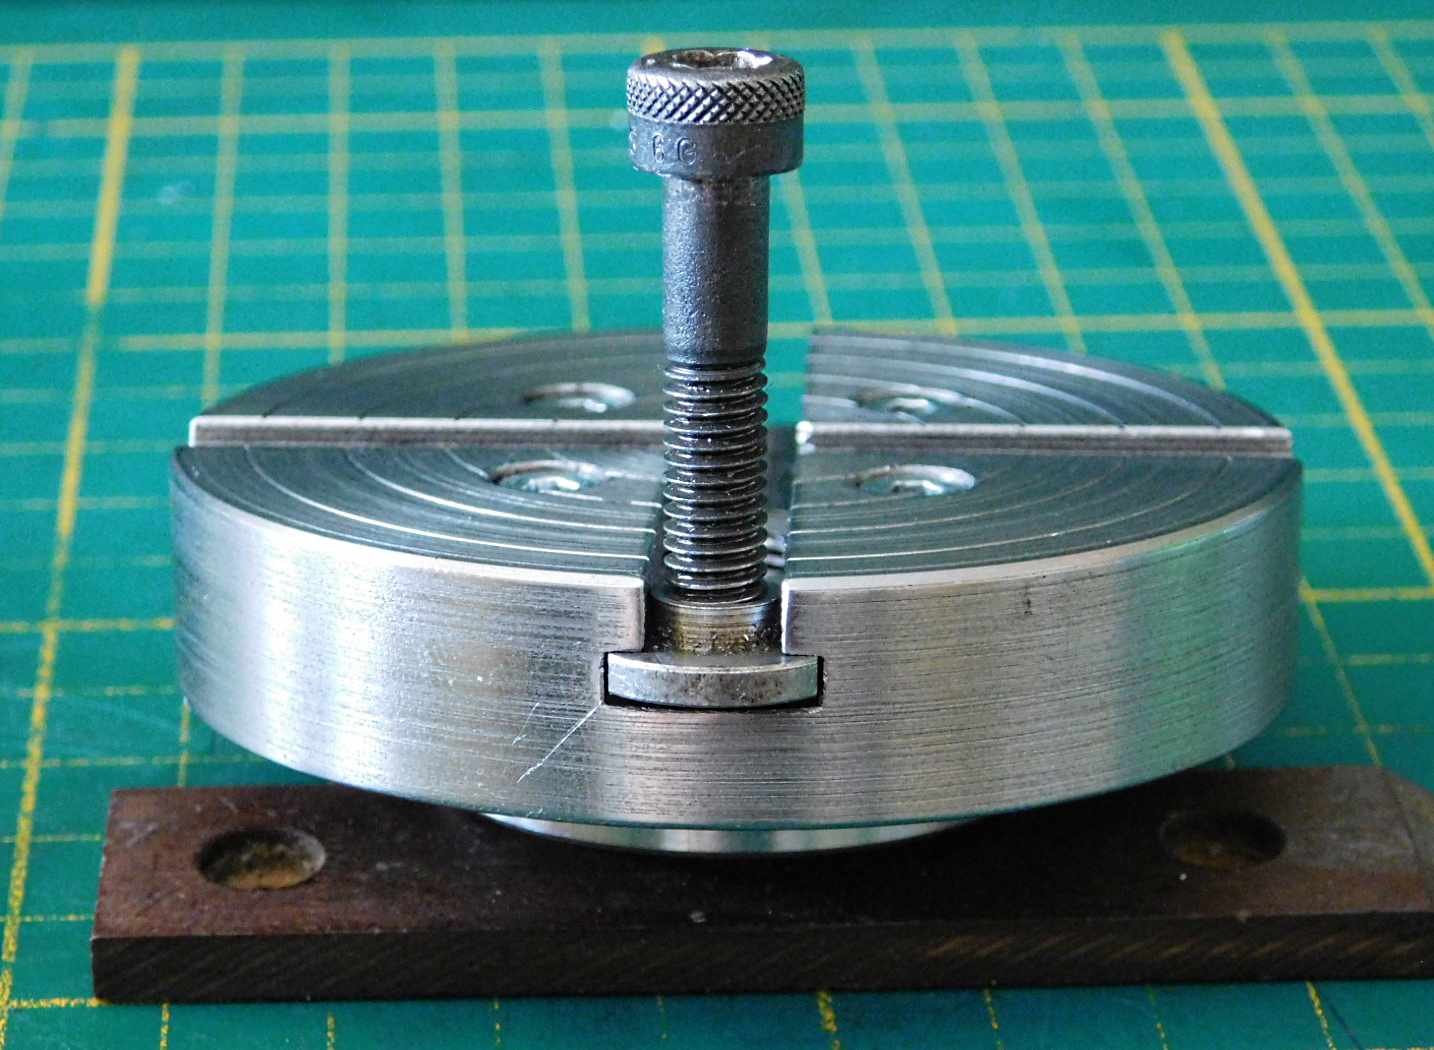
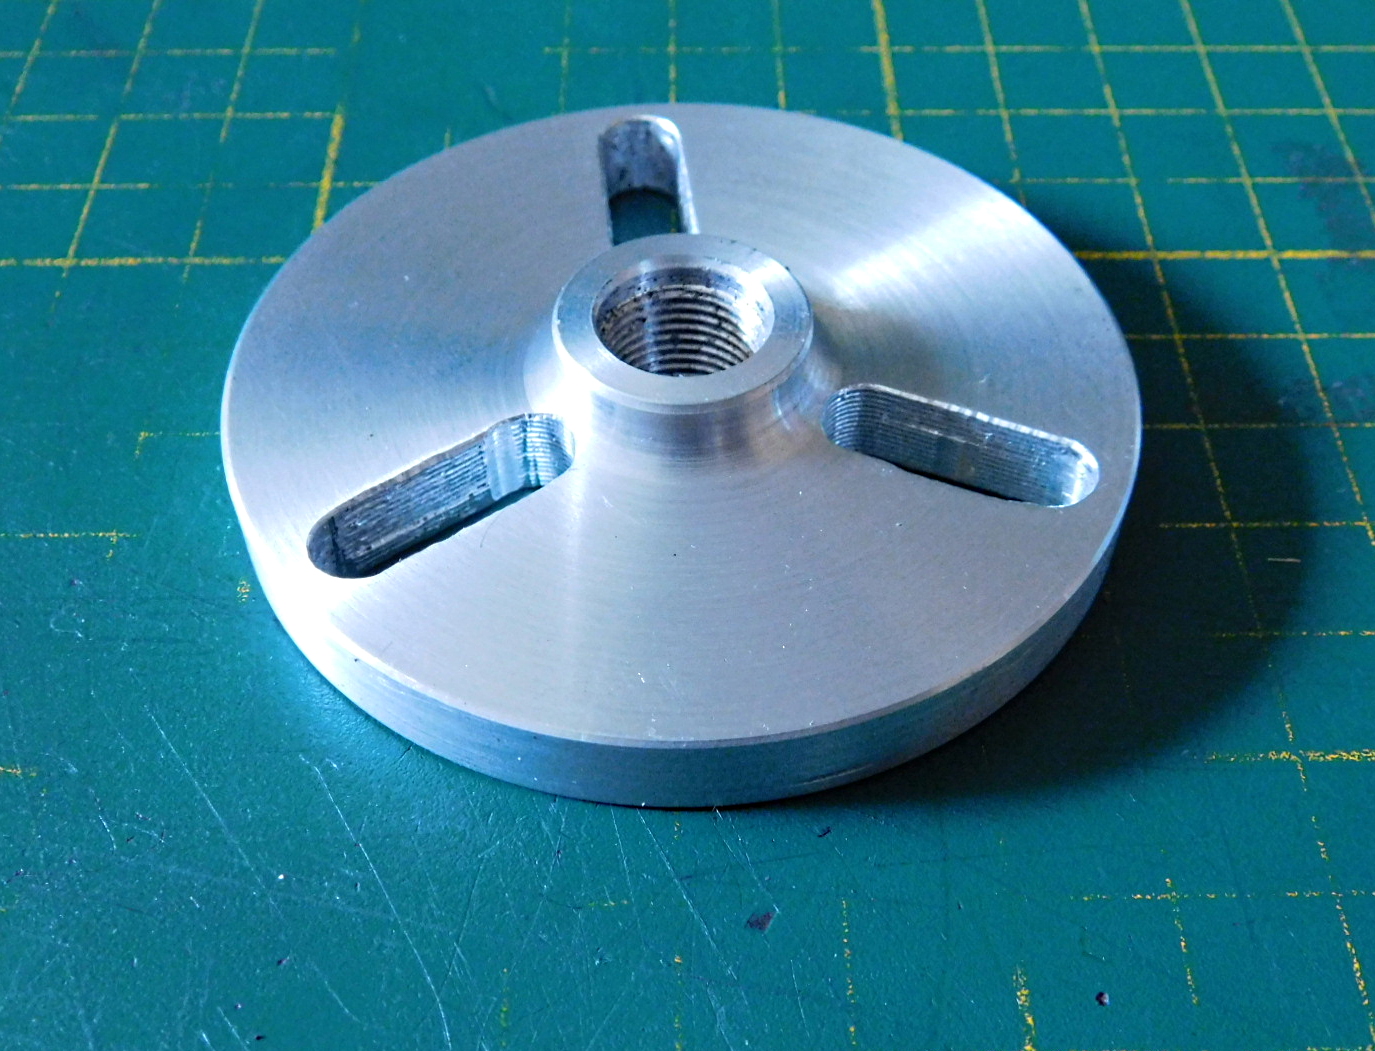
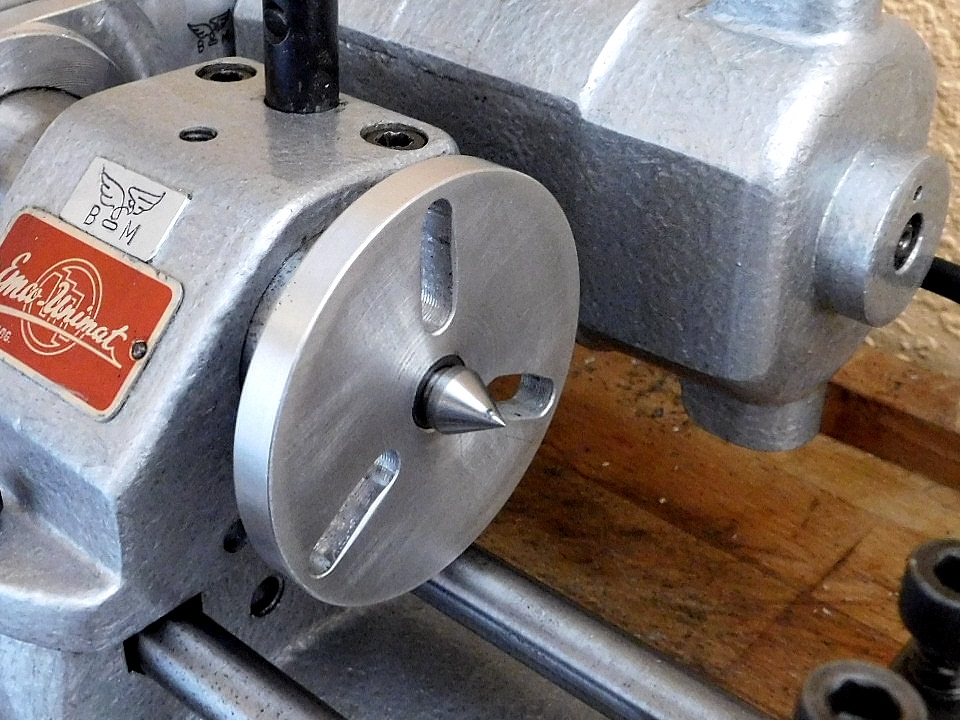
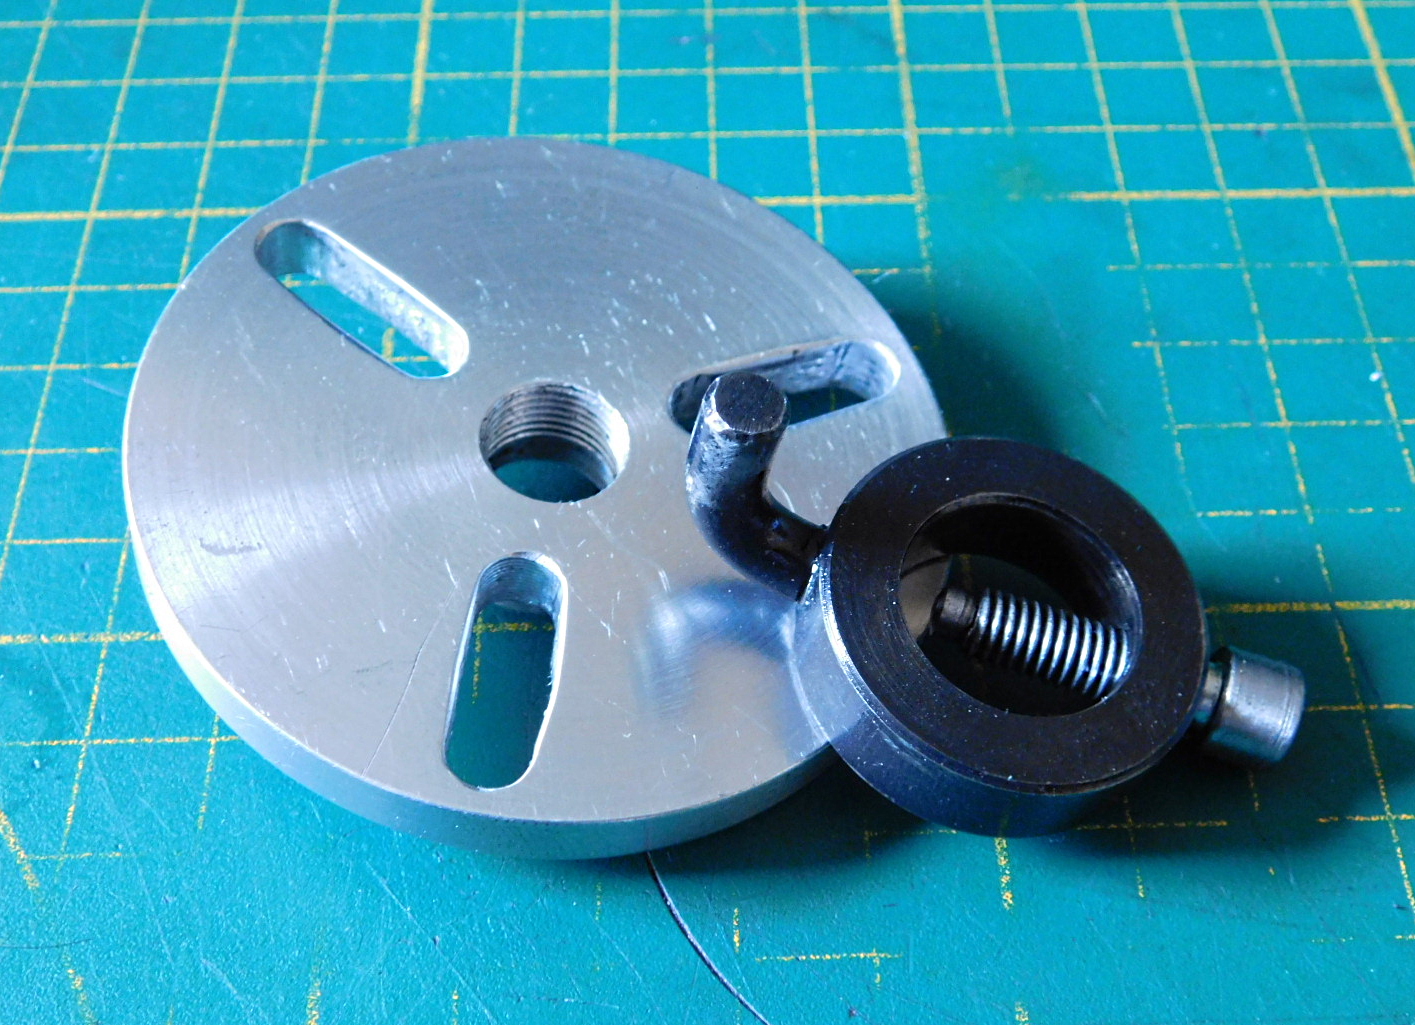
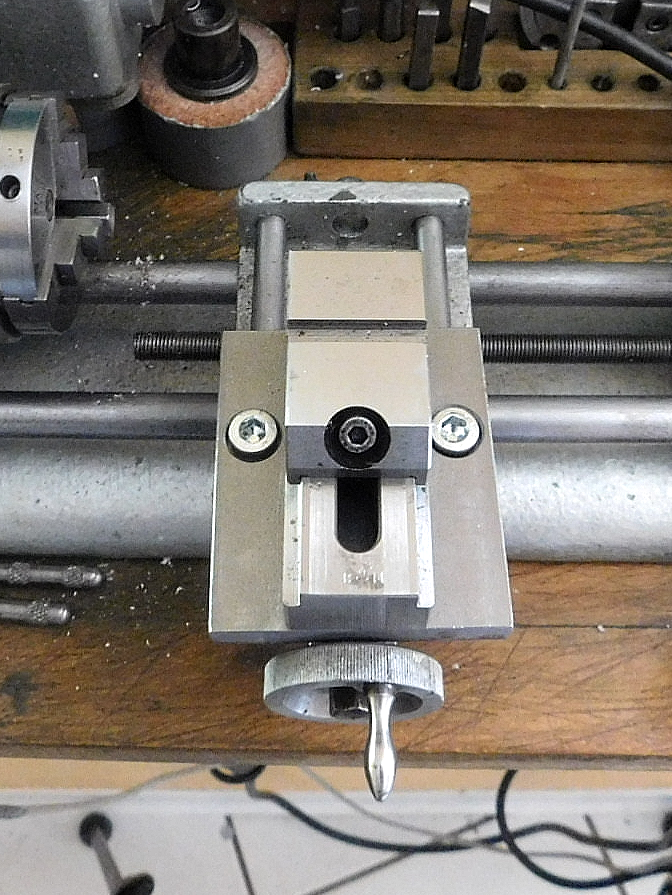
Ich hatte in meinem Fundus noch eine Grauguss-Scheibe. Aus dieser und einem Stück Ø 40mm 42 Cr Mo 4 Stahl habe ich eine Aufspannscheibe für die kleine Unimat gefertigt. Die T-Nuten habe die gleiche Abmessung wie die T-Nut auf dem Planschlitten.
Die Aufspannscheibe wird mit 4 Innensechskantschrauben M4 auf das Spannstück mit dem Aufnahmegewinde der Spindel aufgeschraubt.
I still had a grey cast iron disc in my collection. From this and a piece of Ø 40mm 42 Cr Mo 4 steel I made a clamping wheel for the small Unimat. The T-slots have the same dimensions as the T-slots on the flatbed.
The clamping disc is screwed with 4 hexagonal screws M4 to the clamping piece with the pick-up thread of the spindle.
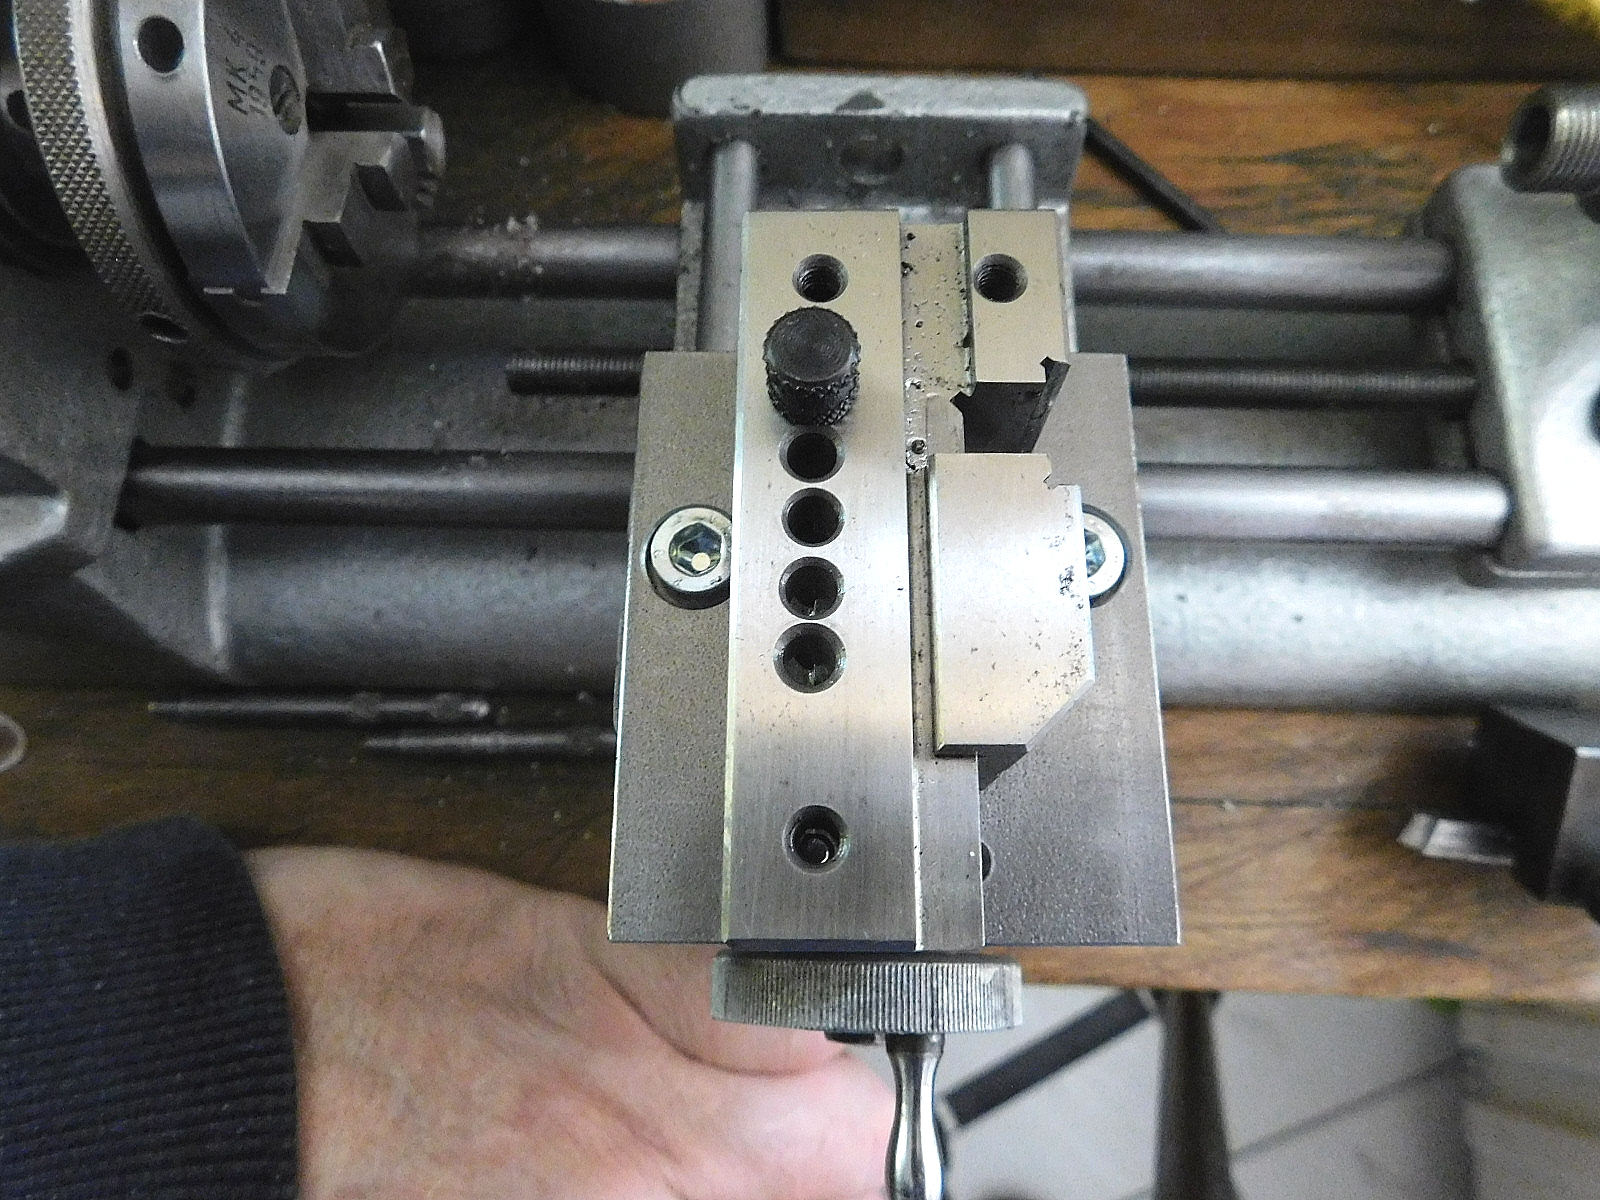
 Die beiden Teile der Aufspannplatte.
Die Pfeile müssen bei der Montage gegeneinander stehen, so ist der Rundlauf gewährleistet.
The two parts of the clamping plate.
The arrows must be against each other during assembly to ensure concentricity.
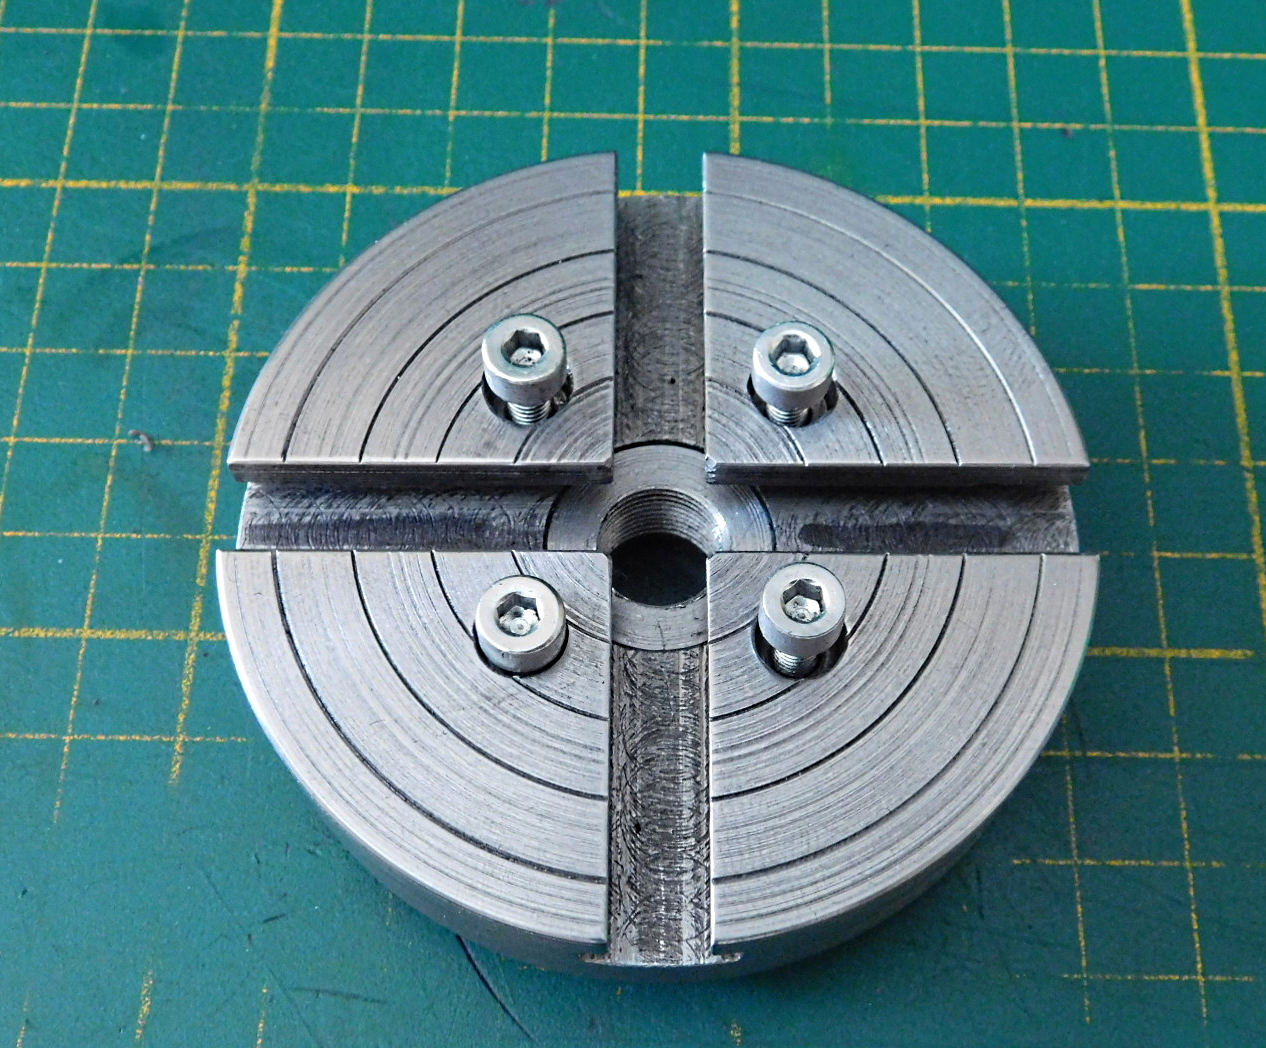 Aufspannscheibe mit T-Nuten.
Clamping plate with T-slots.

Auf der Spindel.
Die Aufspannscheibe hat einen Durchmesser von 72 mm und eine Dicke von 15 mm.
On the spindle.
The clamping plate has a diameter of 72 mm and a thickness of 15 mm.
 Der Nutenstein vom Stahlhalter passt perfekt.
The slot nut from the turning tool holder fits perfectly.
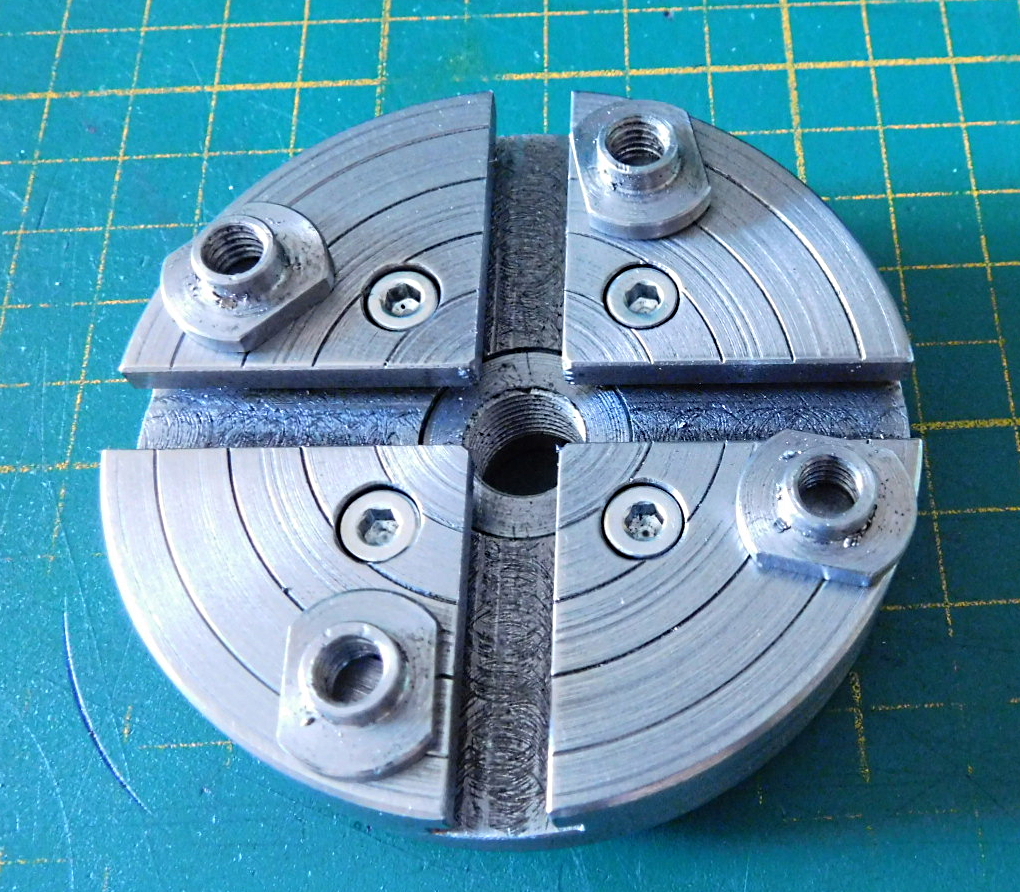 Vier Nutensteine aus 42 Cr Mo 4 Stahl sind auch noch entstanden.
 Four slot nuts made of 42 Cr Mo 4 steel were also created.
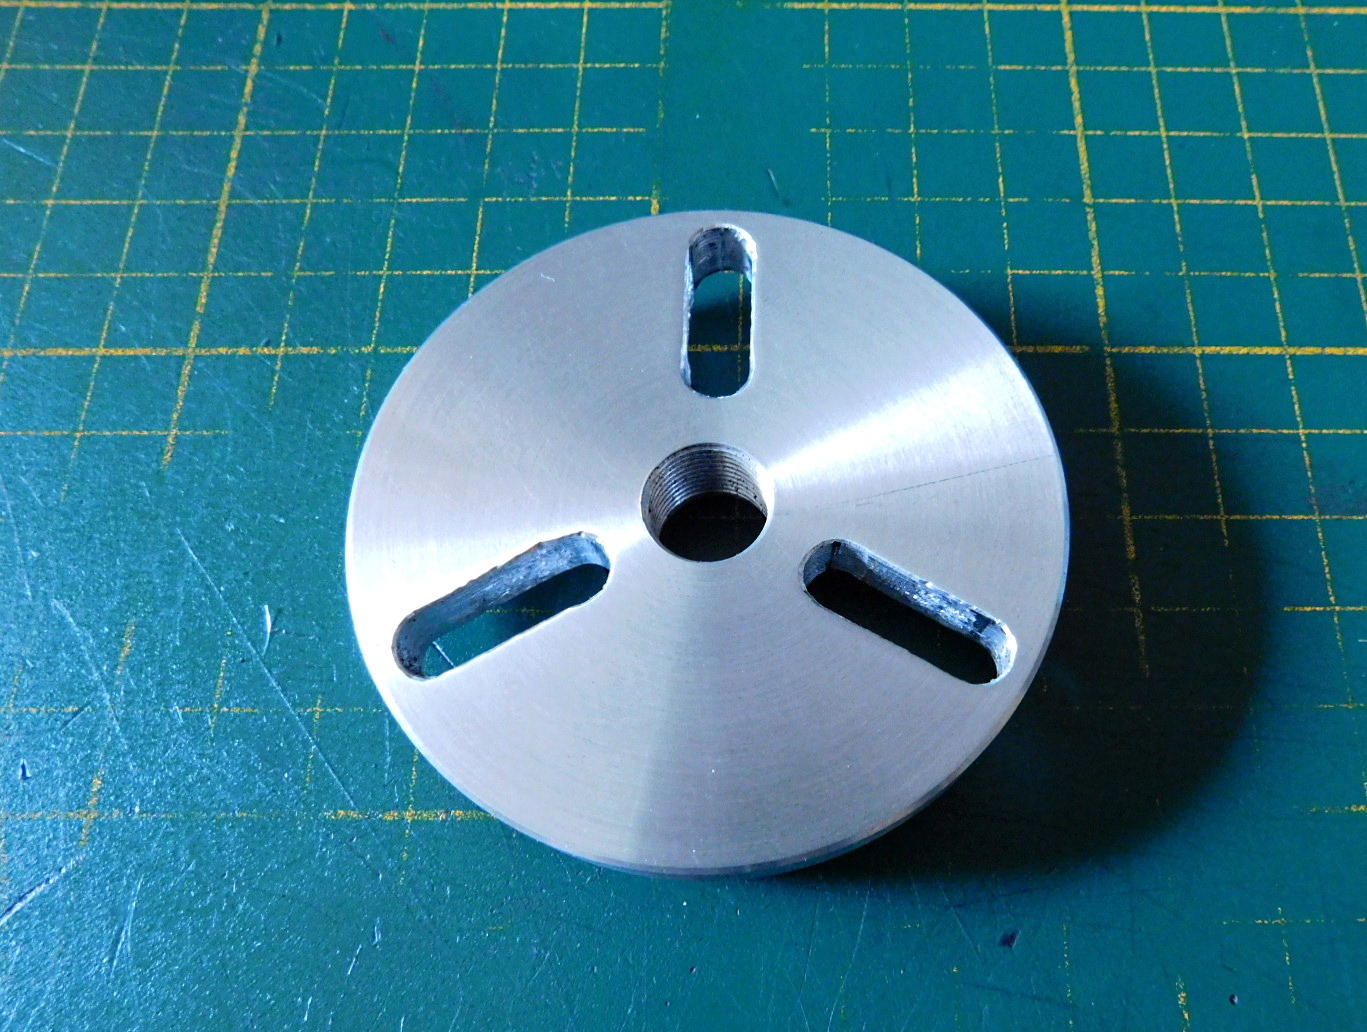
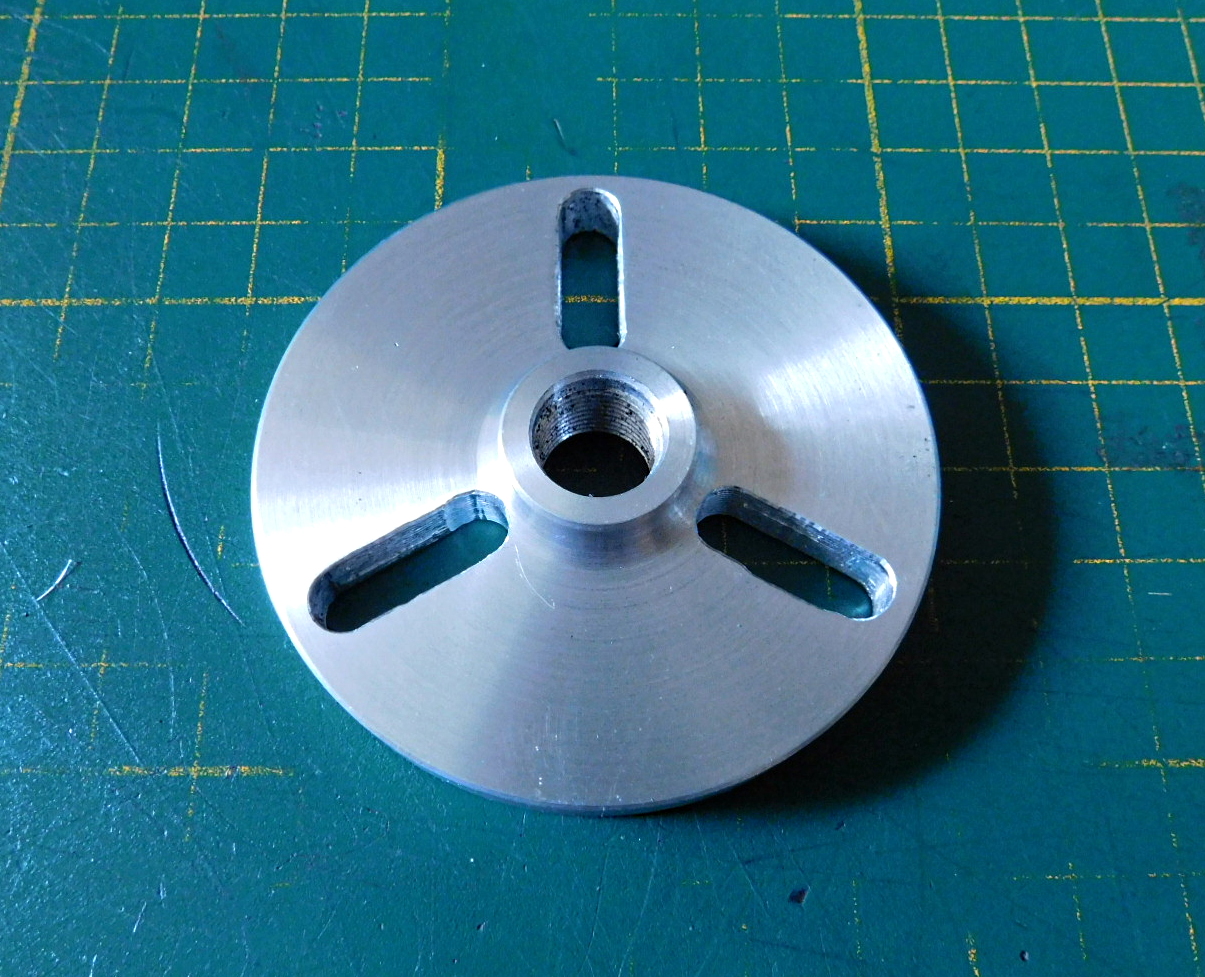
Eine Aluminium-Ronde hatte ich auch noch, so konnte ich auch die Fehlende Mitnehmerscheibe für das Drehherz anfertigen.
I also had an aluminium round, so I was able to make the missing driving disc for the turning heart.
Das Drehherz habe ich nun auch fertig.
Ein Stahlscheibe und ein abgewinkeltes Stück Stahl, welches in die gedrehte Scheibe eingeschraubt und mit Loctite gesichert wurde, dazu noch eine Druckschraube.
Fertig war das Teil.
I have now also finished the turned heart.
A steel disk and an angled piece of steel, which was screwed into the turned disk and secured with Loctite, plus a pressure screw.
The part was finished.

03.10.2022
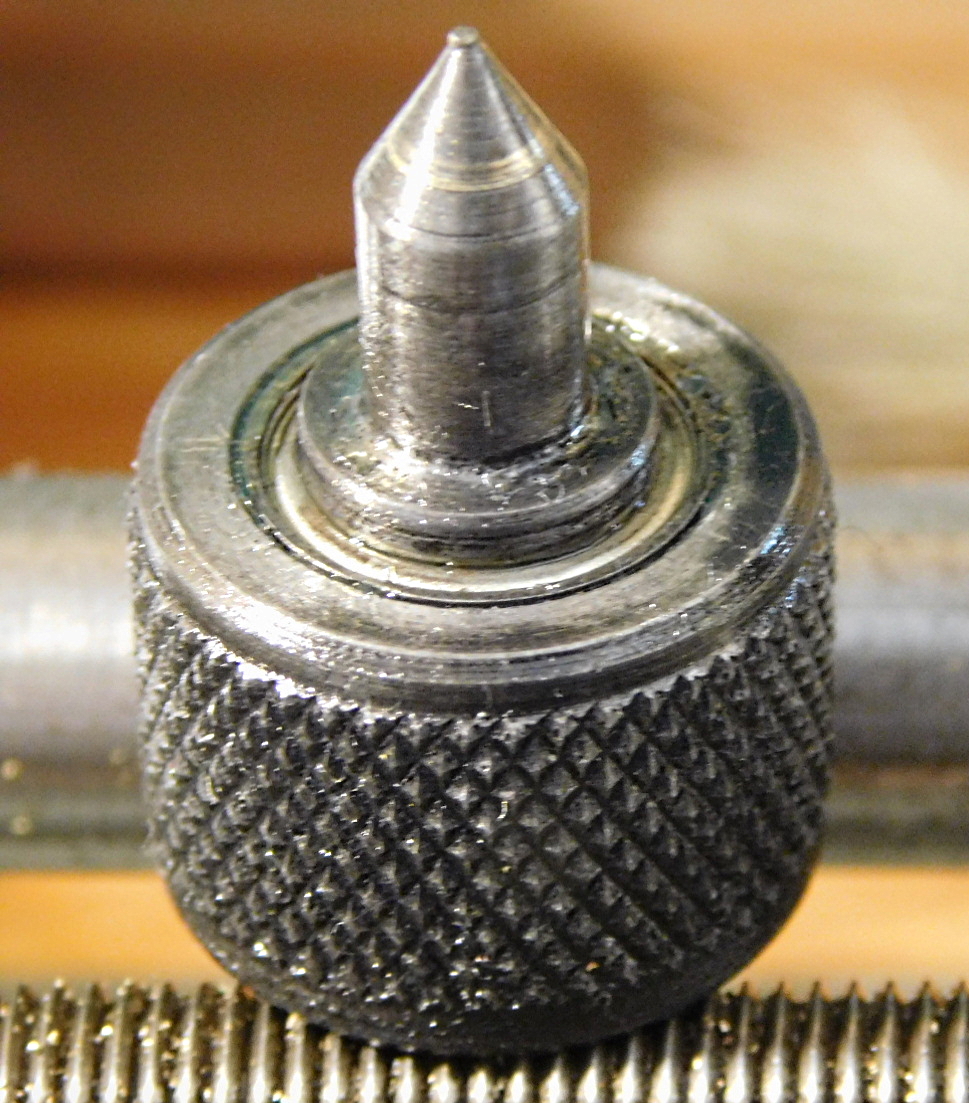
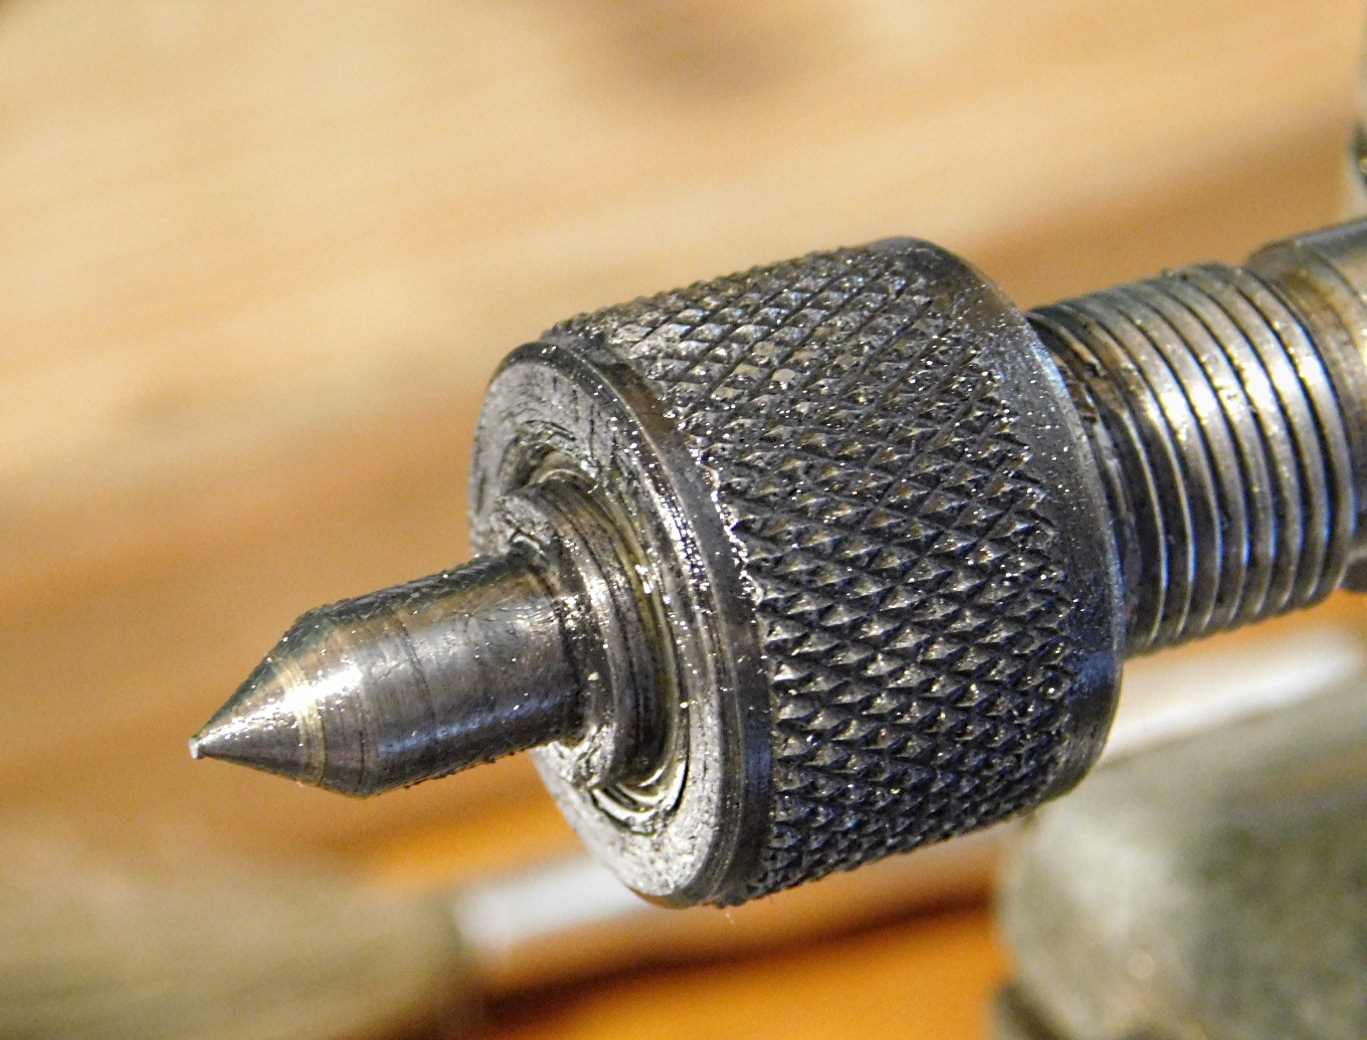
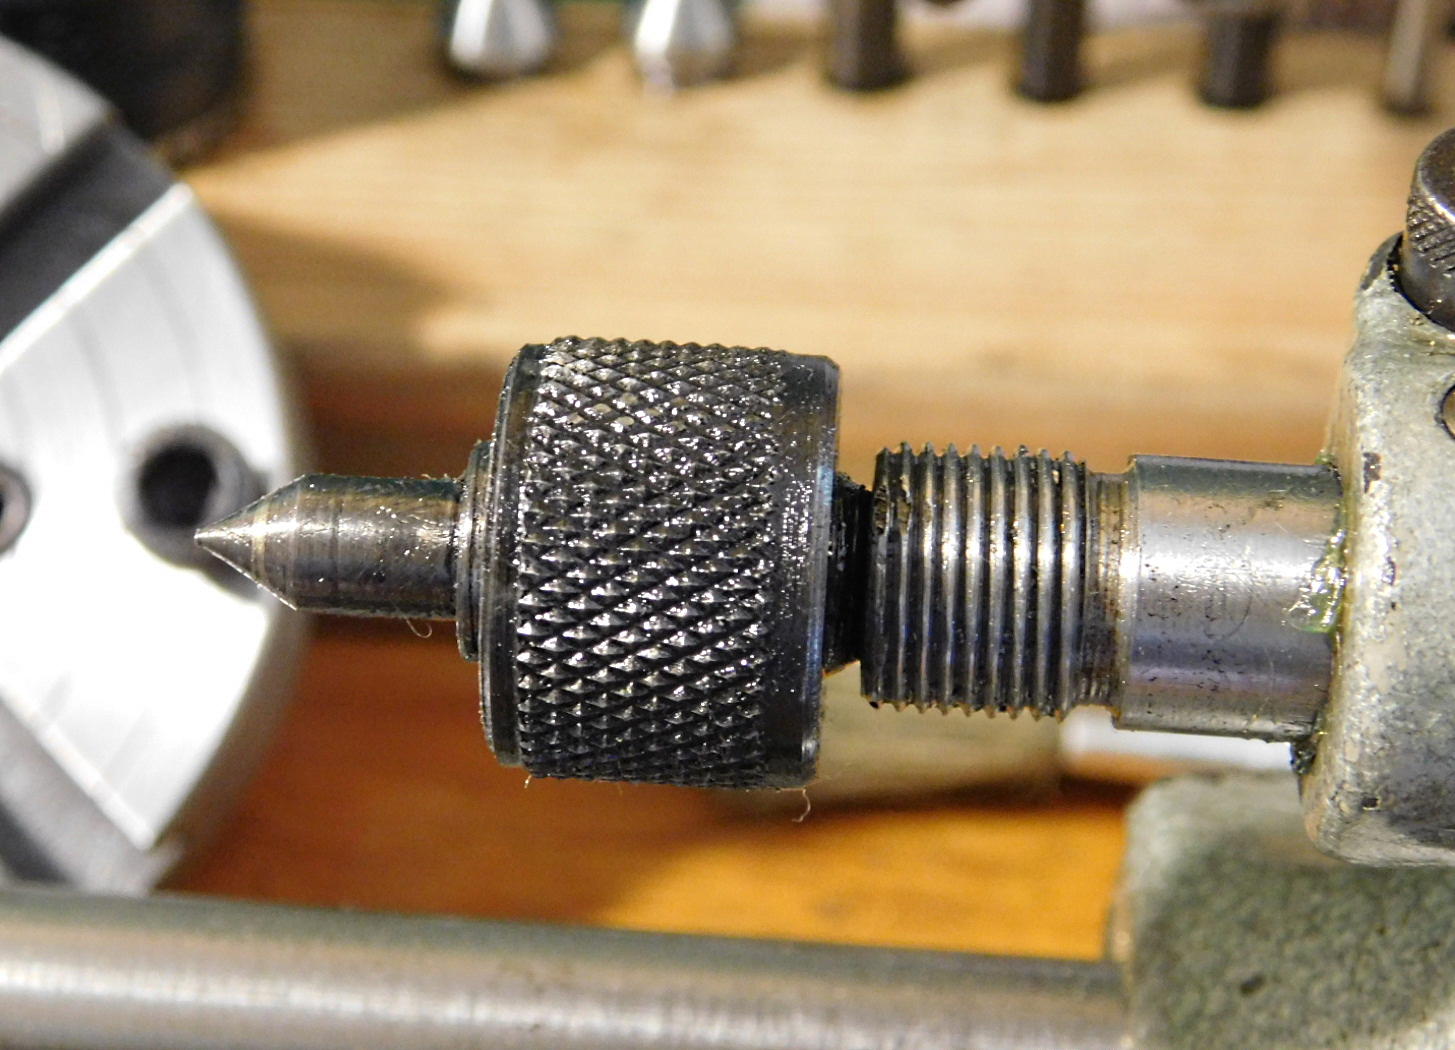
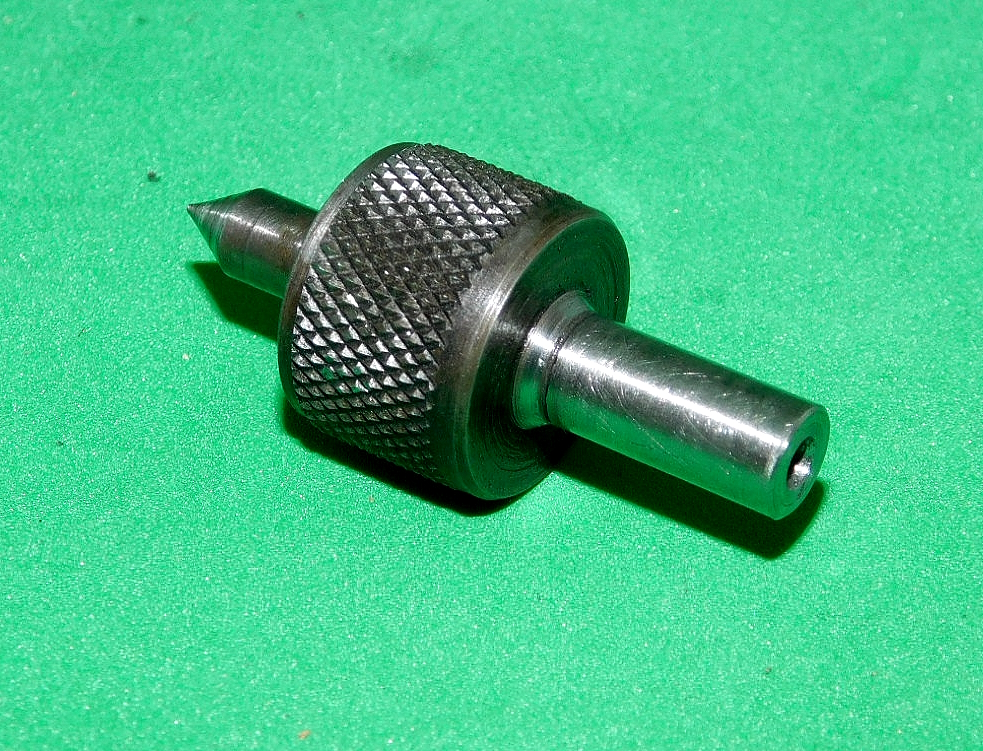
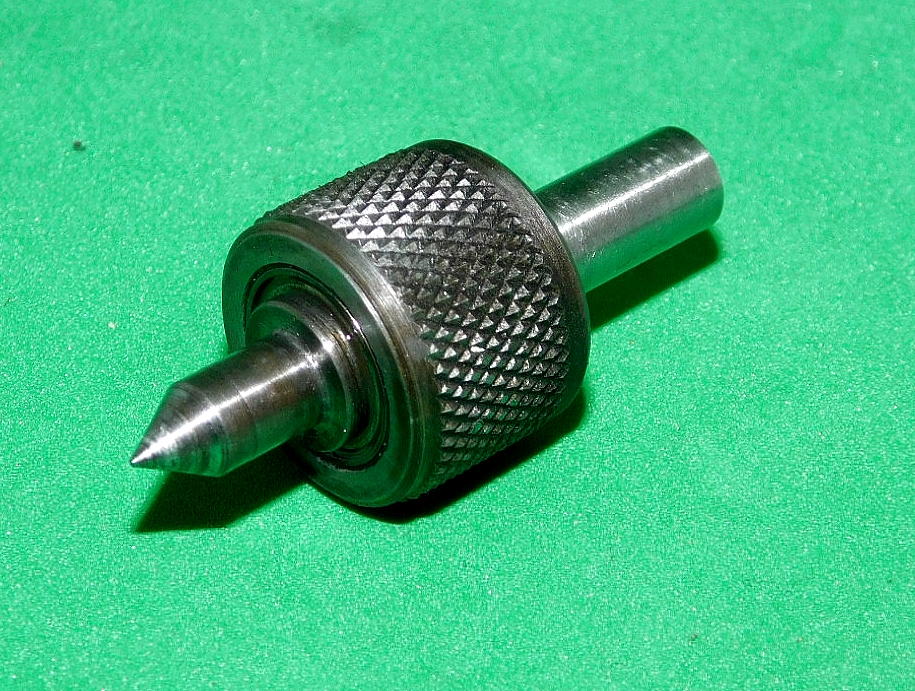
Eine kleine Kugel gelagerte Spitze habe ich auch angefertigt.
I have also made a small ball-bearing rotating centre.
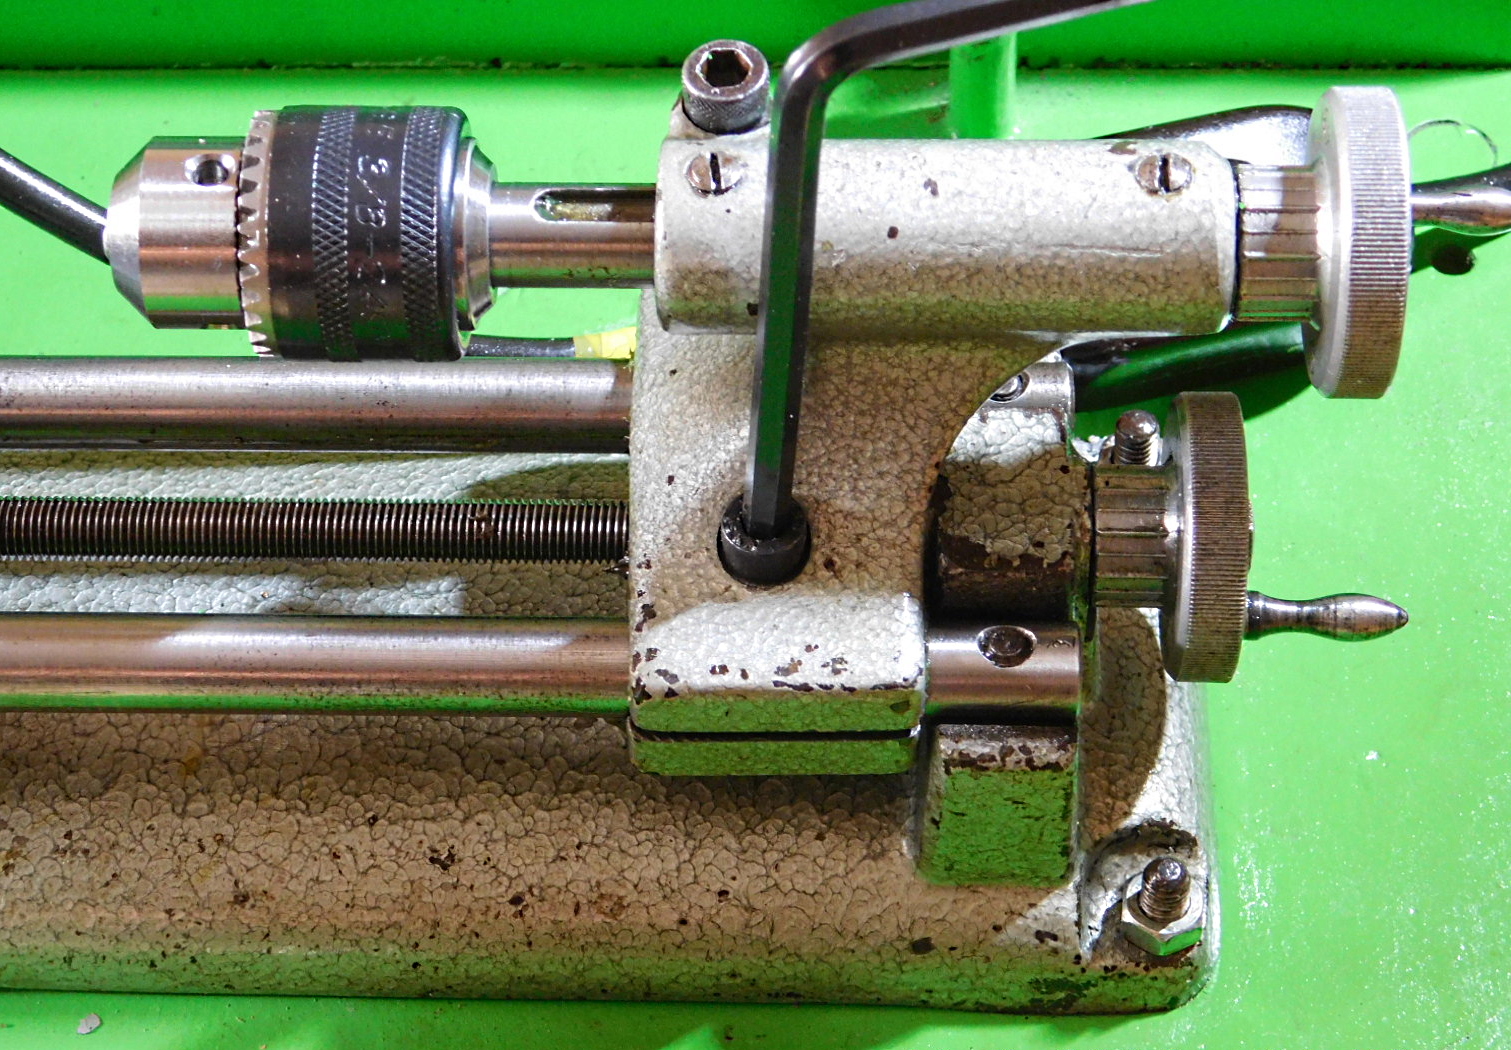
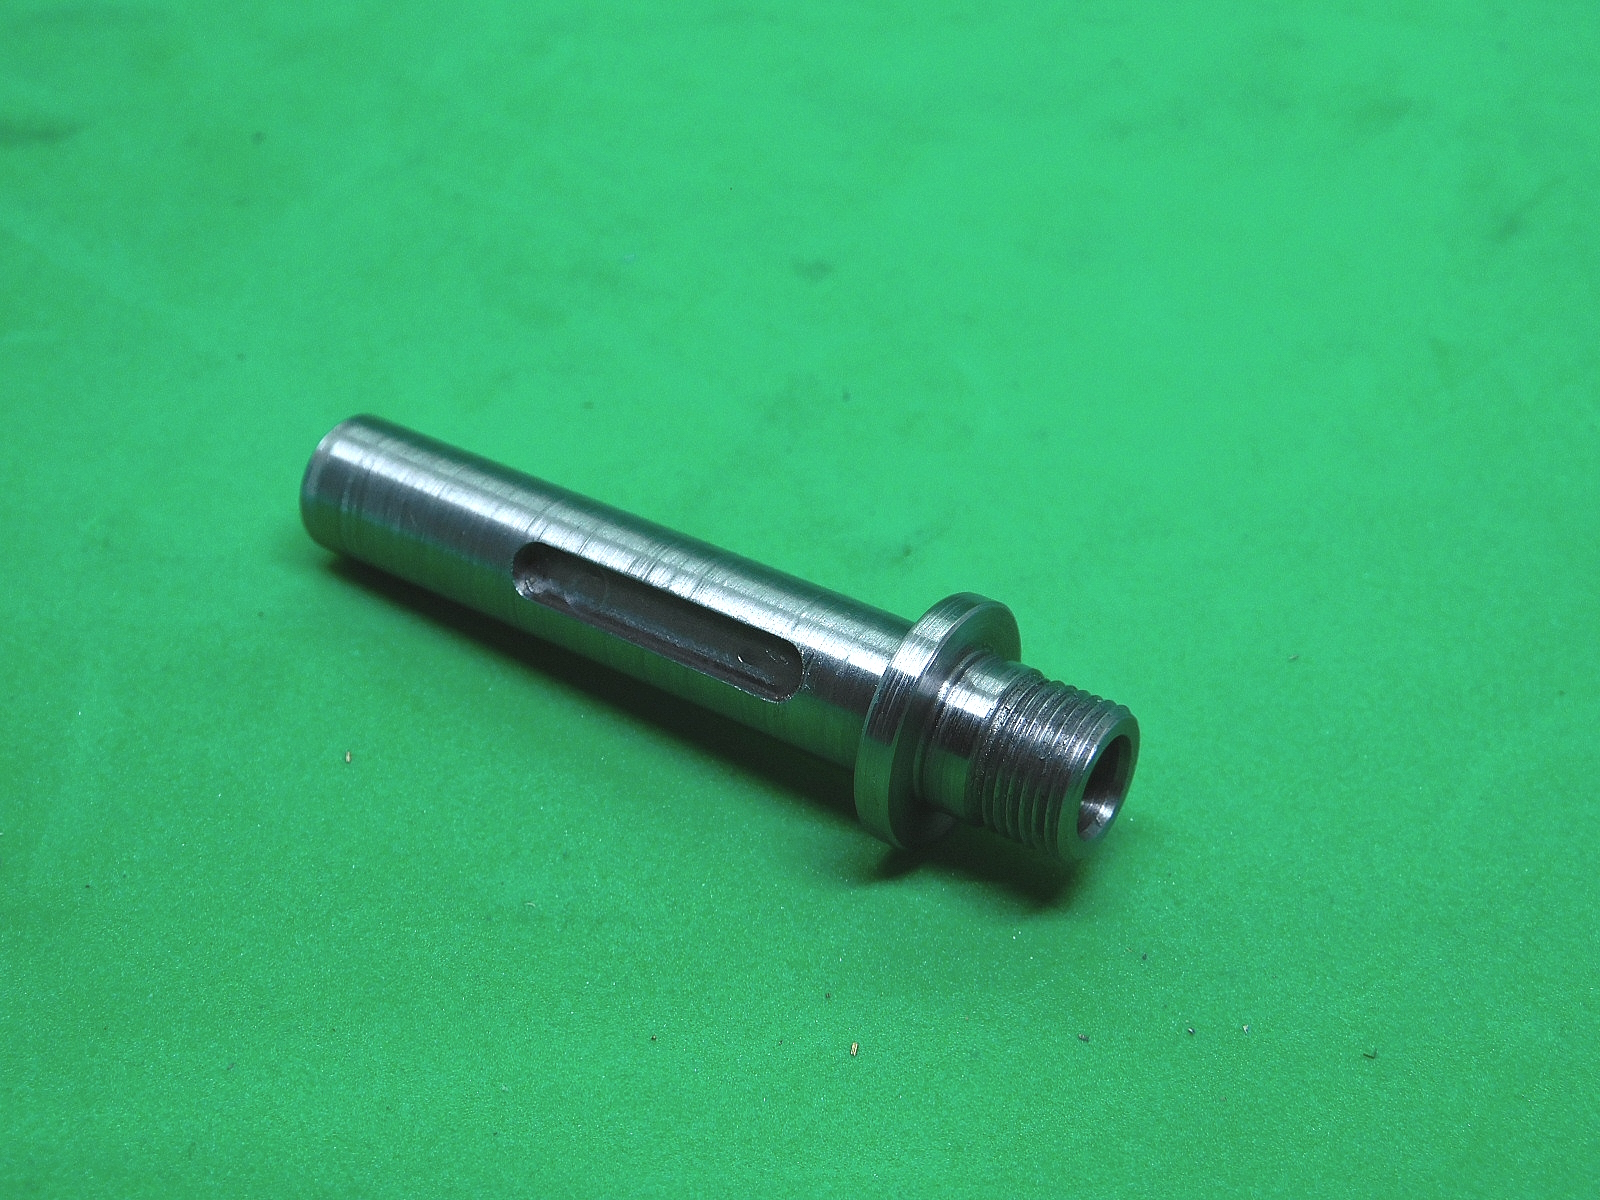
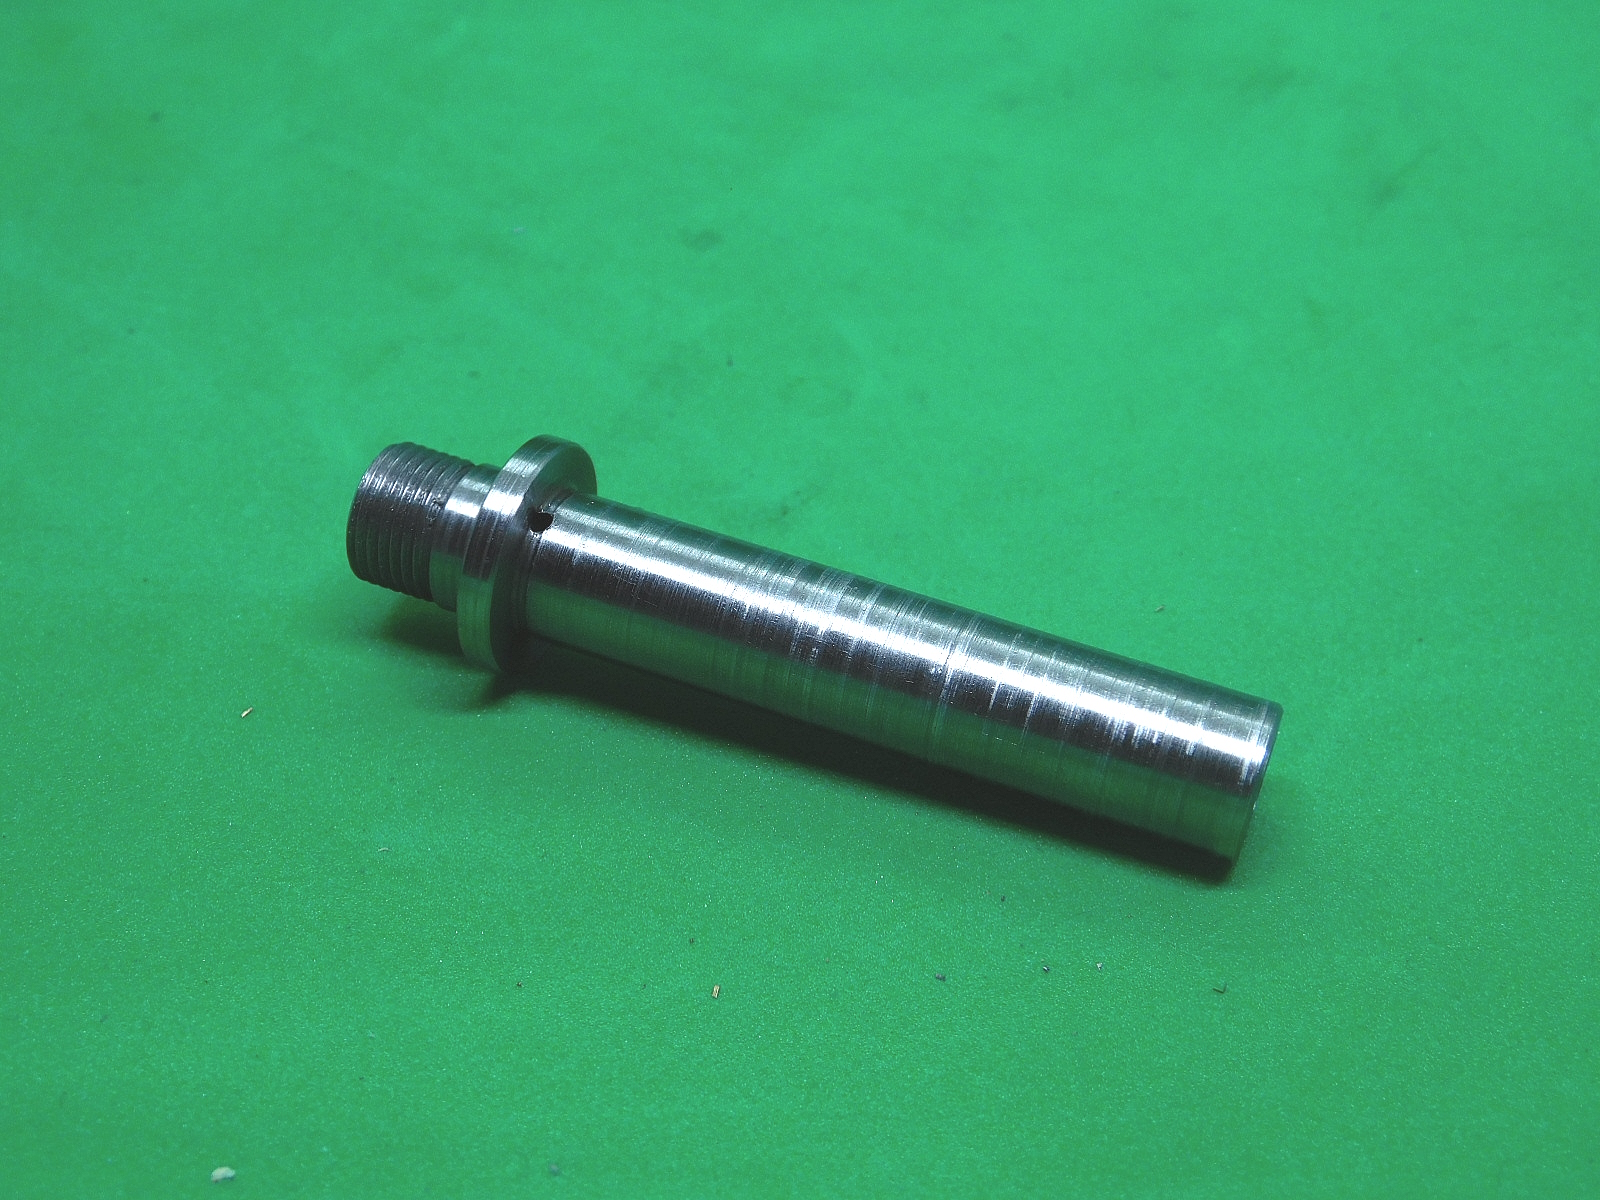
Die Pinole für den Reitstock habe ich neu angefertigt. Jetzt hat auch meine Unimat MK 4 einen Anlaufbund an der Pinole.
I made a new quill for the tailstock. Now my Unimat MK 4 also has a collar on the quill.
Aufspann-Flansch
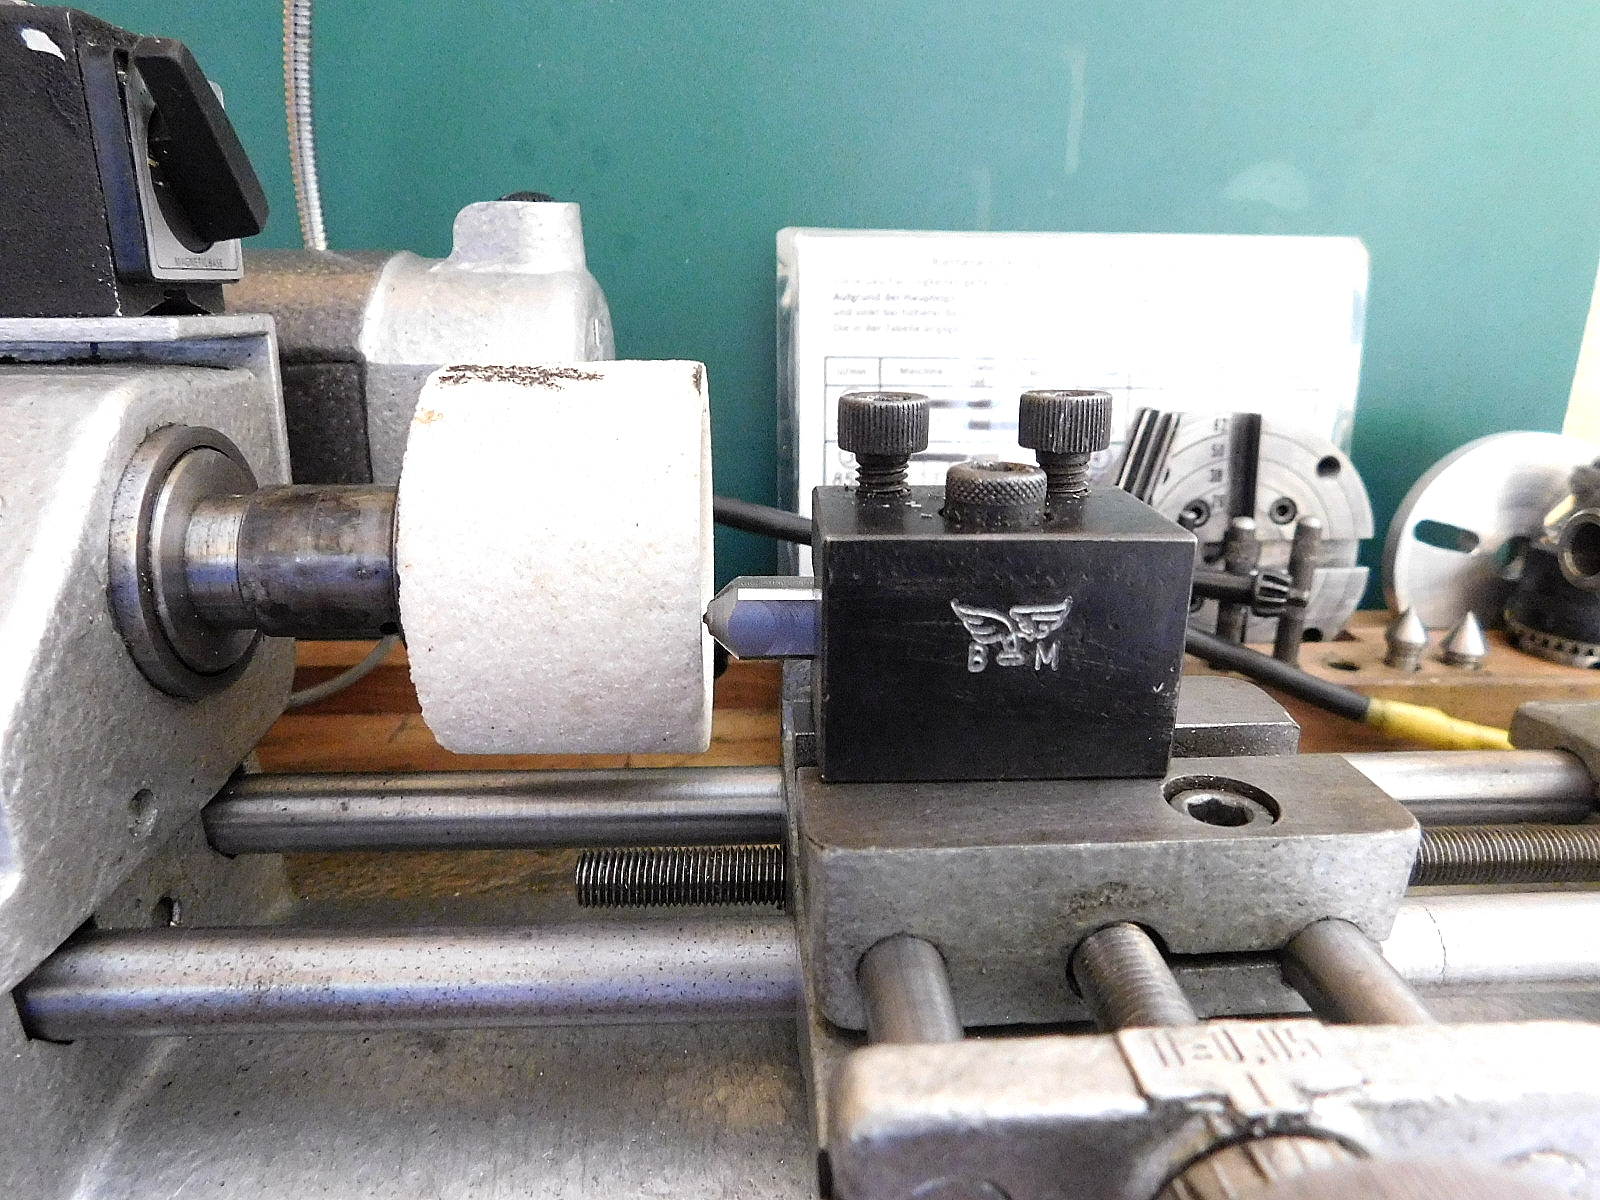
Den Aufspannflansch für die Schleifscheiben habe ich ebenfalls angefertigt.
I also made the clamping flange for the grinding wheels.
Der Flansch kann Schleifscheiben mit einer Bohrung von 16 mm aufnehmen. Mit einem Zwischenring kann man auch Scheiben mit 20 mm Bohrung aufnehmen.
Der maximale Schleifscheiben Durchmesser beträgt 70 mm.
Die Schleifscheiben-Dicke max. 10 mm.
The flange can hold grinding wheels with a 16 mm bore. With an extension ring, it is also possible to hold wheels with a bore of 20 mm.
The max. grinding wheel diameter is 70 mm.
The grinding wheel thickness is max. 10 mm.
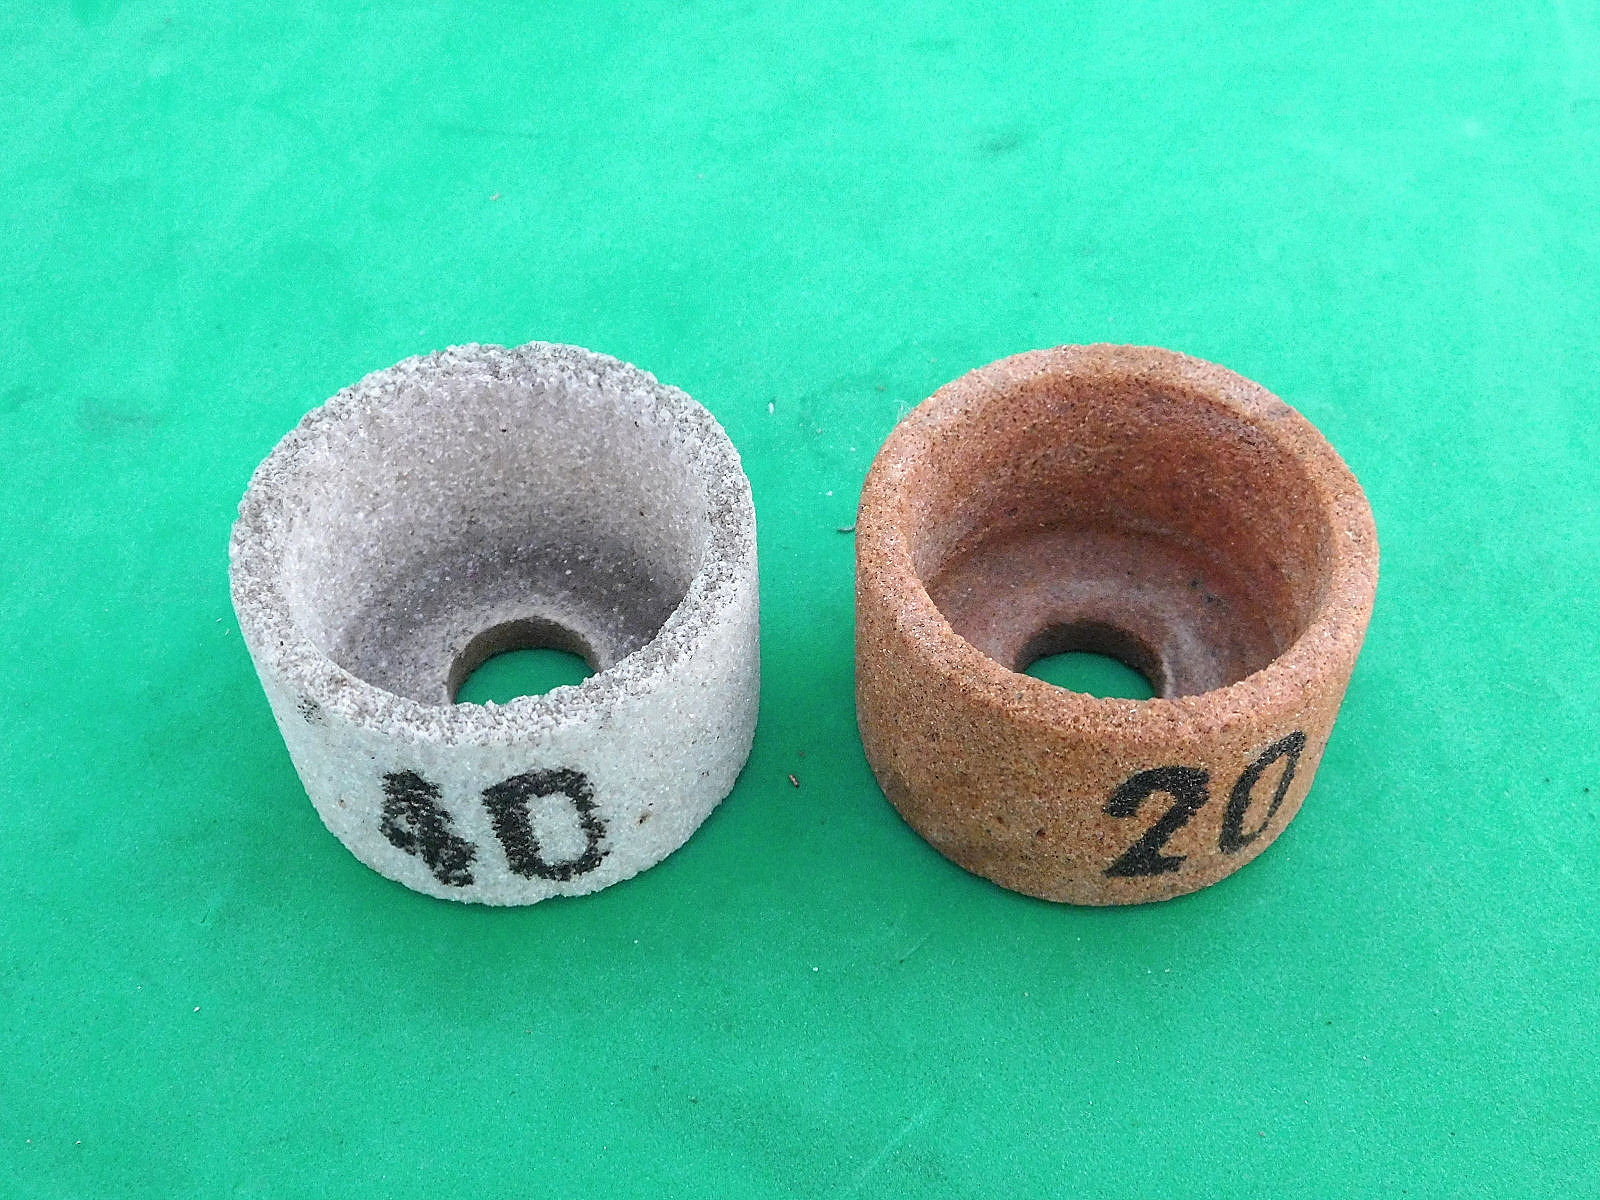
Auf einem Kleinanzeigen-Portal habe ich passende Topf-Schleifscheiben gefunden. Der Außendurchmesser beträgt 50 mm. Die Aufnahmebohrung 16 mm. Der Verkäufer hatte mehrere Sorten davon.
I found matching cup grinding wheels on a small ads portal. The outer diameter is 50 mm. The mounting hole is 16 mm. The seller had more than one kind of it.
Einen neuen Aufspannflansch für die Schleifscheiben habe ich angefertigt. Der Auflageflansch ist etwas dicker, so hat der Haltestift mehr Auflagefläche.
I made a new clamping flange for the grinding discs. The support flange is slightly thicker so that the holding pin has more contact surface.
 Die Topf-Schleifscheibe musste nur an der Stirnseite Abgezogen werden.
The cup grinding wheel only had to be removed on the front side.
12.10.2022
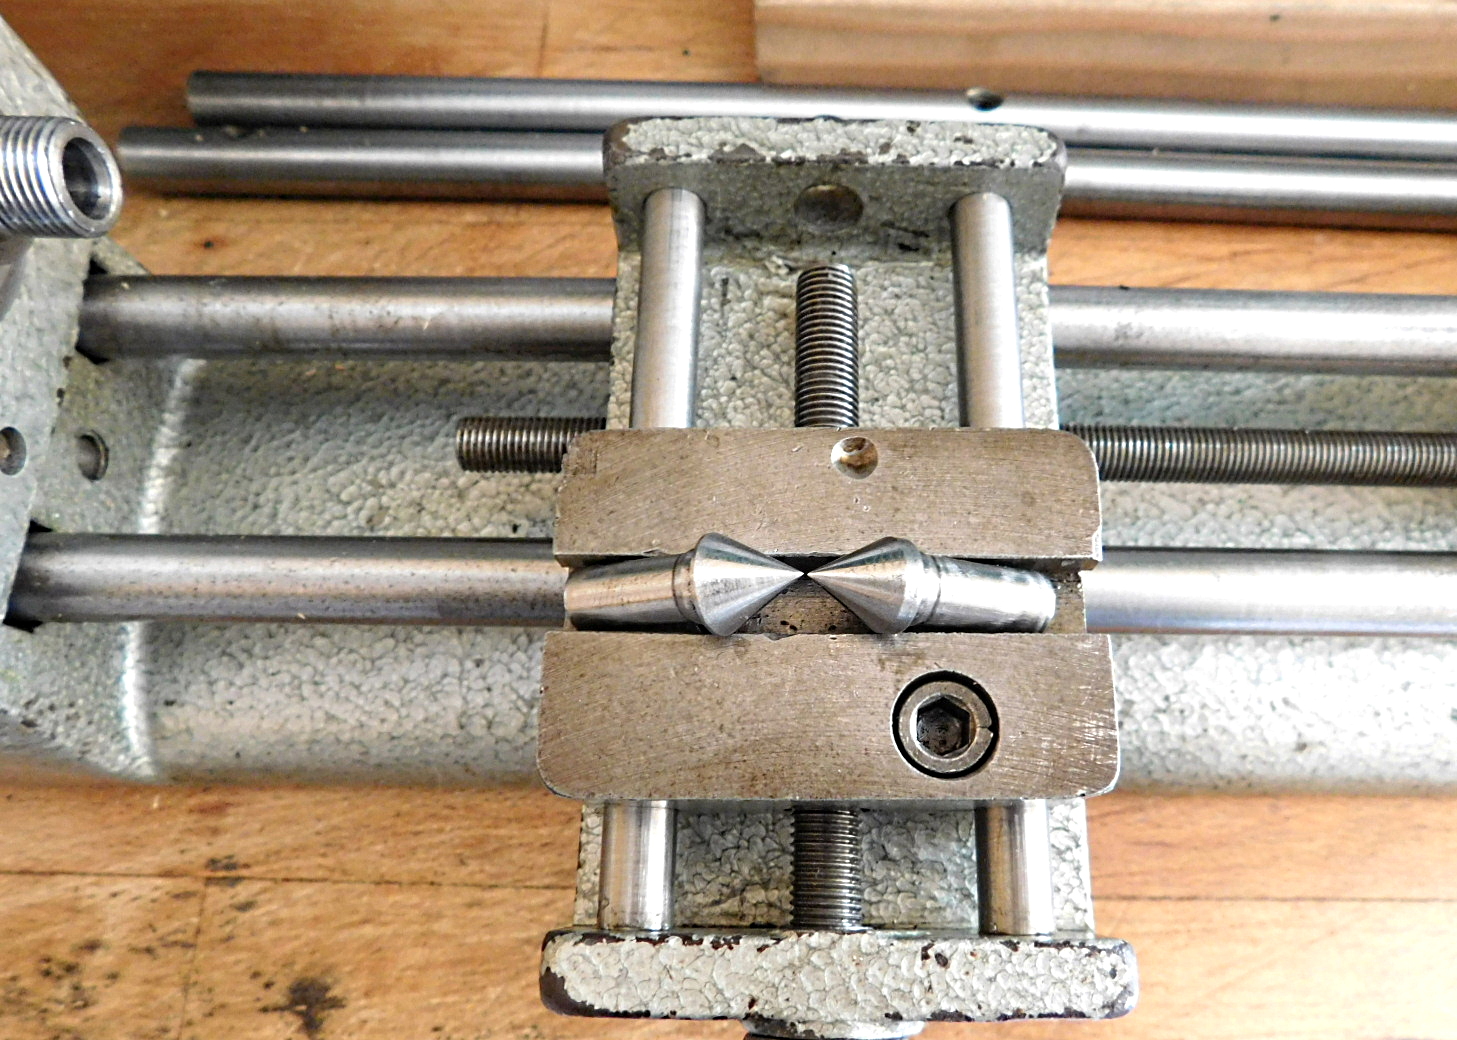
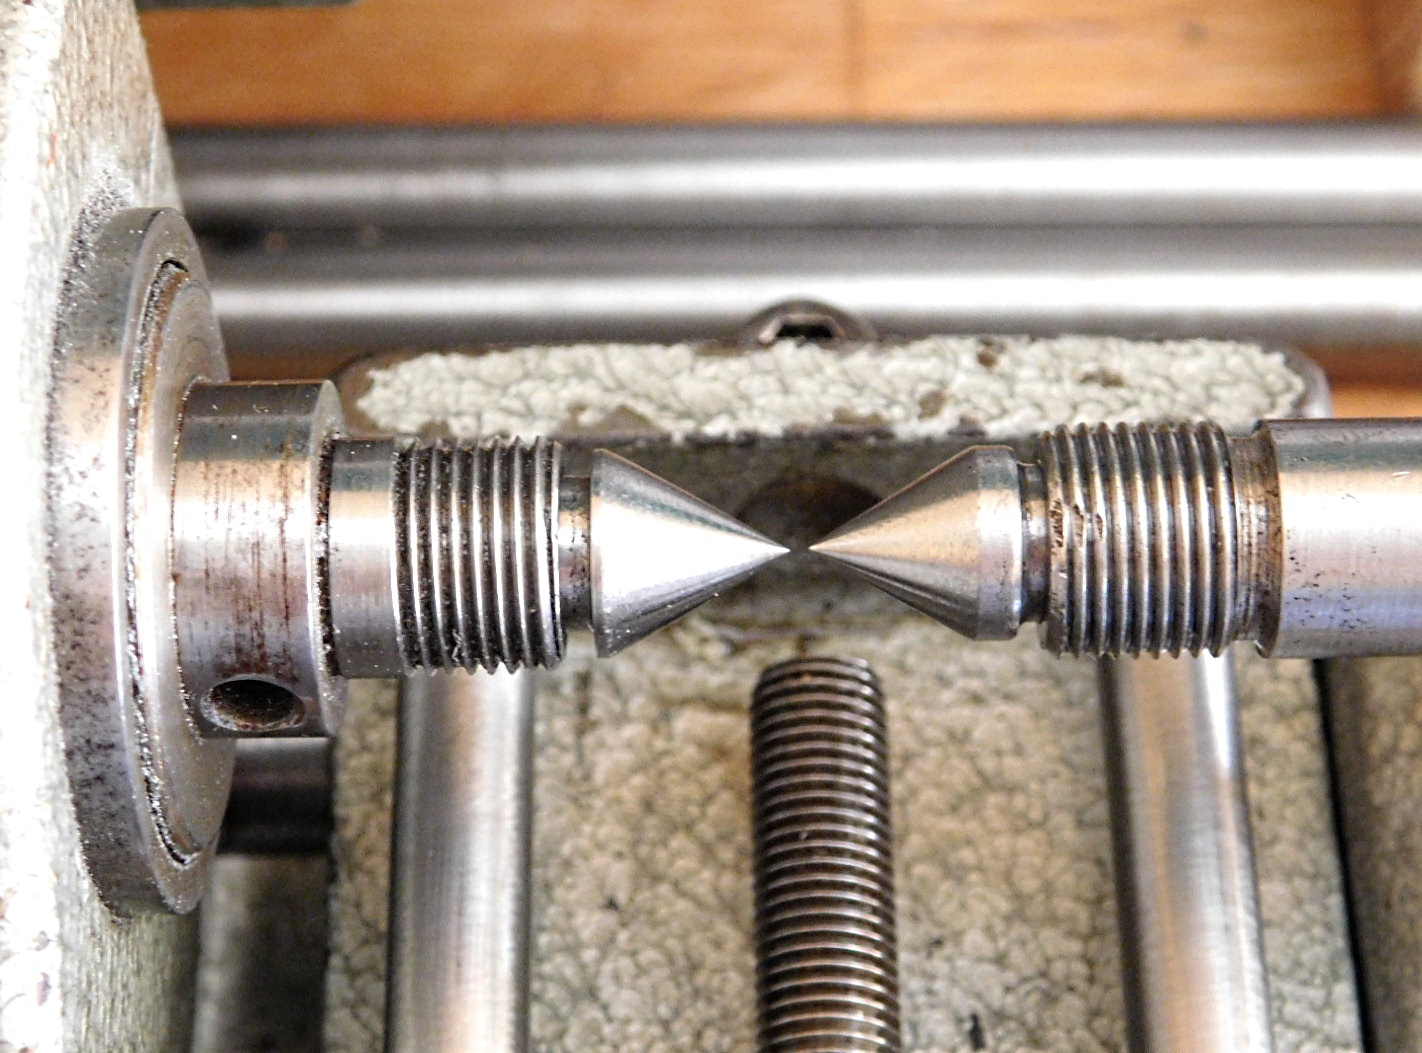
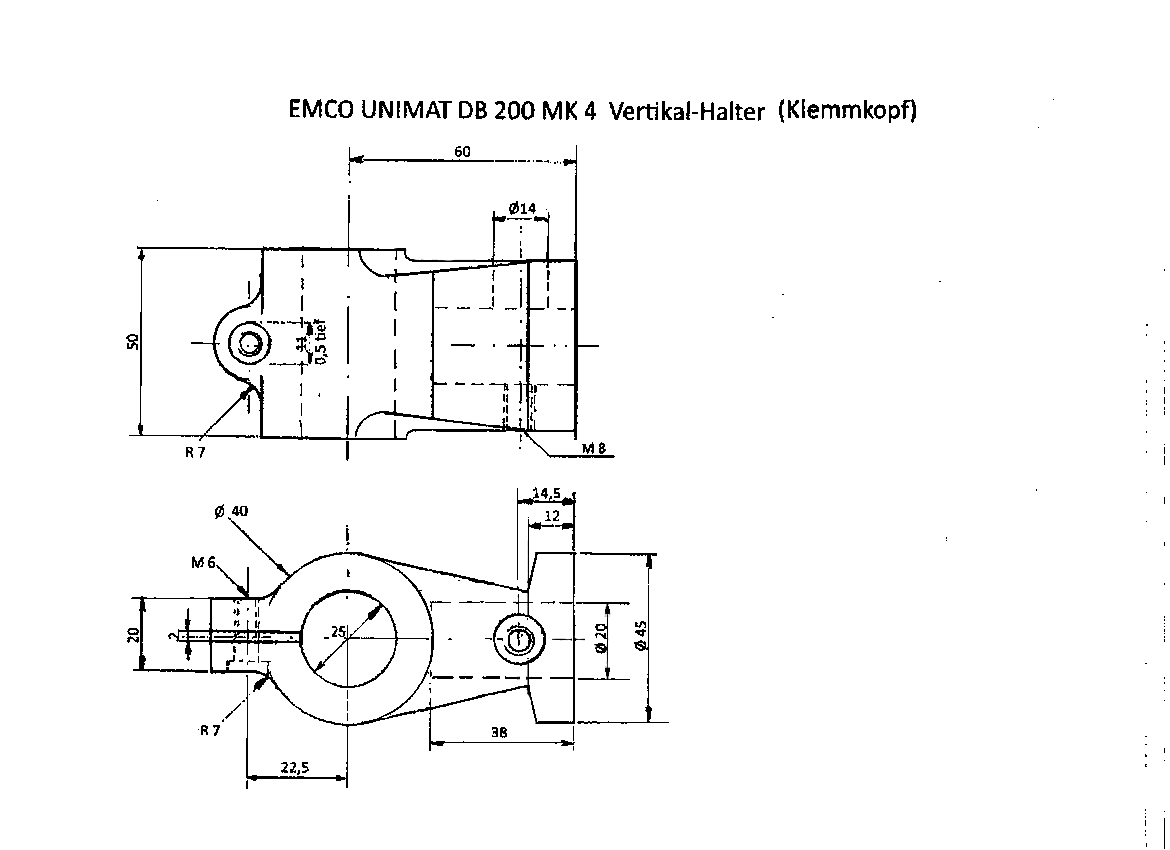
Vertikal-Säule.
Von einem User habe ich die Maße der Vertikal-Säule erhalten.
Diese habe ich nachgefertigt.
Der Säulendurchmesser beträgt 25 mm mit einer Gesamtlänge von 285 mm. Die Spann-Bohrung ist bei den älteren Modellen der Unimat-Maschine anders gestaltet als bei den späteren SL- Maschinen. Ein Spann-Bolzen mit einem Kegel greift in eine entsprechend keglige Bohrung und verspannt die Vertikal-Säule mit dem Maschinenbett.
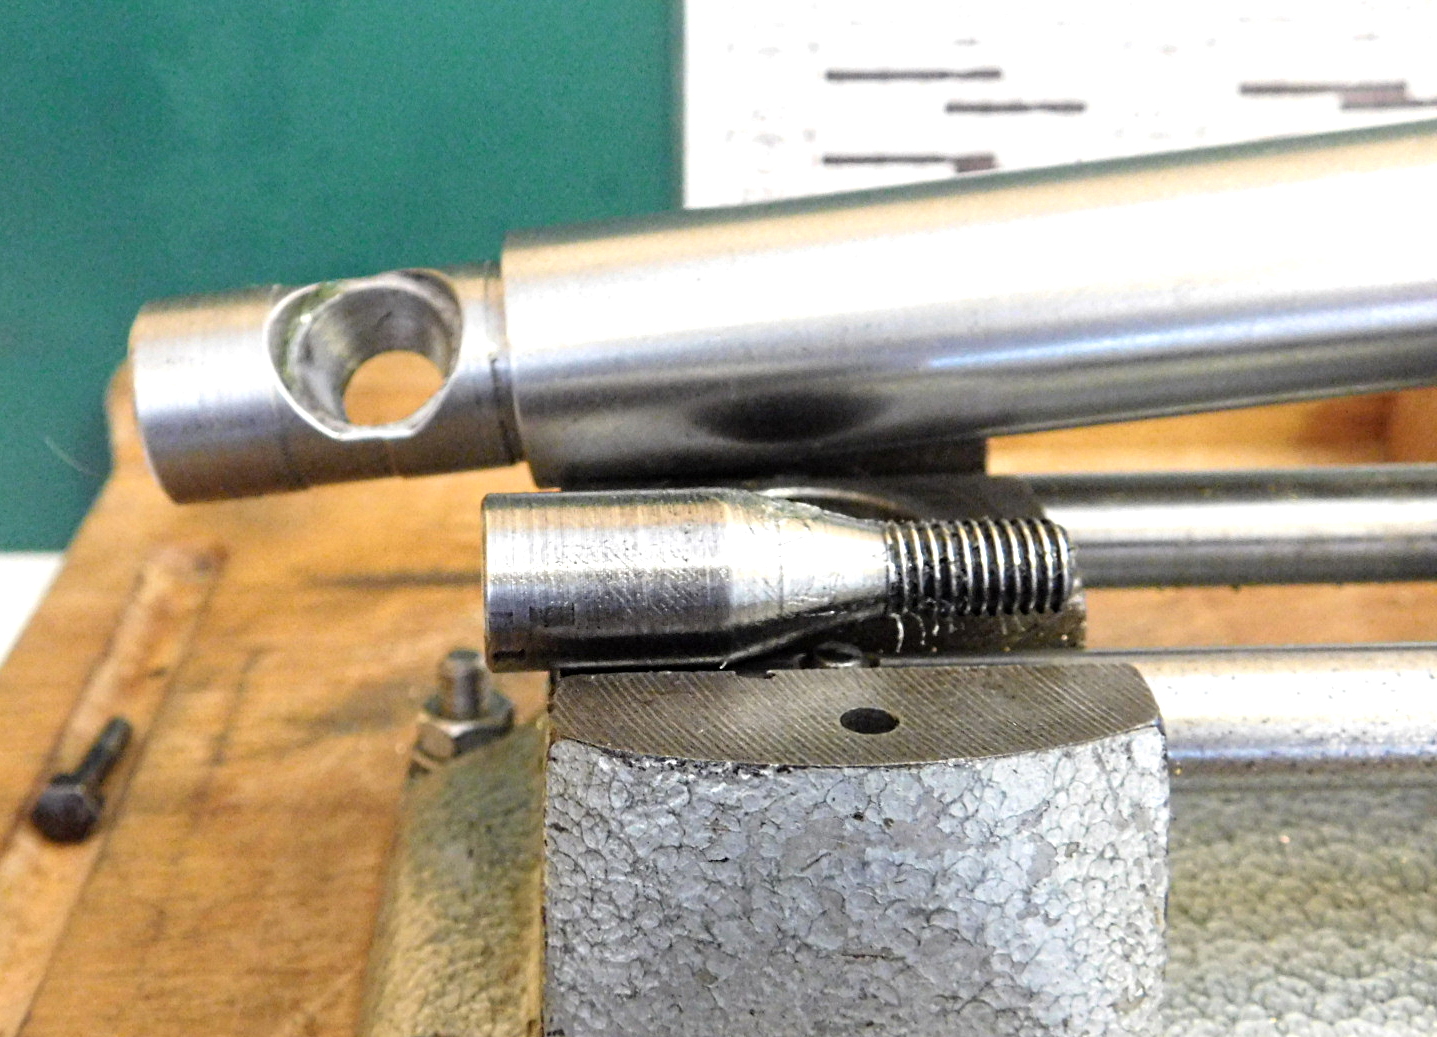
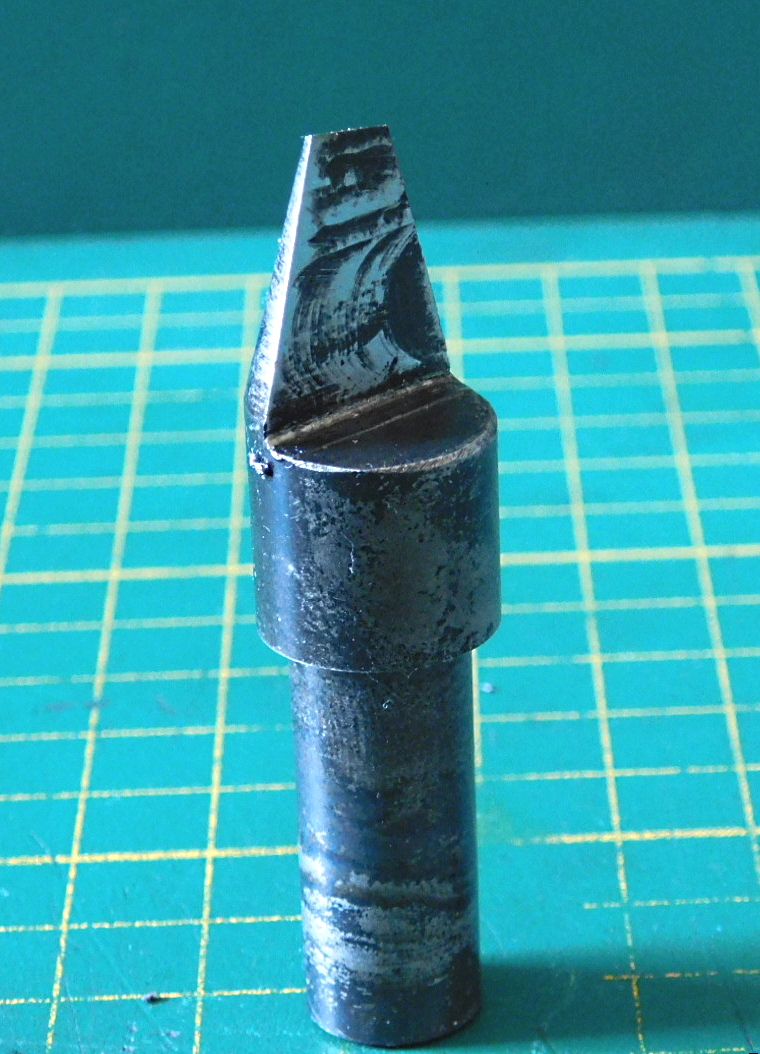
Um diese Bohrung in die Vertikal-Säule zu machen habe ich einen kegligen D-Bit Bohrer angefertigt.
Zunächst habe ich den Originalen Spann-Bolzen auf der Drehmaschine in die Spannzange gespannt und den Kegel mit dem Oberschlitten und einer Messuhr abgefahren. Den Oberschlitten habe ich so lange verstellt, bis die Messuhr auf der Kegellänge keinen Ausschlag mehr anzeigte.
In dieser Einstellung habe ich aus Stahl 1.2210 (115CrV3) den D-Bit Bohrer vorgedreht. Auf der Fräsmaschine auf halbe Dicke abgefräst und nochmals auf der Drehmaschine den Kegel überdreht. Anschließend abgestochen und gehärtet, sowie angelassen.
Zum Schluss wurde der, so geschaffene Bohrer an der Schneidfläche mit einem Stein abgezogen.
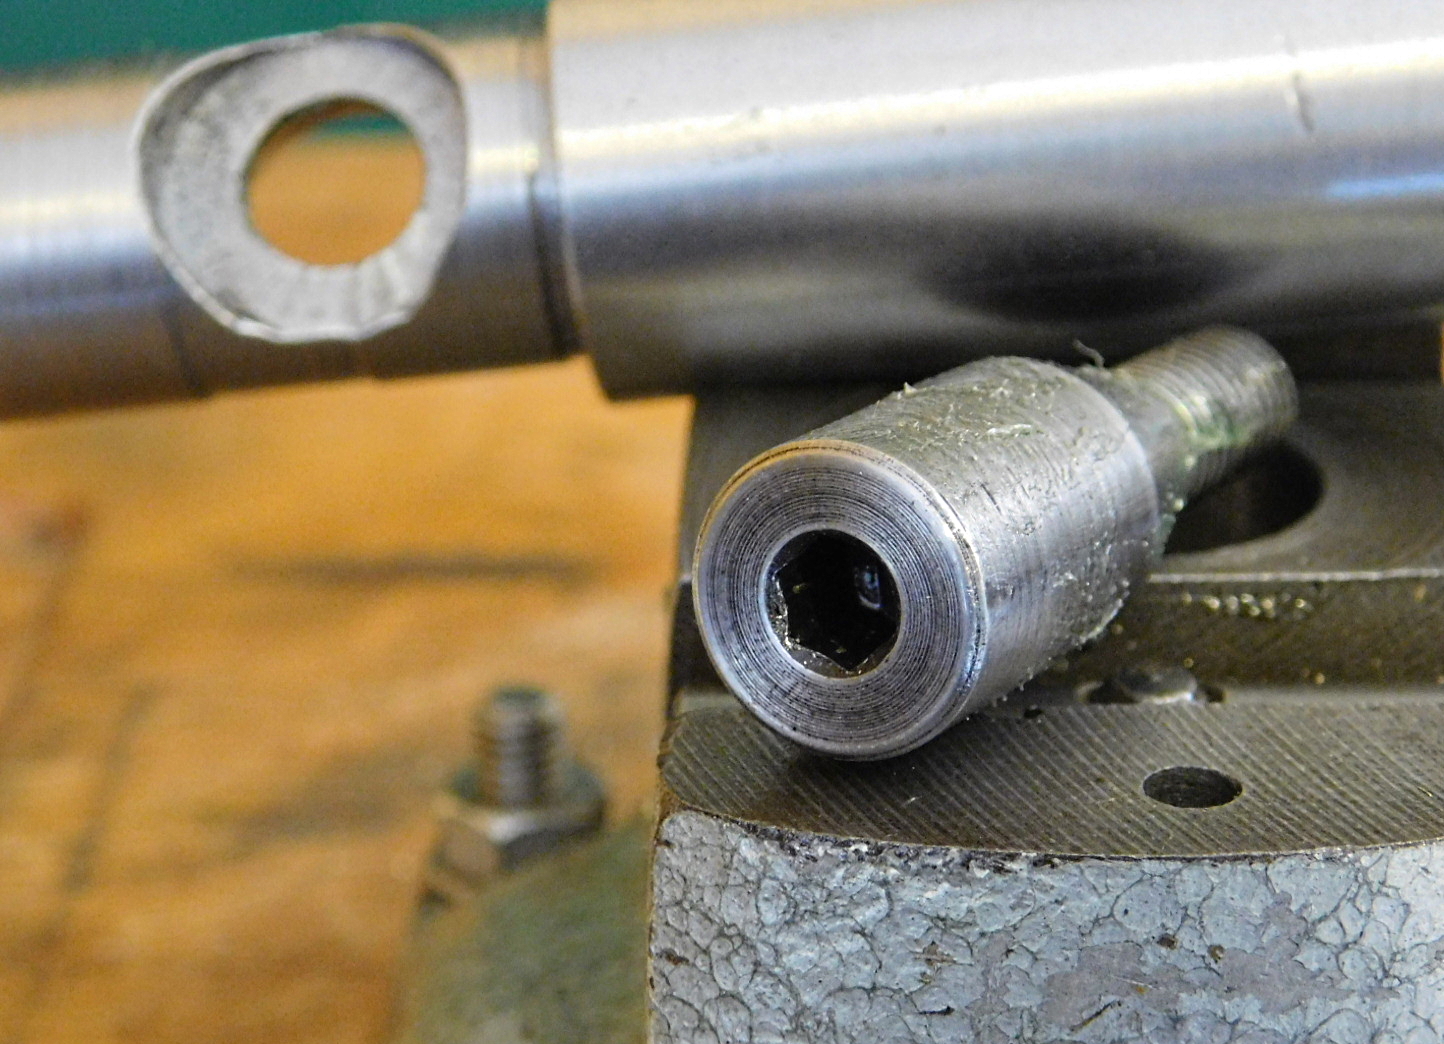
In gleicher Weise habe ich auch einen zweiten Spann-Bolzen angefertigt. Dieser bekam am Ende einen 5 mm Innensechskant eingeräumt. Anschließend wurde dieser Bolzen gehärtet und mit etwas höherer Temperatur angelassen, so dass lediglich die Oberfläche noch hart war, der Kern aber elastisch blieb.
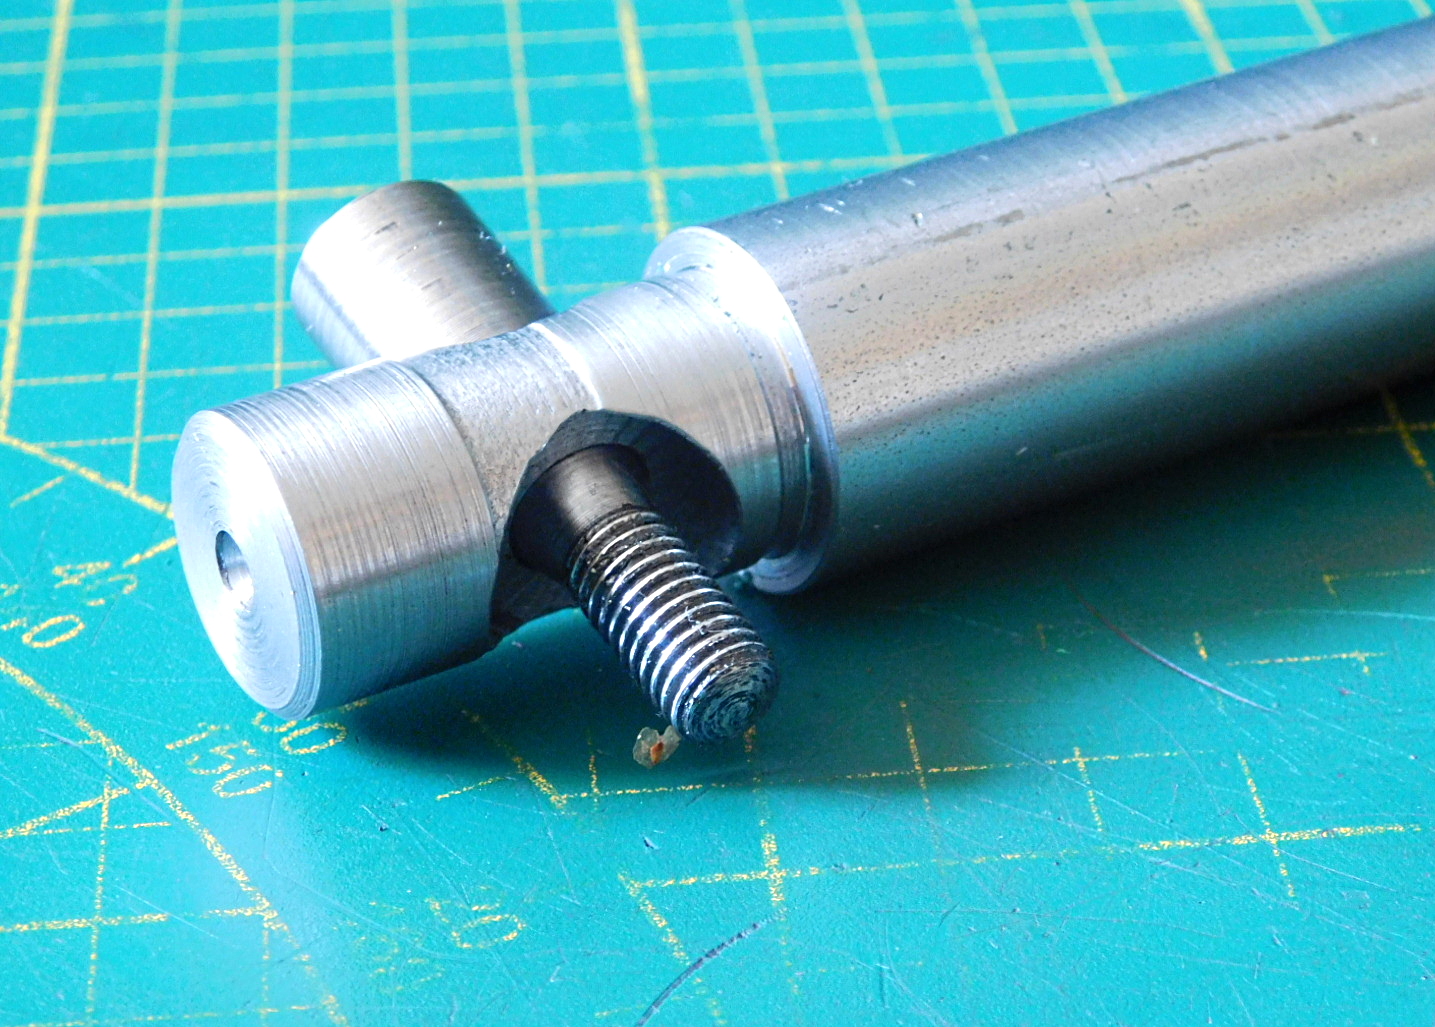
Der Absatz der Vertikalen Säule wurde auf der Fräsmaschine ausgerichtet und eine Pilotbohrung von 8,5 mm gebohrt. Mit einem Fräser wurde danach der Freistich eingefräst. Dann kam der Kegelbohrer zum Einsatz. Schälender Weise wurde die Keglige Bohrung langsam, mit viel Schmierung, erweitert. Die Gegenüber liegende Seite wurde ebenfalls Freigefräst.
Aus dem gleichen Material wie der D-Bit Bohrer wurde auch eine Zweite Spannschraube gefertigt. Am vorderen Ende ist ein M 8 Gewinde geschnitten und an der anderen Seite habe ich einen Innensechskant mit 5 mm Schlüsselweite eingeräumt.
Der Spannbolzen wurde ebenfalls gehärtet und angelassen.
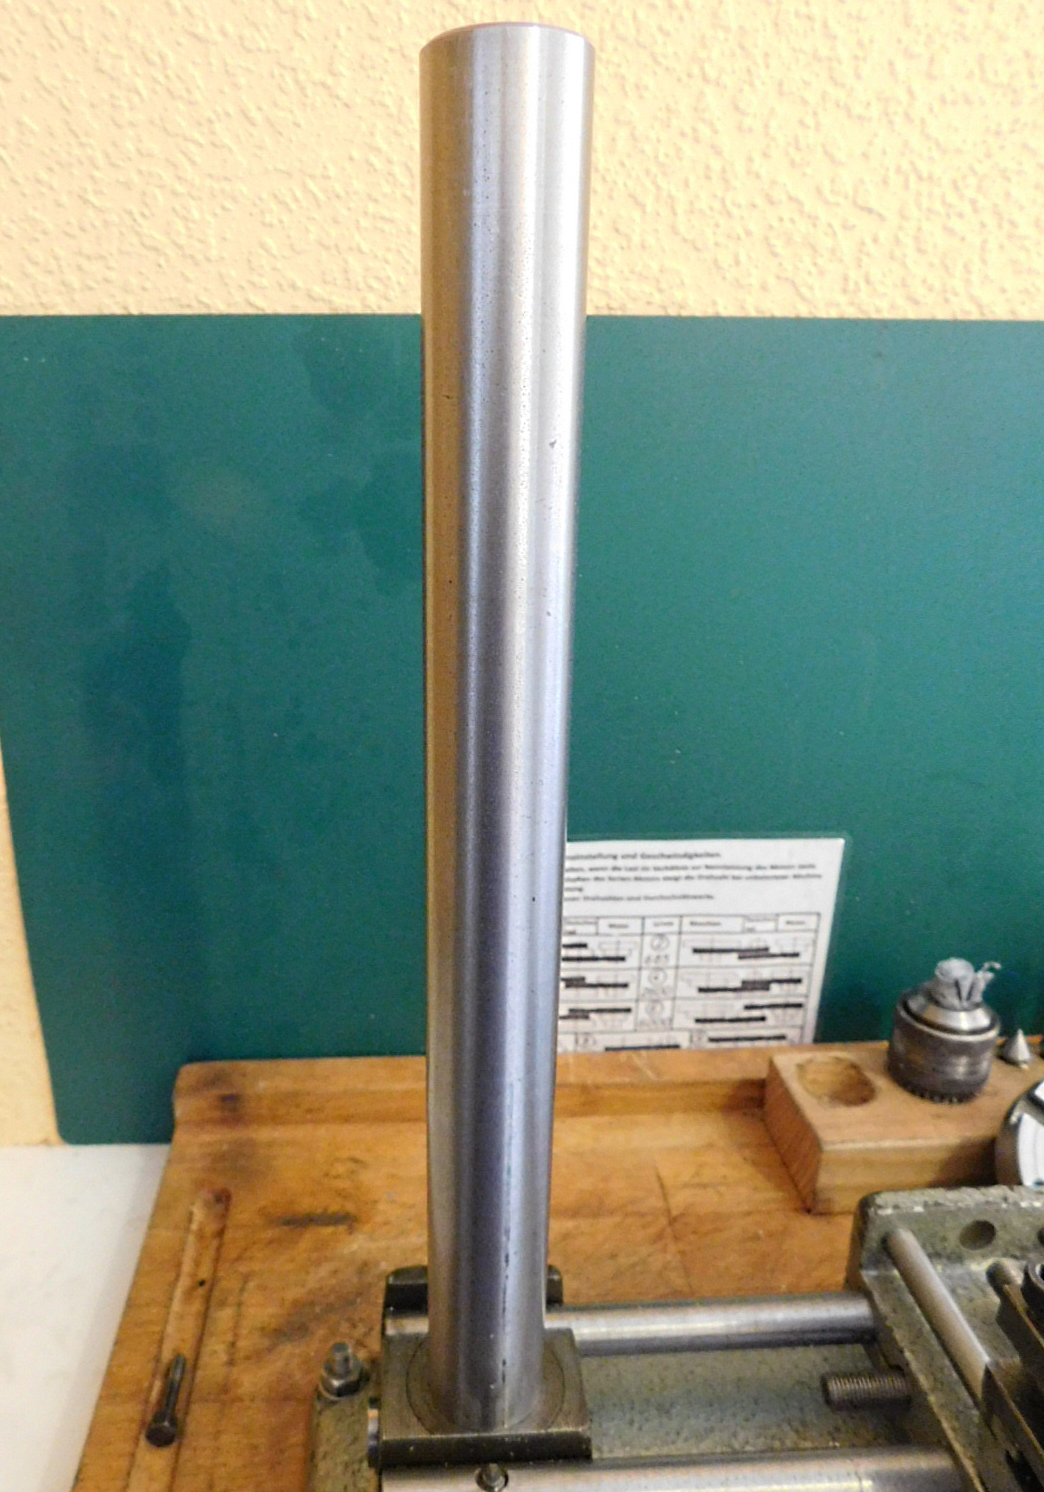
Vertical column.
I received the dimensions of the vertical column from a user.
I have reproduced them.
The column diameter is 25 mm with a total length of 285 mm. The clamping hole on the older models of the Unimat machine is designed differently than on the later SL machines. A clamping bolt with a cone presses into a correspondingly tapered hole and clamps the vertical column to the machine bed.
To make this hole in the vertical column I made a tapered D-bit drill.
First, I clamped the original clamping bolt on the lathe in the collet chuck and traced the taper with the top slide and a dial gauge. I adjusted the top slide until the dial gauge no longer showed any deflection on the taper length.
In this setting I pre-turned the D-bit drill from steel 1.2210 (115CrV3). Milled it to half thickness on the milling machine and turned the taper again on the lathe. Then the taper was cut off, hardened and tempered.
Finally, the drill created in this way was honed on the cutting surface with a stone.
I also made a second clamping bolt in the same way. This was given a 5 mm hexagon socket at the end. This bolt was then hardened and tempered at a slightly higher temperature so that only the surface was still hard but the core remained elastic.
The shoulder of the vertical column was aligned on the milling machine and a pilot hole of 8.5 mm was drilled. The undercut was then milled with a milling cutter. Then the cone drill was used. The tapered hole was slowly widened with a lot of lubrication. The opposite side was also milled free.
A second clamping screw was made from the same material as the D-bit drill. At the front end an M 8 thread was cut and at the other side I put in a hexagon socket with 5 mm spanner size.
The clamping bolt was also hardened and tempered.
 Kegel Spann-Bolzen mit kegliger Bohrung in der Vertikal-Säule.
Taper clamping bolt with tapered bore in the vertical column.
 Kegel D-Bit Bohrer.
Taper D-bit drill.
 Rückseite der Kegel-Bohrung und Innensechskant im Spann-Bolzen.
Back of taper bore and hexagon socket in clamping bolt.

 Vertikal-Säule auf dem Maschinenbett montiert.
Vertical column mounted on the machine bed.
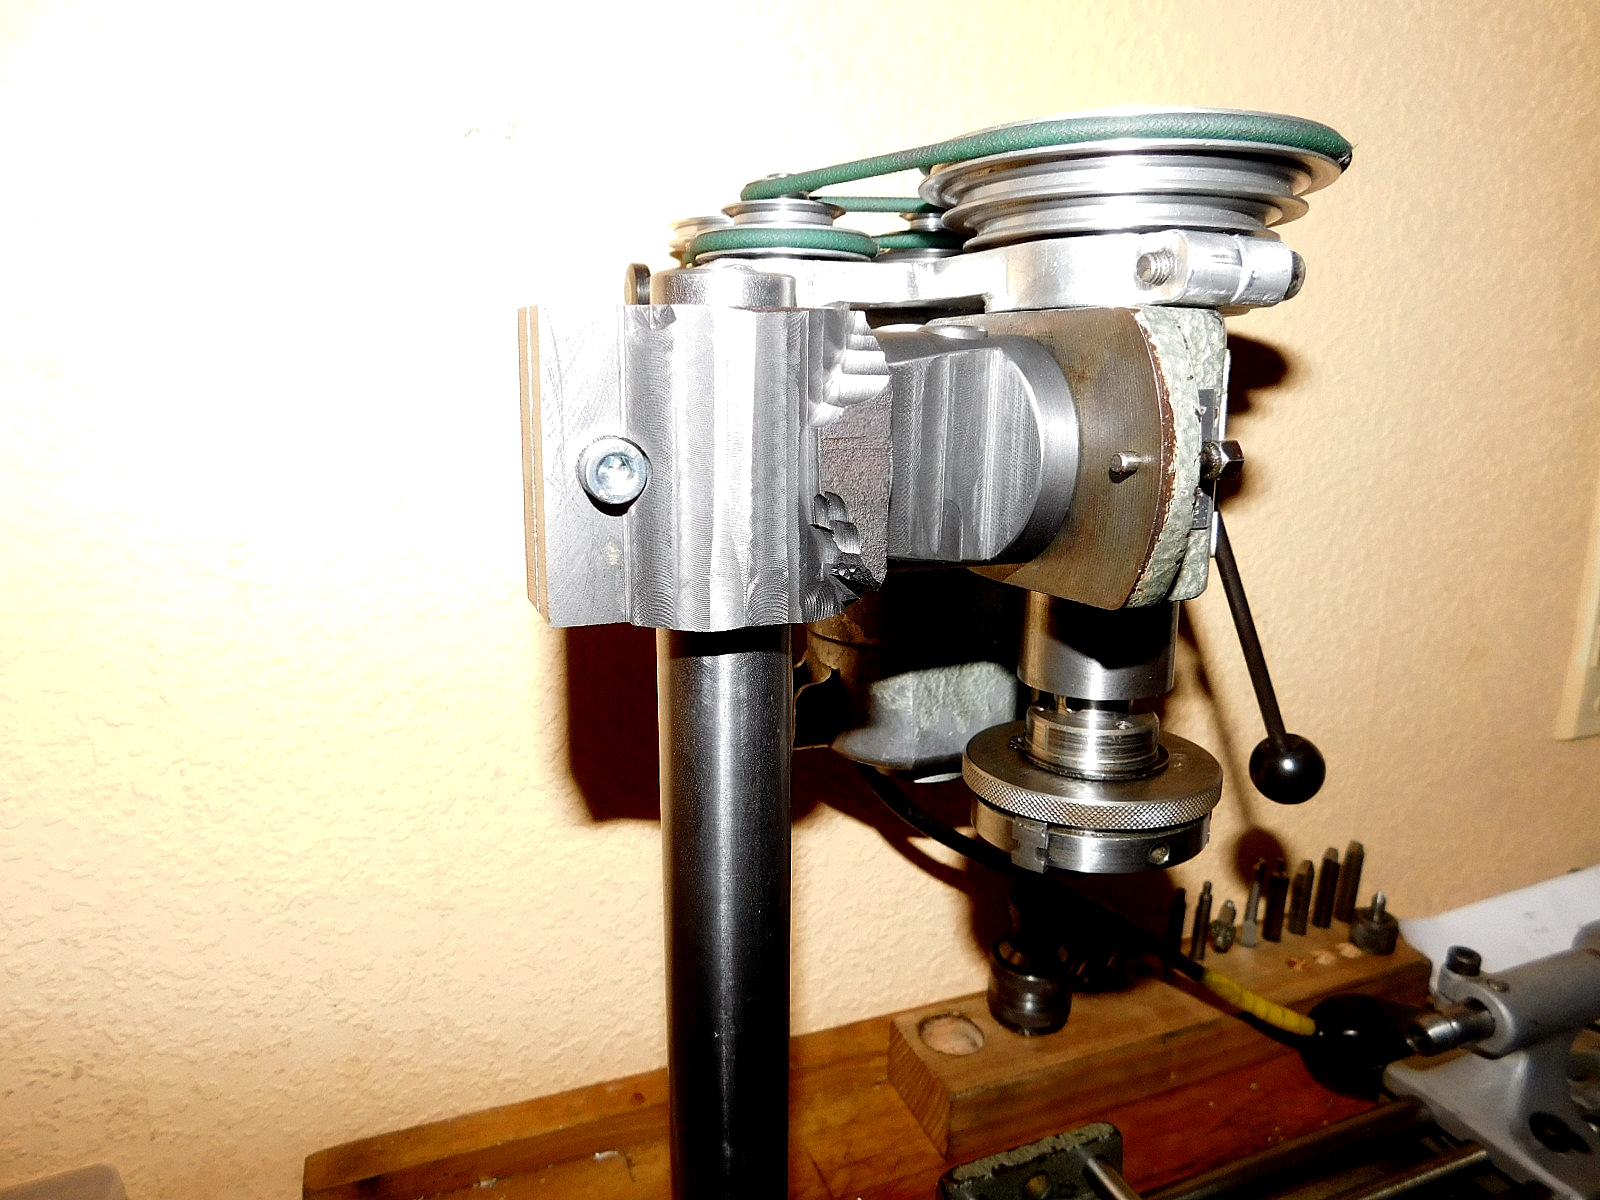
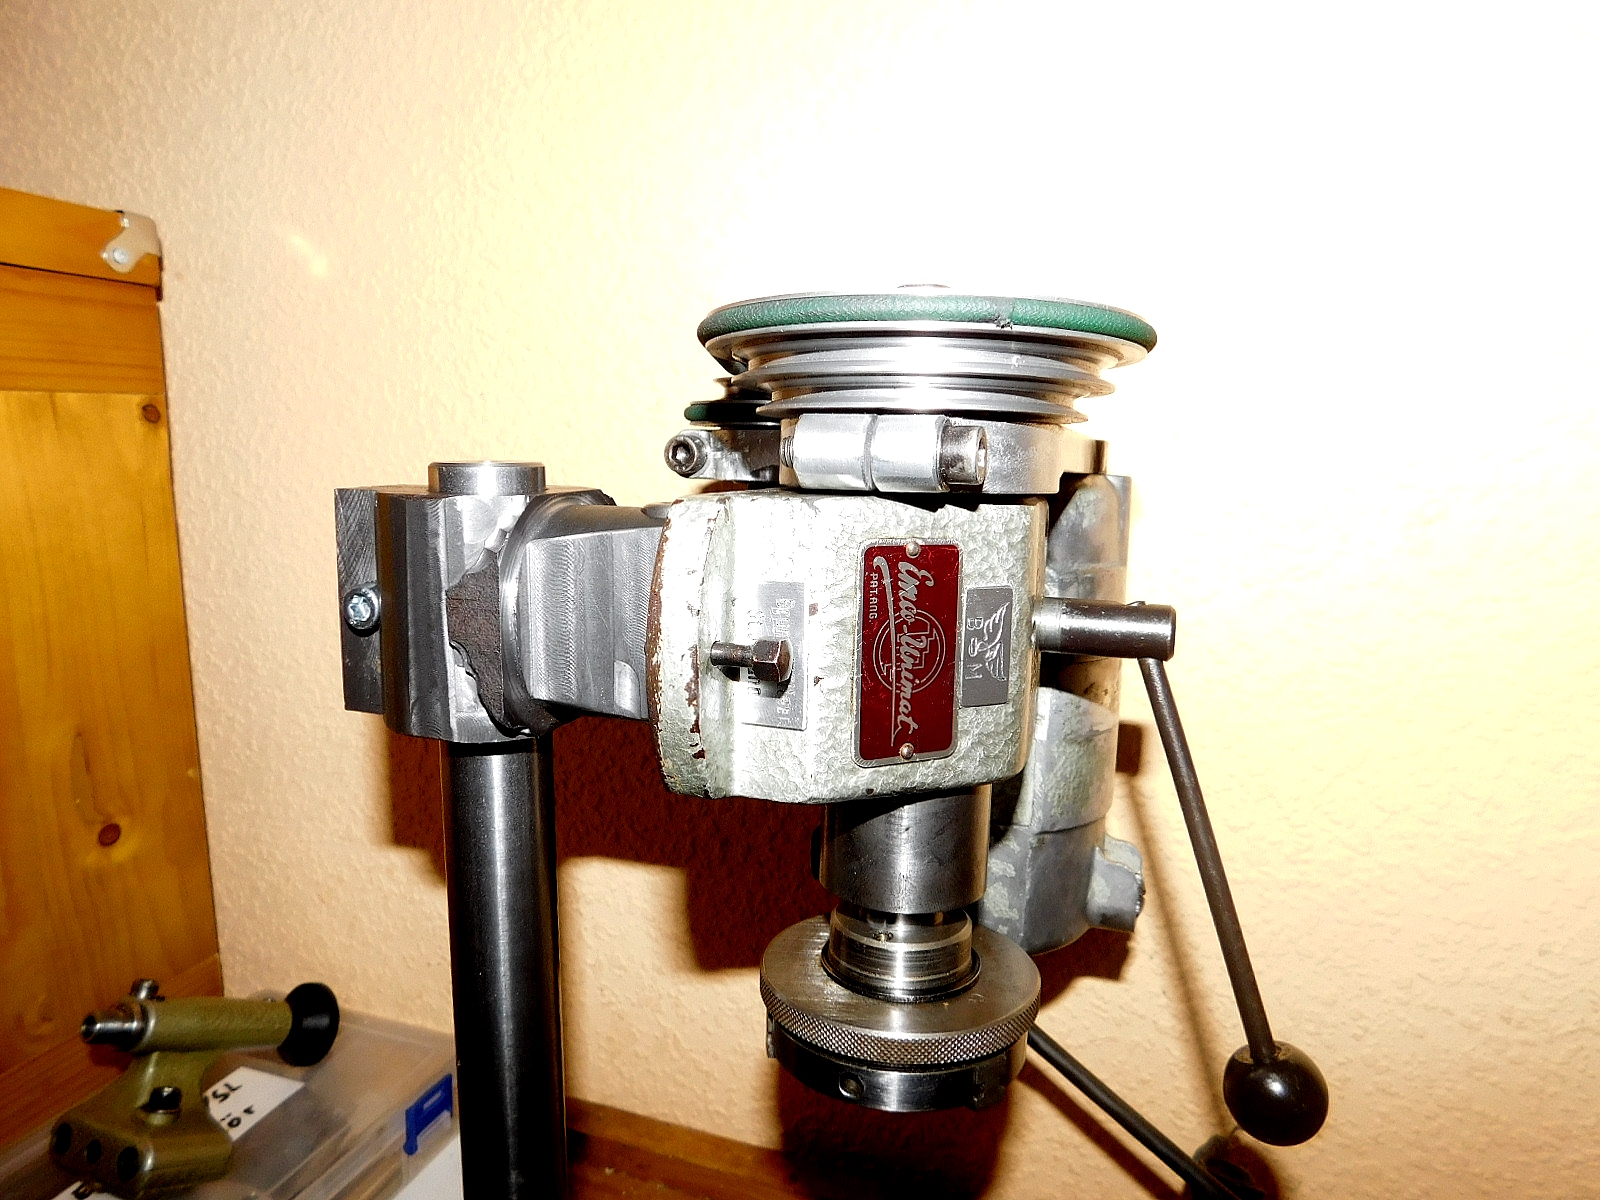
Den Klemmkopf für den Spindelstock zum Ausbau zur Bohr-/ Fräsmachine habe ich neu gezeichnet und aus einem Graugussblock 50 x 50 mm schon einmal grob herausgearbeitet.
Die Übergänge müssen noch fertig gefräst werden.
Es passt aber schon mal.
I have made a new drawing of the clamping head for the headstock for removal to the drilling/milling machine and have already roughly machined it out of a cast iron block 50 x 50 mm.
The connections still have to be milled.
But it fits already.
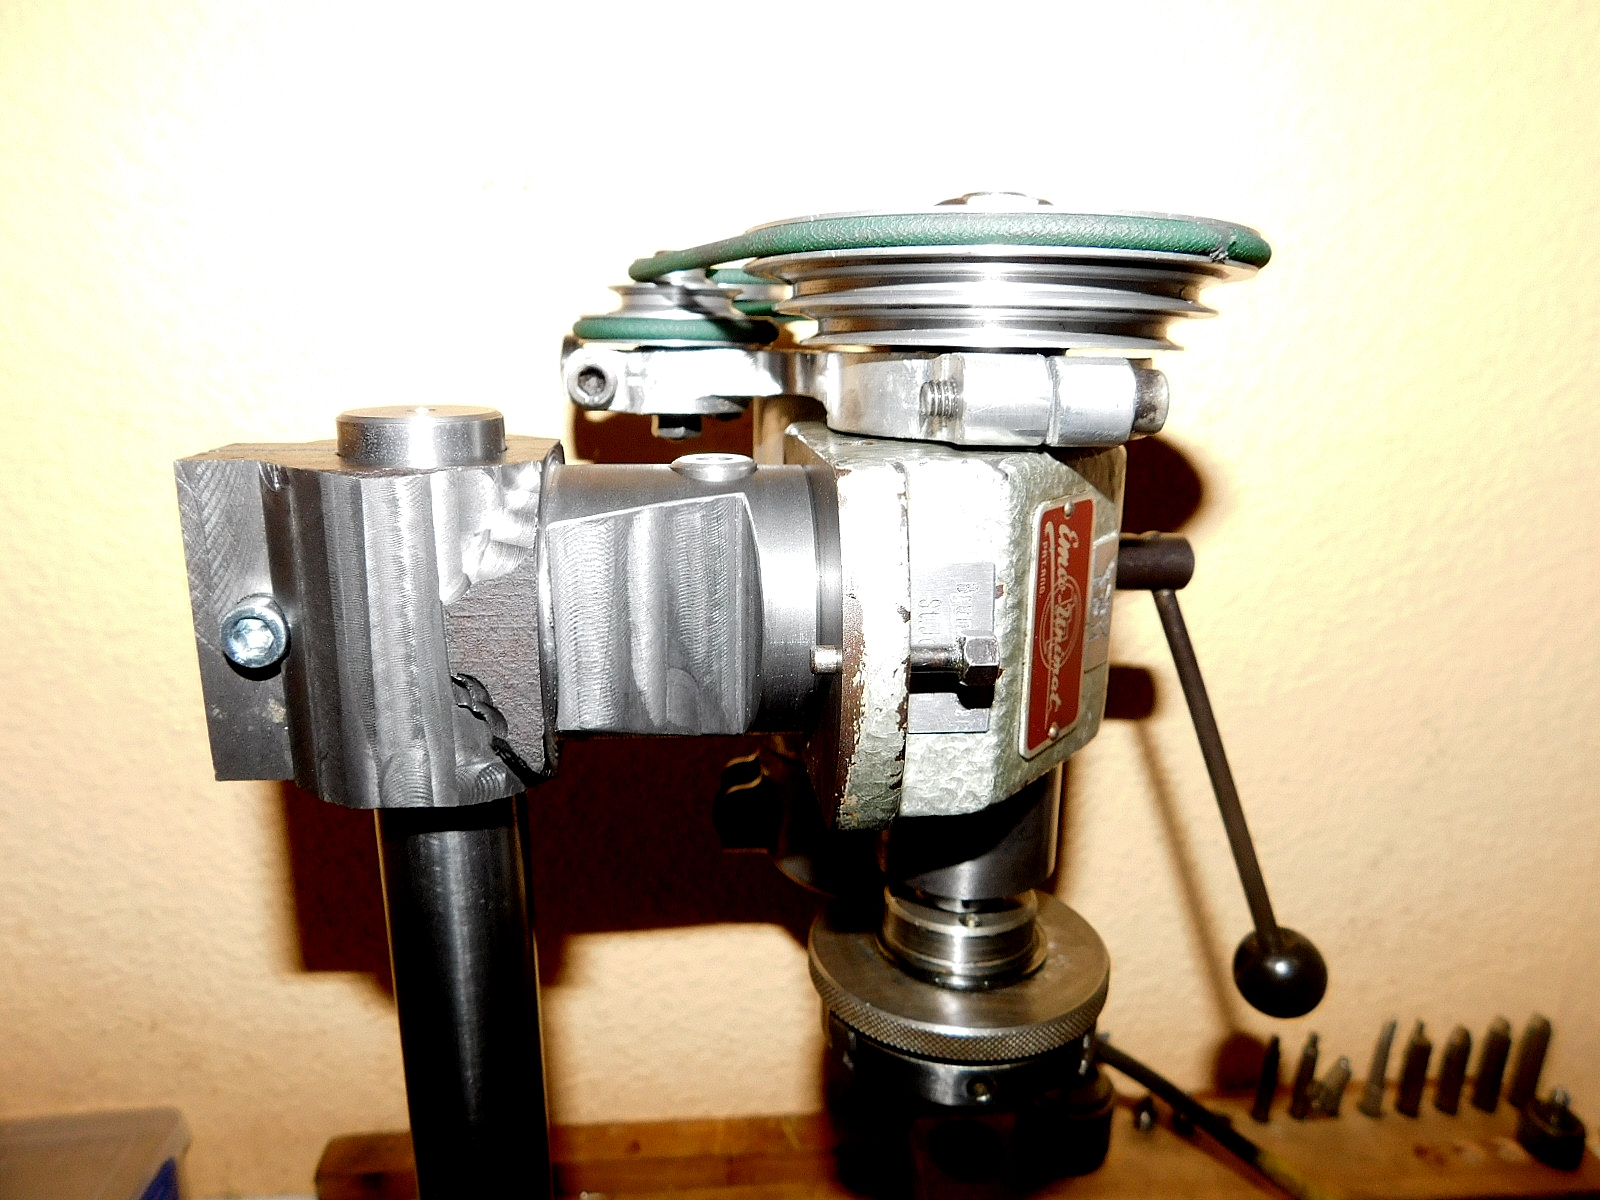
Da muss noch einiges an Material weg gefräst werden.
There is still some material to be milled away.
Ich habe lange nach einem passenden, kleinen Schraubstock gesucht.
Den originalen Schraubstock der Fa. Emco möchten die Verkäufer vergoldet haben. Da mach ich aber nicht mit.
Vor einigen Jahren hatte ich mir einmal einen kleinen Schleifschraubstock aus taiwanesische Produktion angeschafft. Dieser Schraubstock hat an der Unterseite und an den Längsseiten Befestigungsgewinde. Ich habe mir eine Stahlplatte angefertigt mit deren Hilfe ich diesen Mini-Schraubstock auf dem Planschlitte befestigen kann.
I have been looking for a suitable small vice for a long time.
The sellers want the original Emco vice to be gold-plated. But I won't go along with that.
A few years ago, I bought a small grinding vice made in Taiwan. This vice has fastening threads on the underside and on the long sides. I made myself a steel plate with which I can attach this mini vice to the faceplate.
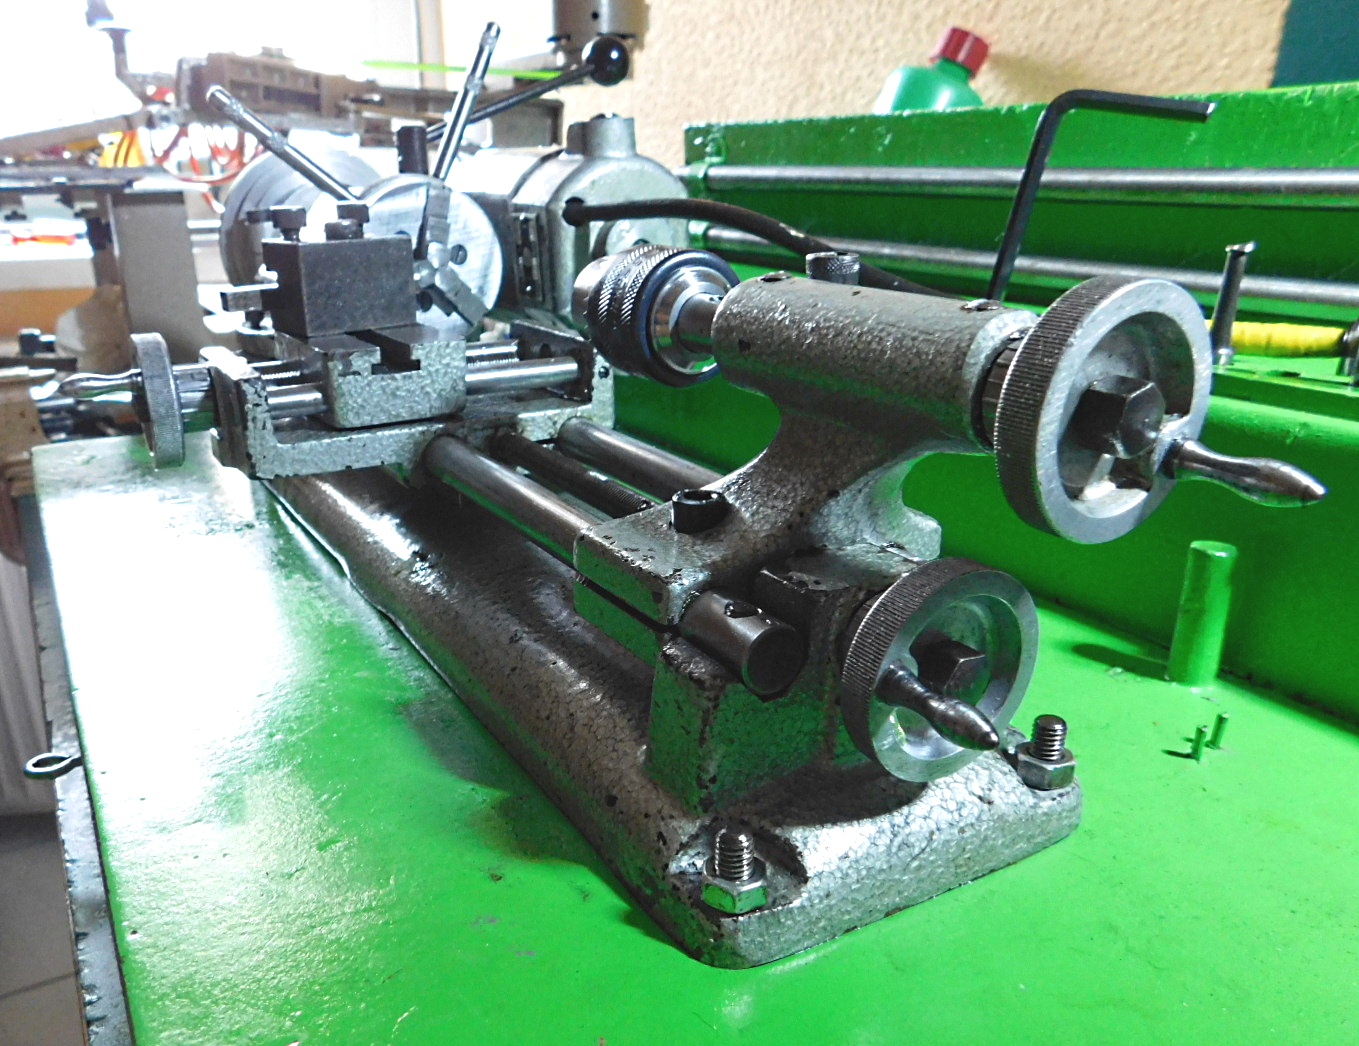
Die Maschine habe ich nochmals zerlegt und gereinigt. Danach bekam sie neue Farbe "Hammerite Silber-Grau"
I disassembled and cleaned the machine again. After that it has new color "Hammerite silver-gray".

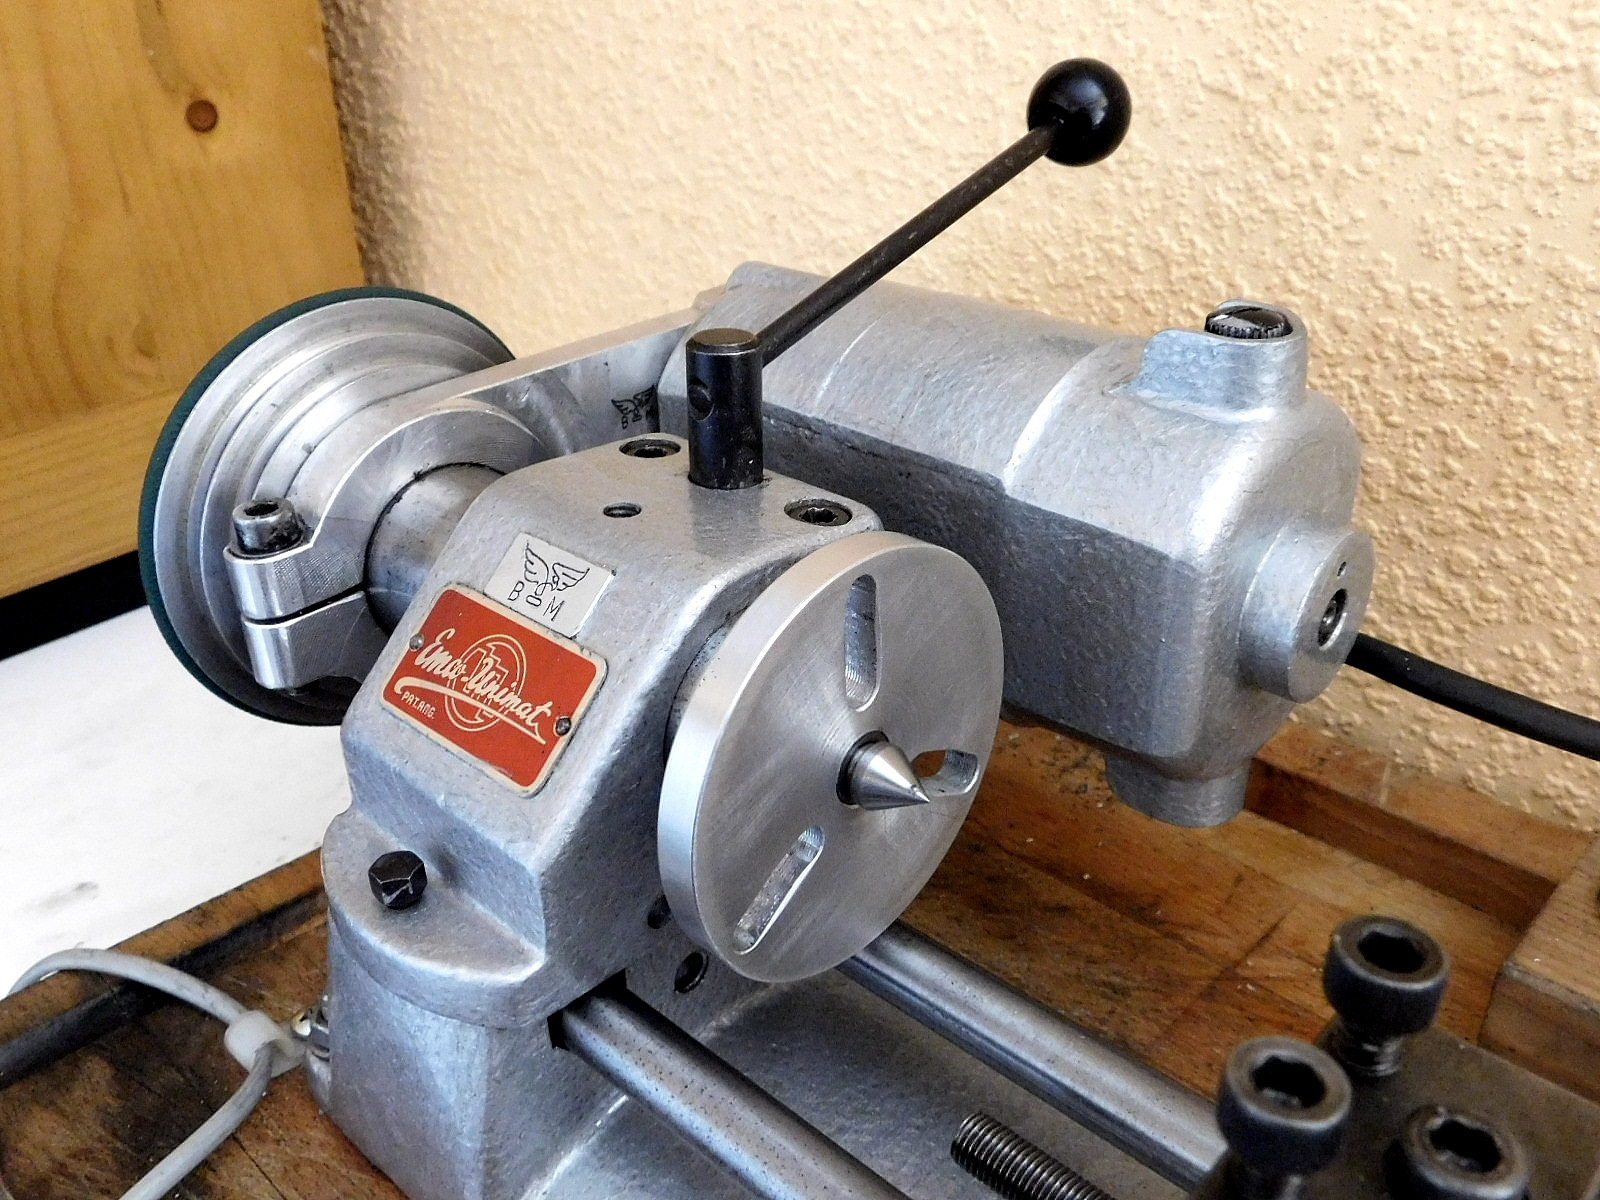
 Reitstock mit neu angefertigter Pinole mit Anlaufbund.
Tailstock with newly made quill with collar.
 Selbst gefertigte Aufspannscheibe.
Self-made clamping disk.
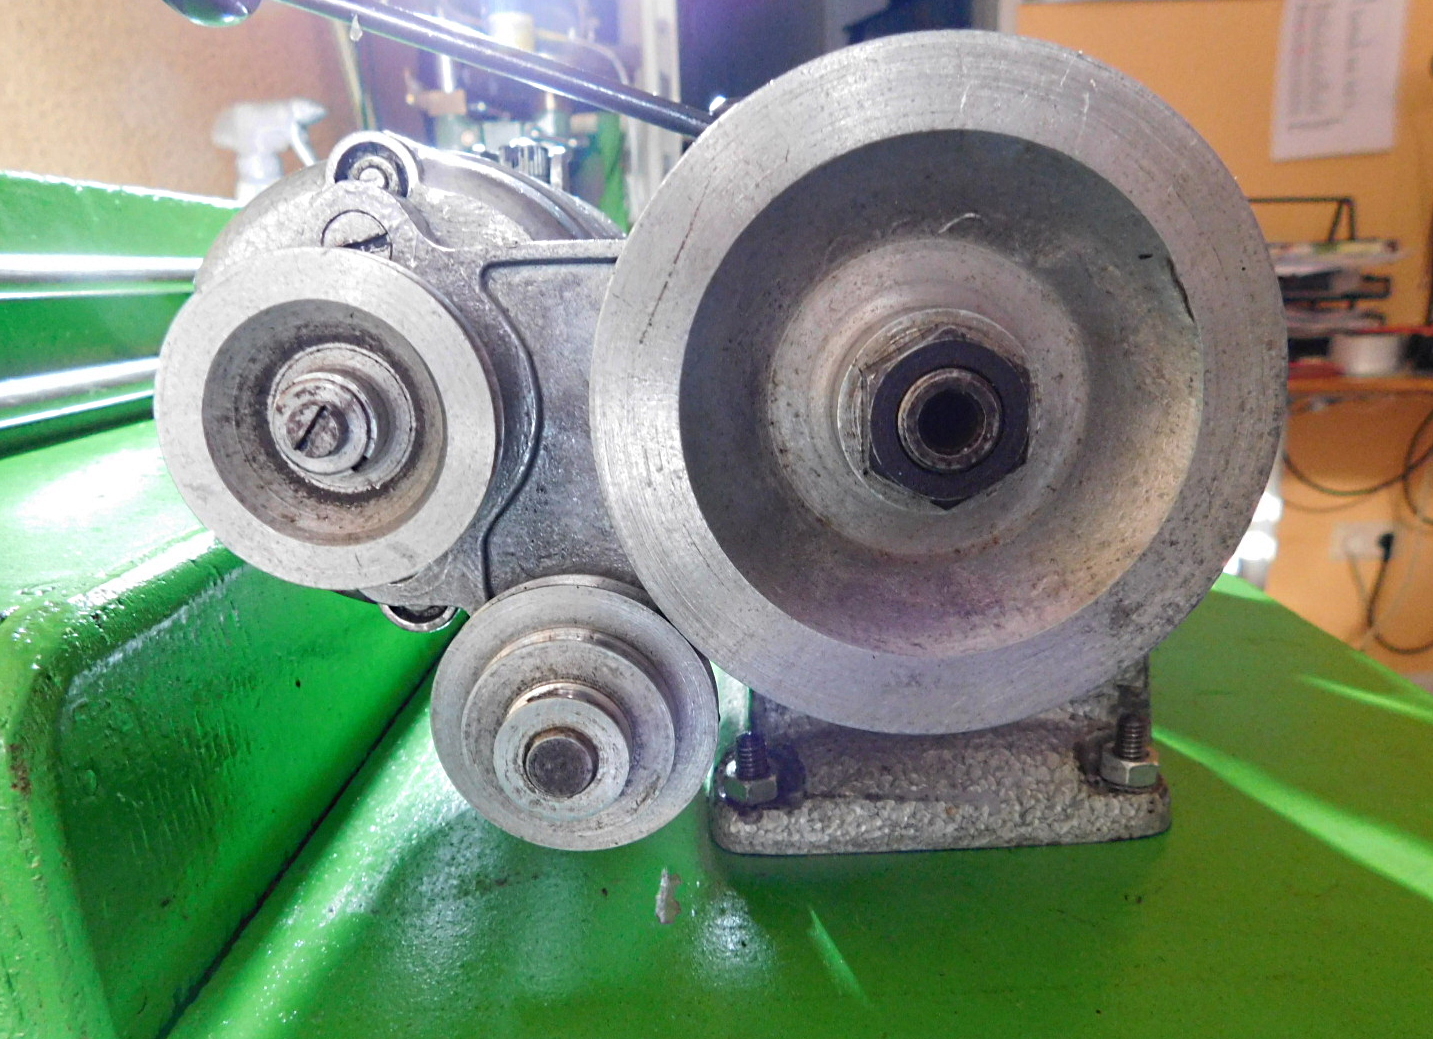
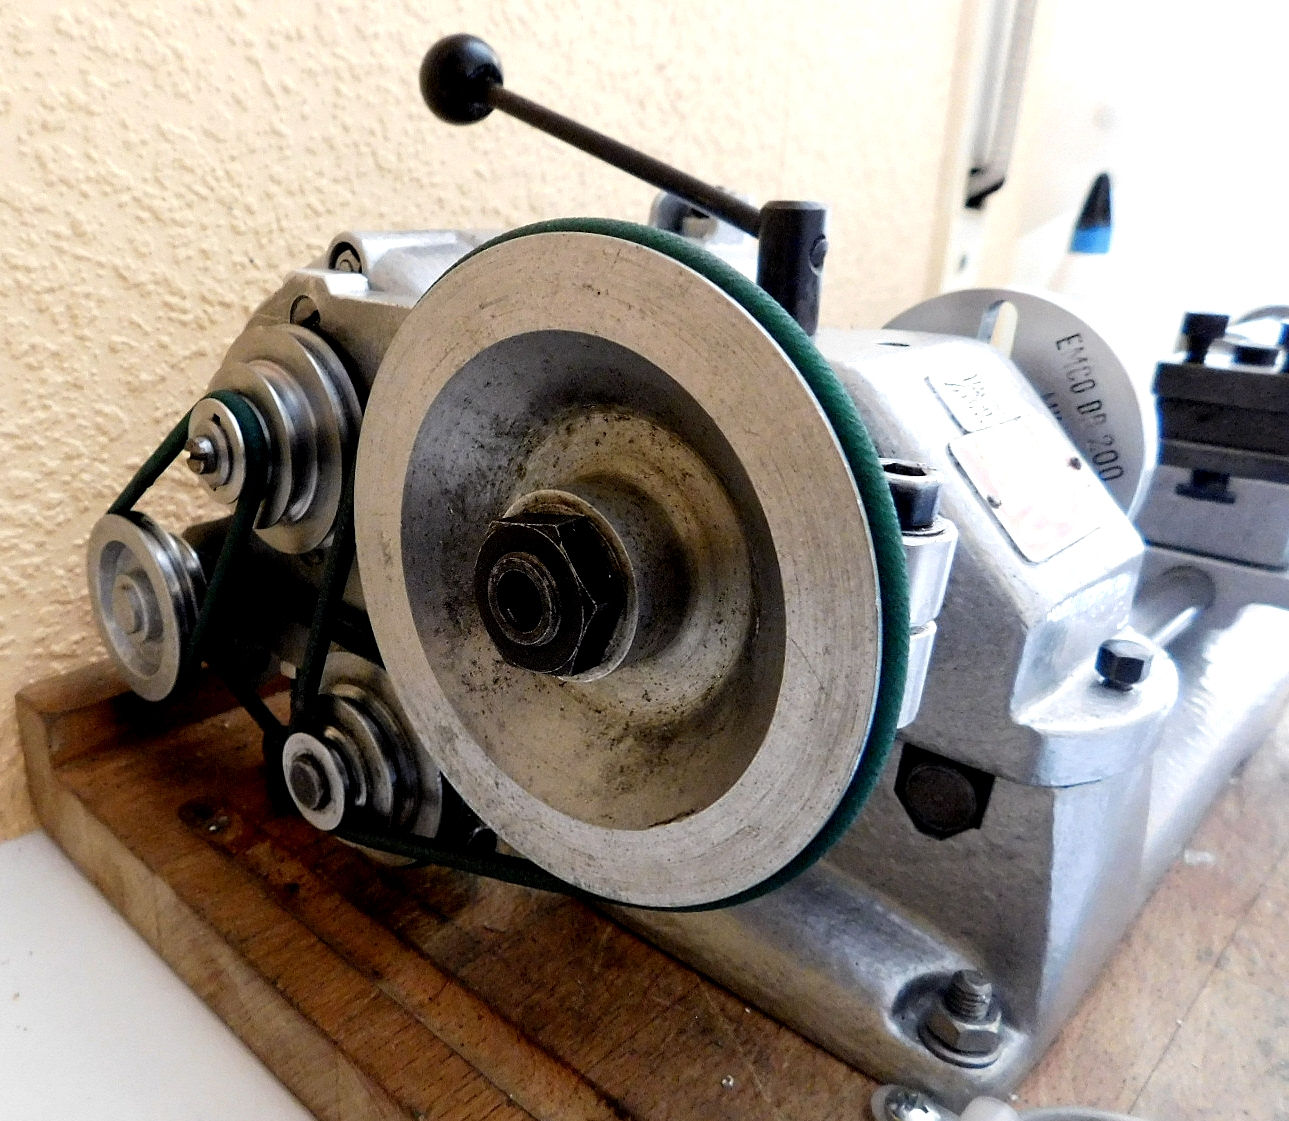 Selbst gefertigtes Doppel-Vorgelege.
Self-made double transmission.
 Angefertigte Mitnehmerscheibe für das Drehherz.
Fabricated driver disc for the rotary heart.
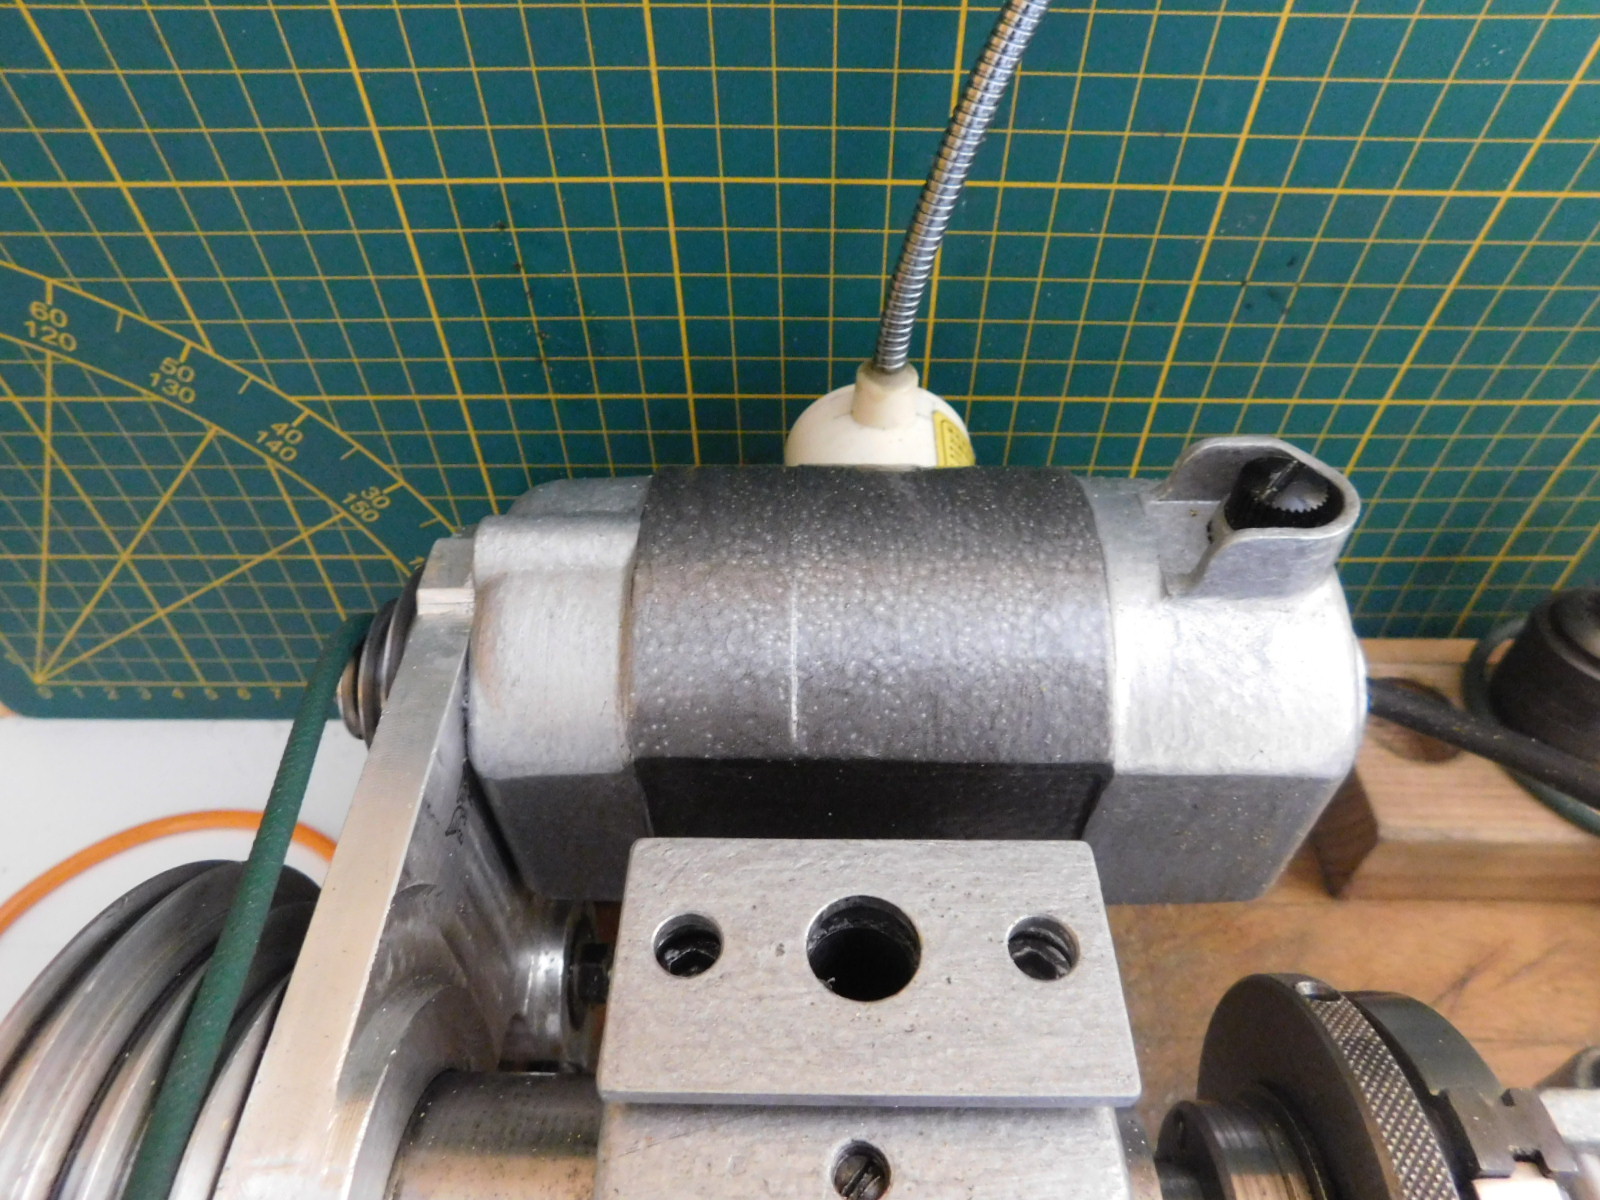 Am Motor habe noch noch einen zusätzlichen Farbakzent gesetzt. Der Spindelstock bekam noch einen Winkel verpasst, auf dem ich einen Meßuhrständer sicher befestigen kann.
I added an additional colour accent to the motor. The headstock was given an angle on which I can securely mount a dial gauge stand.